Back Extension Machine Training for Pain Relief Tips
Back Extension Machine (Roman Chair) Training for a Stronger Back

A woman engages in back extension exercises to strengthen back muscles, improve core stability, and relieve chronic back pain.
A practical, El Paso Back Clinic–style guide to core stability, safer form, and pain prevention
If you’ve ever used a back extension machine—also called a hyperextension bench or Roman chair—you already know it looks simple. You lock your feet, rest your hips on the pad, and hinge forward and back up.
But the best results come from how you do it.
At El Paso Back Clinic, the goal is not just “stronger muscles.” It’s a smarter plan that supports spine stability, hip power, and better movement habits—especially for people who deal with recurring low back tightness, desk-related stiffness, or training-related flare-ups. Dr. Alexander Jimenez, DC, APRN, FNP-BC, often emphasizes that many back problems improve when you combine movement quality, targeted strengthening, and a whole-person plan (Jimenez, n.d.-a; Jimenez, n.d.-b).
This article explains:
-
what the back extension machine actually trains,
-
how to set it up correctly,
-
how to avoid the common mistakes that irritate backs,
-
and how integrative care (chiropractic + NP-style whole-body support) fits into a complete plan.
What the Back Extension Machine Trains (and Why It Matters)
Back extensions are a posterior chain exercise. That means they train the muscles on the back side of your body, including:
-
Erector spinae (spinal extensor muscles that help you stay upright) (MasterClass, 2021).
-
Glutes (hip extension power and pelvic support) (MasterClass, 2021).
-
Hamstrings (help control the lowering phase and assist hip extension) (MasterClass, 2021).
-
Deep core stabilizers (the “bracing” muscles that keep the spine steady while the hips move) (WebMD, 2024).
This is important because many people think “core” means only the abs. In real life, core stability is about the ability to resist unwanted motion and control the spine while the hips move.
A back extension machine helps train that pattern if you do it as a hip hinge, not as a “low back bend.” (More on that below.)
Roman Chair vs. Back Extension Machine: Same Goal, Different Feel
You’ll see a few styles:
-
45-degree hyperextension bench (most common “Roman chair” style)
-
90-degree Roman chair (more upright)
-
Seated back extension machine (you sit and extend backward against resistance)
Verywell Fit notes that these machines are often grouped together because they train similar movement patterns and posterior chain muscles, even though the setup and feel can differ (Verywell Fit, 2025).
If you’re choosing equipment for home or clinic use, adjustability matters. Many benches are built to adjust pad position and angle so different body types can hinge correctly (Valor Fitness, n.d.).
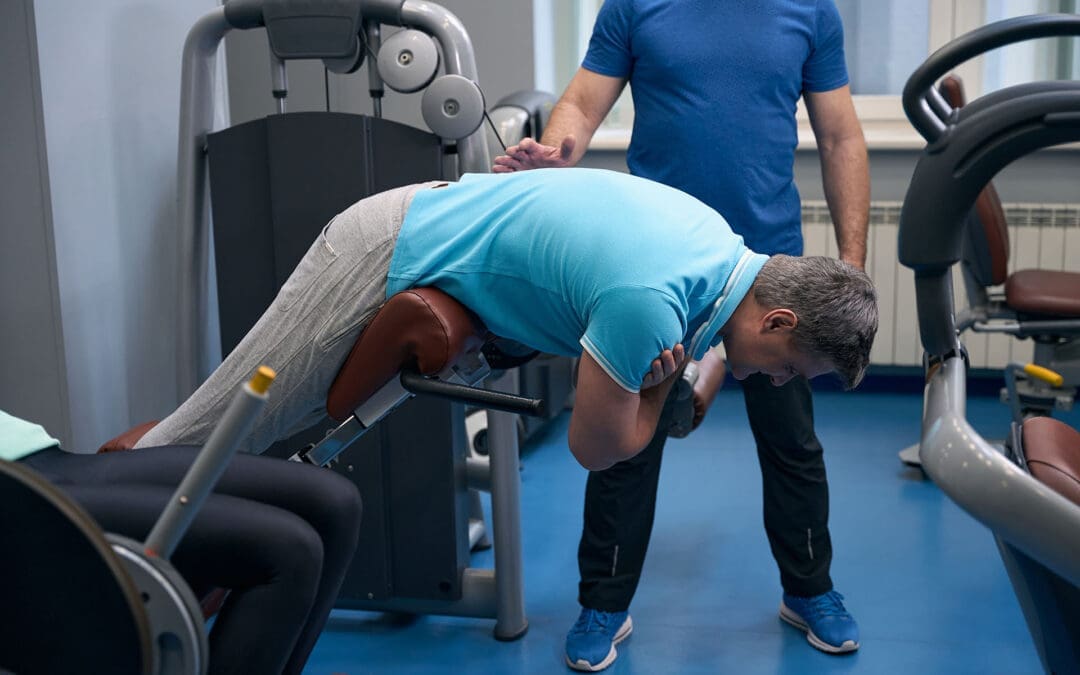
Step 1: Set Up the Machine Correctly (This Is Where Most People Go Wrong)
Before you do a single rep, take 30 seconds to set it up.
The best setup checkpoints
-
Hip pad position: The pad should sit around your hip crease (where your hips fold). If it’s too high, you can’t hinge well. If it’s too low, you may feel unstable (WebMD, 2024).
-
Feet locked in: Your heels and feet should feel secure in the restraints (WebMD, 2024).
-
Top position posture: At the top, you want a straight line from head to hips—not a “lean back” pose (MasterClass, 2021).
Quick self-test
If you feel the movement mostly in your low back joints (pinchy or compressed) rather than in your glutes/hamstrings, your setup or technique needs adjustment.
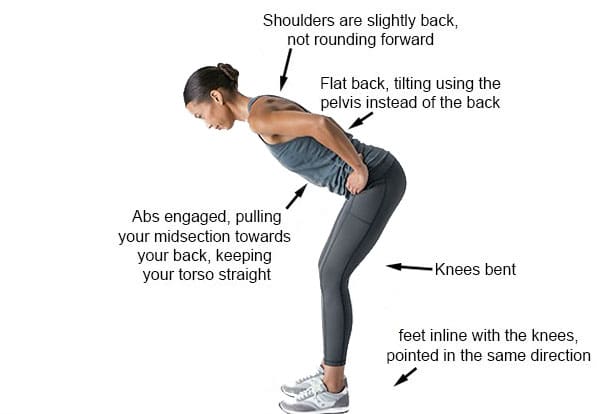
Step 2: Use the Right Form (Neutral Spine + Hip Hinge)
A safer back extension is controlled and clean. The spine stays neutral, and the movement comes mostly from the hips.
How to do it (simple steps)
-
Brace first: Take a breath and tighten your midsection like you’re preparing to be lightly bumped.
-
Hinge down: Push your hips back and lower your chest slowly. Keep your neck neutral.
-
Drive up: Squeeze glutes and hamstrings to lift your torso back up.
-
Stop at neutral: Finish tall and braced. Do not crank into hyperextension (MasterClass, 2021; WebMD, 2024).
Good cues that help
-
“Hips back, not ribs up.”
-
“Move like a hinge, not a bendy straw.”
-
“Glutes finish the rep.”
Chuze Fitness also describes back extensions as a way to work against gravity and build strength in a simple, repeatable pattern, with the option to progress by adding load later (Chuze Fitness, n.d.-a).
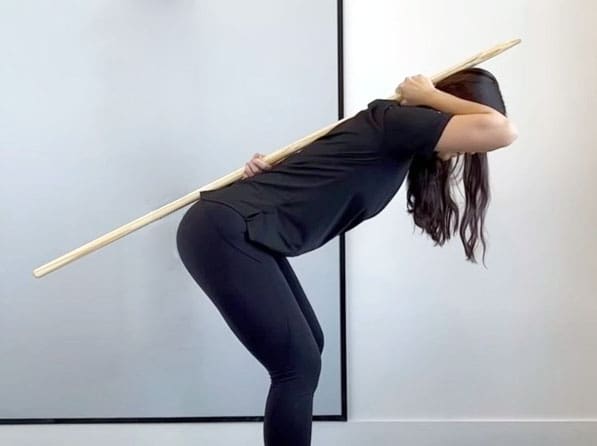
The #1 Mistake: Hyperextending at the Top
One of the biggest errors is leaning back too far at the top. People do it to “feel” the lower back more, but it often adds compression where you don’t want it.
What you want instead: a neutral, stacked finish.
-
Ribs down
-
Glutes tight
-
Spine tall
-
No “backward bend” finish (MasterClass, 2021).
If you can’t stop at neutral, reduce the range of motion and slow the tempo.
Another Common Mistake: Turning It Into a Low-Back Exercise Only
Back extensions are often taught as if they only train the lower back. In reality, they work best when the hips do the job and the trunk stays braced.
A helpful way to think:
-
The hips create motion
-
The spine controls motion
That is a big reason back extensions can be useful for stability—when done correctly (WebMD, 2024).
Reps and Sets: Simple Programming That Works
The “right” plan depends on your goal and your history.
Beginner (control first)
-
2–3 sets of 8–12 reps
-
Bodyweight only
-
Slow lowering (2–3 seconds down)
General strength and pain prevention
-
3 sets of 10–15 reps
-
Add light load only if form stays clean (Chuze Fitness, n.d.-a).
Stronger posterior chain (experienced lifters)
-
3–5 sets of 6–10 reps
-
More rest
-
Still stop at neutral (no hyperextension)
Rule: load is earned by control.
Verywell Fit’s equipment review also highlights that comfort, stability, and fit matter for consistent training—especially for people using these tools as part of a back-strengthening routine (Verywell Fit, 2025).
Safer Progressions (If Your Back Is Sensitive)
If your back flares easily, you can still train the posterior chain—you just need smarter progressions.
Options that tend to be more back-friendly:
-
Shorter-range back extensions (only move where you can stay neutral)
-
Isometric holds at neutral (hold 10–20 seconds)
-
Lower load, slower tempo
-
Add glute-focused assistance work (like bridges) alongside back extensions
At El Paso Back Clinic, Dr. Jimenez often frames strengthening as part of a bigger plan: improve mechanics, build tolerance, and progress gradually based on the person’s symptoms and daily demands (Jimenez, n.d.-a; Jimenez, n.d.-c).
When to Pause and Get Checked (Red Flags)
Back extension training should feel like muscular effort, not nerve pain.
Stop and seek professional guidance if you have:
-
Pain shooting down the leg
-
Numbness or tingling
-
Weakness in the foot/leg
-
Pain that worsens over time with extension-based movements
WebMD also encourages careful form and smart choices when using back extensions, especially when they’re used for “back health” rather than just bodybuilding (WebMD, 2024).
How This Fits the El Paso Back Clinic Approach: Strength + Mobility + Whole-Person Support
Many people try one thing:
-
“I’ll just strengthen my back.”
Or: -
“I’ll just stretch more.”
Or: -
“I’ll just get adjusted.”
But most lasting results come from combining the right tools in the right order.
Chiropractic care to improve mechanics
Chiropractic-focused care often aims to:
-
improve joint motion where stiffness limits your hinge,
-
reduce irritation that changes how you move,
-
and help you restore better spinal and pelvic mechanics.
El Paso Back Clinic content emphasizes a whole-body view of pain and function, including movement habits and multi-step plans (Jimenez, n.d.-c).
Exercise to build stability and strength
Once movement is cleaner, exercises like the Roman chair can help you:
-
reinforce a strong hinge,
-
strengthen posterior chain muscles,
-
and build stability that carries into work, lifting, and sports (MasterClass, 2021).
Nurse practitioner support to address barriers to recovery
NP-style integrative support often helps by addressing factors that keep people “stuck,” such as:
-
sleep quality,
-
stress load,
-
inflammation drivers,
-
safe pain management planning (when appropriate),
-
and screening for problems that need further testing or referral.
In short: your back isn’t separate from the rest of you.
A Simple 3-Phase Plan You Can Follow
Here is a practical approach that matches how many integrative clinics structure back-pain recovery and performance.
Phase 1: Calm things down and restore motion (1–2 weeks)
-
Gentle mobility (hips + mid-back)
-
Light back extensions with short range
-
Walk daily if tolerated
-
Focus on bracing and hinge control
Phase 2: Build capacity (3–6 weeks)
-
Back extensions: 2–3 days/week
-
Add glute and hamstring work
-
Add core stability work
-
Slowly add reps before adding load
Phase 3: Build real-world resilience (ongoing)
-
Add load gradually (only if neutral form is automatic)
-
Transfer strength into squats, hinges, and carries
-
Keep a weekly routine of mobility + stability work
This kind of integrated plan—adjustments plus exercise and habit change—is also described in chiropractic-focused integration articles discussing the value of combining care approaches to improve outcomes (OPTMZ State, 2026).
Key Takeaways
-
The back extension machine is best used as a hip-hinge strength tool, not a “bend your spine” tool (MasterClass, 2021).
-
Proper setup (hip pad alignment + stable feet) helps you move safely (WebMD, 2024).
-
Avoid the big mistake: hyperextending at the top. Stop at neutral.
-
Strong results often come from a full plan: chiropractic mechanics + targeted exercise + whole-person support, a theme repeated across El Paso Back Clinic education from Dr. Jimenez (Jimenez, n.d.-a; Jimenez, n.d.-c).
References
-
Chuze Fitness. (n.d.-a). 4 benefits of a back extension machine. https://chuzefitness.com/blog/benefits-of-a-back-extension-machine/
-
Jimenez, A. (n.d.-a). Various hyperextension exercises for back pain (Part 2). El Paso Back Clinic. https://elpasobackclinic.com/various-hyperextension-exercises-back-pain-part-2/
-
Jimenez, A. (n.d.-c). 4 steps to reducing back pain. El Paso Back Clinic. https://elpasobackclinic.com/4-steps-reducing-back-pain/
-
MasterClass. (2021, June 7). Back extension guide: How to do machine back extensions. https://www.masterclass.com/articles/back-extension-exercise-guide
-
OPTMZ State. (2026). Integrate adjustments and exercises for back pain relief. https://optmzstate.com/integrate-adjustments-exercises-back-pain-relief/
-
OPTMZ State. (2026). Can adjustments and exercises work together for pain relief? https://optmzstate.com/can-adjustments-and-exercises-work-together-for-pain-relief/
-
Valor Fitness. (n.d.). CB-13 adjustable back extension. https://valorfitness.com/products/cb-13-adjustable-back-extension
-
Verywell Fit. (2025, December 12). The 10 best back extension machines. https://www.verywellfit.com/best-back-extension-machines-7093471
-
WebMD. (2024, June 8). How to do back extensions. https://www.webmd.com/fitness-exercise/how-to-do-back-extensions