Can individuals who sit for long hours daily prevent tight neck and shoulder muscles by improving their posture, regularly stretching, and massaging their trapezius muscles?
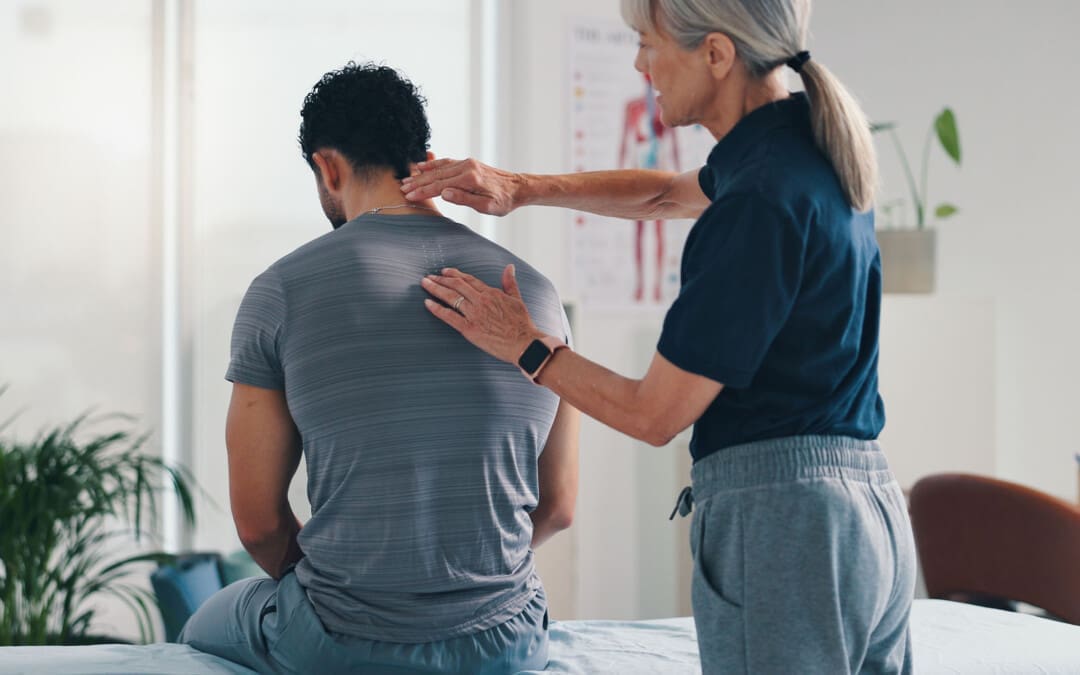
Trapezius Self Massage
The trapezius muscle is a triangle-shaped muscle in the upper back that starts at the base of the neck, spans the length of the upper shoulders, and extends into the middle back. This muscle’s main function is stabilizing and moving the scapula/shoulder blade. The trapezius also helps to move the head, neck, arms, shoulders, and torso, stabilizes the spine, and plays an important role in posture. Physical and mental stress can tighten the trapezius muscle, leading to neck and shoulder pain. Learning to perform a trapezius self-massage can ease tension and provide pain relief. (Domingo A. R. et al., 2017)
Anatomy
The trapezius consists of three parts in three different areas of the back. The bottom of the skull, across the shoulders, and down to the mid back. A trapezius self-massage focuses on the upper portion of the traps. This part is located at the top of the shoulders. To find the upper trapezius, cross one arm in front of your body so that you can place the palm on top of the other shoulder.
For a trapezius self-massage, you need to know that there are two areas where your upper traps start and where the muscle connects to a bone. The first point is on the bottom of the skull, close to the center of the back of the skull. Start there with your fingers and trace the muscle down the back of the neck to where the shoulders widen. If you get lost, You can walk your fingers up or down the muscle on either side to relocate its origin at the base of the skull, the vertebra at the base of your neck that sticks out. This is C-7, another of the upper trapezius’s origin sites. (University of Washington Department of Radiology, 2025)
Massage Technique
Massage oil is optional but can hydrate the skin during a massage. You can perform the trapezius self-massage using your hands.
Start at the Base of The Neck
Choose one shoulder to work at a time.
Raise the arm on the opposite side of your body.
Reach this arm across your body and fold it around your neck so that your fingers rest at the back base of your neck.
Apply a decent amount of pressure to the muscle while moving your fingers in a circular motion.
The action is similar to kneading dough.
Massage this area at the base of your neck for about 30 seconds to start.
If this part of your muscle is sore, you can massage it longer.
Slowly Work Out Towards The End of The Shoulder
Once you have spent about 30 seconds massaging the muscle at the base of the neck, work your way out toward the end of your shoulder.
In close increments, in your fingers across the trapezius muscle, spending at least 30 seconds at each point.
Follow the muscle until you reach the end of the shoulder.
Apply enough pressure, and use slow, rhythmic movements so that you feel relief.
If the pressure is not relieving or makes you wince, it’s too much.
Repeat as Needed
Repeat each side two to three times before switching to the other shoulder. After massaging, you may notice a certain trapezius area is particularly sore or tense. Zero in on those areas a little longer. Remember to relax throughout the trapezius self-massage. This is an opportunity to learn where tension is in your neck and shoulders and how to apply pressure to relieve it. This knowledge can also help you be mindful throughout your day, whether sitting, doing chores, or other physical activities. If you notice scrunching or slouching, massage the trapezius and remind yourself to keep your shoulders relaxed.
Benefits
Tension and tightness in the trapezius muscle are common, particularly among individuals who work in an office, do manual labor, or deal with a lot of stress. (Marker R. J. Campeau S., & Maluf K. S. 2017) Trapezius strains are a common overuse injury that is more likely to happen when the muscle is tight. (Salavati M. et al., 2017) The injury can cause unhealthy posture to avoid the pain. This poor posture will place more stress on the muscles, leading to a cycle of poor posture and chronic pain. A trapezius self-massage can benefit in many ways, including:
Improved blood circulation
Better quality of sleep
Improved posture
Improved range of motion
Decreased swelling
Faster recovery after workouts
Reduced risk of injury
Seeing a Healthcare Provider
Like any other muscle in the body, the trapezius can be injured and requires special treatment to recover. Sometimes, the neck or shoulder pain may not come from the trapezius muscle. Consider seeing a healthcare provider if you have pain in your neck or shoulder that doesn’t get better within a week or two, especially if it isn’t responding to at-home treatment. Regardless of how long you have been experiencing pain or stiffness, contact a healthcare provider if it prevents you from getting adequate sleep or interfering with daily activities. Reasons to see a healthcare provider immediately for neck or shoulder pain include: (Mount Sinai, 2025)
There is sudden pressure or pain in the left shoulder, which can sometimes signal a heart attack.
A fall or accident resulted in pain, swelling, or problems moving the neck or arm.
If there is shoulder pain, a fever, swelling, or redness.
The skin on the shoulder area appears discolored.
It’s important to take regular breaks to stretch and move your muscles. You can release tension in the trapezius by doing shoulder shrugs throughout the day and stretching regularly. When the trapezius feels tight or sore, give yourself a massage.
Injury Medical Chiropractic and Functional Medicine Clinic
Injury Medical Chiropractic and Functional Medicine Clinic works with primary healthcare providers and specialists to build optimal health and wellness solutions. We focus on what works for you to relieve pain, restore function, prevent injury, and help mitigate issues through adjustments that help the body realign itself. They can also work with other medical professionals to integrate a treatment plan to resolve musculoskeletal problems.
Whiplash Chiropractic Massage Therapy
References
Domingo, A. R., Diek, M., Goble, K. M., Maluf, K. S., Goble, D. J., & Baweja, H. S. (2017). Short-duration therapeutic massage reduces postural upper trapezius muscle activity. Neuroreport, 28(2), 108–110. https://doi.org/10.1097/WNR.0000000000000718
University of Washington Department of Radiology. (2025). Trapezius. https://rad.washington.edu/muscle-atlas/trapezius/
Marker, R. J., Campeau, S., & Maluf, K. S. (2017). Psychosocial stress alters the strength of reticulospinal input to the human upper trapezius. Journal of Neurophysiology, 117(1), 457–466. https://doi.org/10.1152/jn.00448.2016
Salavati, M., Akhbari, B., Ebrahimi Takamjani, I., Ezzati, K., & Haghighatkhah, H. (2017). Reliability of the Upper Trapezius Muscle and Fascia Thickness and Strain Ratio Measures by Ultrasonography and Sonoelastography in Participants With Myofascial Pain Syndrome. Journal of Chiropractic Medicine, 16(4), 316–323. https://doi.org/10.1016/j.jcm.2017.06.003
Mount Sinai. (2025). Shoulder pain. https://www.mountsinai.org/health-library/symptoms/shoulder-pain
Should individuals wanting to engage in the exercise start with a warm-up and end with a cooldown to prepare the muscles for optimal performance and post-workout recovery?
Warming Up, Cooling Down
Warming up 5 to 10 minutes before exercise is beneficial for pumping blood to the muscles and preparing them for a run. Dynamic or active stretching and light aerobic activity are a few ways to warm up. This could be active stretching, such as walking lunges, brisk walking, or riding a stationary bike for a few minutes before running. However, individuals should avoid static stretches before running, as they can increase the risk of injury. The minimum length of time for an effective cooldown session is five minutes. Depending on the intensity of the workout, individuals may choose to extend that to 10 minutes.
Steps for a Running Warmup
Do five to 10 minutes of light aerobic exercise to loosen up muscles.
Walk briskly, march, jog slowly, or cycle on a stationary bike.
Don’t rush.
Perform dynamic stretches and movements during the warmup, including walking lunges, jumping jacks, or toe touches.
Begin the run with a slow jog and gradually increase speed.
Slow down if you run out of breath.
This is part of knowing how fast you should run; starting too fast is a common mistake.
Pay attention to posture and form.
Ensure you are using the best technique before speeding up.
Warm Up Benefits
When warming up, the blood vessels dilate. The increased blood flow primes the muscles with oxygen and prepares them to perform at their best. Blood flow also increases the temperature in the muscles for enhanced flexibility. Allowing the heart rate to increase gradually is beneficial, instead of going full max heart output by jumping full speed into the running. (The American Heart Association, 2024)
Properly Cooling Down
At the end of the run:
Cool down by walking or slowly jogging for five to 10 minutes.
Breathing and heart rate should gradually return to normal.
Drink water or an electrolyte-infused drink to rehydrate the body.
Benefits of a Cooldown
The cool-down keeps blood flowing throughout the body at a consistent level. Stopping immediately can cause light-headedness because heart rate and blood pressure can drop rapidly. Winding down slowly allows heart rate and blood pressure to fall gradually. The cooldown is also a good mental transition from the intensity and accomplishing the workout.
Before or After Stretching
Stretching evidence shows it doesn’t have the benefits once thought. Static stretching before, during, or after exercise has not been shown to prevent injury or delayed onset muscle soreness. (Herbert R. D., de Noronha M., & Kamper S. J. 2011) Stretching cold muscles is not recommended. However, there is some evidence that dynamic or active stretching after a warmup can benefit performance. Active stretching is done with exercises that take the muscles through their full range of motion and mimic the actions that will be done during the workout. (Van Hooren B., & Peake J. M. 2018)
Stretching After Running
Standard stretching includes the hamstring stretch, quad stretch, calf stretch, low lunge stretch, IT band stretch, butterfly stretch, hip and backstretch, arms and abs stretch, and triceps stretch. Tips for proper stretching:
Don’t Bounce
Avoid bouncing, as this mimics pulling a rubber band back and forth. You want the muscle to stay stretched.
Hold the stretch for 15 to 30 seconds.
Don’t Stretch Through Pain
Don’t stretch beyond the point where tightness is felt in the muscle.
Do not push through muscle resistance.
Never stretch to the point of pain.
Stretch Whole Body
Don’t just stretch the areas with tightness and/or soreness.
Stretch the whole body equally to prevent injury.
Don’t Hold Your Breath
Take deep breaths during the stretch.
Stay relaxed and breathe in and out slowly.
If starting a new fitness routine, consult your healthcare provider to determine the optimal running warmups and stretching exercises.
Injury Medical Chiropractic and Functional Medicine Clinic
Injury Medical Chiropractic and Functional Medicine Clinic works with primary healthcare providers and specialists to build optimal health and wellness solutions. We focus on what works for you to relieve pain, restore function, prevent injury, and help mitigate issues through adjustments that help the body realign itself. They can also work with other medical professionals to integrate a treatment plan to resolve musculoskeletal problems.
The Science of Motion
References
The American Heart Association. (2024). Warm up, cool down. https://www.heart.org/en/healthy-living/fitness/fitness-basics/warm-up-cool-down
Herbert, R. D., de Noronha, M., & Kamper, S. J. (2011). Stretching to prevent or reduce muscle soreness after exercise. The Cochrane database of systematic reviews, (7), CD004577. https://doi.org/10.1002/14651858.CD004577.pub3
Van Hooren, B., & Peake, J. M. (2018). Do We Need a Cool-Down After Exercise? A Narrative Review of the Psychophysiological Effects and the Effects on Performance, Injuries and the Long-Term Adaptive Response. Sports medicine (Auckland, N.Z.), 48(7), 1575–1595. https://doi.org/10.1007/s40279-018-0916-2
Can understanding how nociceptors function and their role in processing pain signals help individuals who are managing injuries and/or living with chronic pain conditions?
Nociceptors
Nociceptors are nerve endings that detect harmful stimuli, such as extreme temperatures, pressure, and chemicals, and signal pain. They are the body’s first defense against potentially damaging environmental inputs.
Nociceptors are in the skin, muscles, joints, bones, internal organs, deep tissues, and cornea.
They detect harmful stimuli and convert them into electrical signals.
These signals are sent to the brain’s higher centers.
The brain interprets the signals as pain, which prompts the body to avoid the harmful stimulus.
Nociceptors, often called pain receptors, are free nerve endings all over the body. They play a pivotal role in how the body feels and reacts to pain. The main purpose of a nociceptor is to respond to damage to the body by transmitting signals to the spinal cord and brain. (Purves D, Augustine GJ, Fitzpatrick D, et al., editors. 2001) If you bang your foot, the nociceptors on the skin are activated, sending a signal to the brain via the peripheral nerves to the spinal cord. Pain resulting from any cause is transmitted this way. Pain signals are complex, carrying information about the stimuli’s location and intensity. This causes the brain to fully process the pain and send communication back to block further pain signals.
Thermal nociceptors respond to extreme hot or cold temperatures.
For instance, when touching a hot stove, the nociceptors, which signal pain, are activated immediately, sometimes before you know what you’ve done.
Mechanical
Mechanical nociceptors respond to intense stretching or strain, such as pulling a hamstring or straining a tendon.
The muscles or tendons are stretched beyond their ability, stimulating nociceptors and sending pain signals to the brain.
Chemical
Chemical nociceptors respond to chemicals released from tissue damage.
For example, prostaglandins and substance P or external chemicals like topical capsaicin pain creams.
Silent
Silent nociceptors must be first activated by tissue inflammation before responding to a mechanical, thermal, or chemical stimulus.
Most visceral nociceptors are located on organs in the body.
Polymodal
Polymodal nociceptors respond to mechanical, thermal, and chemical stimuli.
Mechano-thermal
Mechano-thermal nociceptors respond to mechanical and thermal stimuli.
Pain Transmission
Nociceptors are also classified by how fast they transmit pain signals. Transmission speed is determined by the type of nerve fiber known as an axon a nociceptor has. There are two main types.
The first type is A fiber axon, fibers surrounded by a fatty, protective sheath called myelin.
Myelin allows nerve signals/action potentials to travel rapidly.
Because of the difference in transmission speed, the pain signals from the A fibers reach the spinal cord first. As a result, after an acute injury, an individual experiences pain in two phases, one from the A fibers and one from the C fibers. (Ngassapa D. N. 1996)
Pain Perception Phases
When an injury occurs, the stimulated nociceptors activate the A fibers, causing a person to experience sharp, prickling pain.
This is the first phase of pain, known as fast pain, because it is not especially intense but comes right after the stimulus.
During the second phase of pain, the C fibers are activated, causing an intense, burning pain that persists even after the stimulus has stopped.
The fact that the C fibers carry burning pain explains why there is a short delay before feeling the sensation.
The C fibers also carry aching, sore pain caused by organs within the body, such as a sore muscle or stomachache. (Ngassapa D. N. 1996)
Injury Medical Chiropractic and Functional Medicine Clinic
Injury Medical Chiropractic and Functional Medicine Clinic works with primary healthcare providers and specialists to build optimal health and wellness solutions. We focus on what works for you to relieve pain, restore function, prevent injury, and help mitigate issues through adjustments that help the body realign itself. They can also work with other medical professionals to integrate a treatment plan to resolve musculoskeletal problems.
From Injury To Recovery With Chiropractic Care
References
Purves D, A. G., Fitzpatrick D, et al., editors. (2001). Nociceptors. In Neuroscience. 2nd edition. (2nd ed.). Sunderland (MA): Sinauer Associates. https://www.ncbi.nlm.nih.gov/books/NBK10965/
University of Texas McGovern Medical School. (2020). Chapter 6: Pain Principles. https://nba.uth.tmc.edu/neuroscience/m/s2/chapter06.html
Ngassapa D. N. (1996). Comparison of functional characteristics of intradental A- and C-nerve fibres in dental pain. East African medical journal, 73(3), 207–209.
Can cervical retraction be a good addition to a home exercise program for individuals with neck pain, spinal arthritis, or needing to strengthen their neck muscles?
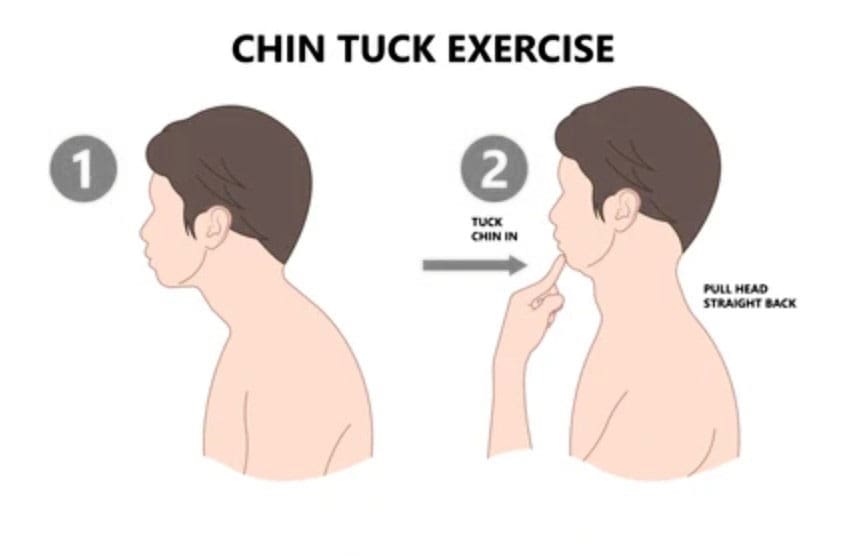
Cervical Retraction
Cervical retraction is a neck exercise that involves gently sliding the head backward while keeping the chin tucked. It can help with:
Neck pain
Stretching and loosening the muscles at the back of the neck.
Headaches
Tightness
Improve posture
Improve flexibility and mobility
Preparation
Basic steps for performing a cervical retraction exercise:
Sit upright with good posture.
Tuck your chin as far as you can comfortably.
Look up while keeping your chin tucked.
Rotate the neck 1-2 inches to each side.
Return to the starting position.
Stop the exercise if you experience pain.
You want to get good at this without loading the joints while learning the movement. Gently and accurately moving your head in alignment with the neck will help you find the correct head action as it moves. Then, it can be performed as a full exercise. Performing the movement correctly requires focus. This is why cervical retraction is done while sitting in a chair with proper posture. Individuals can also stand, but it is more complicated for the body to coordinate than sitting, but it can be done once the individual has practiced.
Sitting or Standing
Gently tuck your chin down toward your neck.
The focus is alignment.
Keeping your chin where it is, press your head back.
There will be soreness, especially for those with pain symptoms, but the neck should feel better.
Be mindful of any intense or severe pain resulting from cervical retraction.
Individuals with cervical spondylosis (neck arthritis) stop if pain presents. (Cleveland Clinic, 2023)
Other Neck Exercises
Another good neck-strengthening exercise is the isometric neck press. In this exercise, you move your head forward, backward, and to each side while your hand provides resistance. This develops flexibility and is recommended for those with arthritis in this area. (Sadeghi, A. et al., 2022) Other exercises include: (Pain Consultants of West Florida, 2019)
Neck extensions: Backward bending can help relieve nerve compression and ease the strain on the cervical spine.
Side rotation: This exercise can improve neck mobility.
Shoulder rolls: This exercise can help keep the neck and shoulder joints fluid.
Injury Medical Chiropractic and Functional Medicine Clinic
If you have a neck condition or radiculopathy that causes pain or other symptoms going down the arm or are unsure how to do it, check with a healthcare provider or physical therapist before trying the exercise. Injury Medical Chiropractic and Functional Medicine Clinic works with primary healthcare providers and specialists to develop an optimal health and wellness solution. We focus on what works for you to relieve pain, restore function, and prevent injury. Regarding musculoskeletal pain, specialists like chiropractors, acupuncturists, and massage therapists can help mitigate the pain through spinal adjustments that help the body realign itself. They can also work with other medical professionals to integrate a treatment plan to resolve musculoskeletal issues.
Neck Injuries
References
North American Spine Society. (2012). Cervical exercise: The Backbone of Spine Treatment. https://www.spine.org/KnowYourBack/Prevention/Exercise/Cervical-Exercise
Cleveland Clinic. (2023). Could your neck pain actually be neck arthritis? https://my.clevelandclinic.org/health/diseases/17685-cervical-spondylosis
Pain Consultants of West Florida. (2019). Chronic Neck Pain: How Core Exercises Can Help. Our Blog. https://pcwfl.com/chronic-neck-pain-how-core-exercises-can-help/
Sadeghi, A., Rostami, M., Ameri, S., Karimi Moghaddam, A., Karimi Moghaddam, Z., & Zeraatchi, A. (2022). Effectiveness of isometric exercises on disability and pain of cervical spondylosis: a randomized controlled trial. BMC sports science, medicine & rehabilitation, 14(1), 108. https://doi.org/10.1186/s13102-022-00500-7
Can individuals relieve back pain by incorporating core strength training to reduce pain and discomfort in their lower backs?
Introduction
Many individuals worldwide have dealt with back issues that make it difficult to complete any task that they are doing. Many often feel pain and discomfort radiating from the three sections of the back and can radiate from the neck, shoulders, and hips. When these areas of the musculoskeletal system are being affected, it can lead to a life of pain and chronic conditions that cause overlapping risk profiles. At the same time, some causes of back pain often correlate with environmental factors and weak core muscles. When a person is dealing with weak core muscles, they will experience instability and pain when they are mobile, leading to back pain. In today’s article, we look at what the core muscles are, how they are connected to back pain, and how strengthening them can reduce the effects of back pain. We discuss with certified medical providers who inform our patients how strengthening the core muscles can reduce back pain. While asking informed questions to our associated medical providers, we advise patients to incorporate various core strengthening exercises to prevent overlapping risk profiles correlated with back pain. Dr. Alex Jimenez, D.C., encompasses this information as an academic service. Disclaimer.
What Are The Core Muscles?
Do you feel a constant ache or pain in your back after lifting or carrying objects in a hunched position? Do you experience muscle weakness in your torso that you can’t stay in a plank position for a few seconds? Or do you experience radiating pain from your lower back to your leg? The core muscles are a group of muscles wrapped around the torso like a support belt that helps with stability, balance, and protecting the lumbar from injuries. The core muscles are found in the lower body’s front, back, and sides. At the same time, the core muscles can help generate intrabdominal pressure while moving the vertebral column. (Flynn & Vickerton, 2024) In the core muscles, the transverse abdominis muscle or the seatbelt muscle. This muscle works with the inspiratory muscles through elastic loading to evoke transversus expiratory activity when breathing and functioning in motion. (De Troyer et al., 1990)
Core Muscles & Back Pain
The core muscles, especially the transverse abdominis muscles, are often overlooked as many individuals frequently deal with numerous factors that cause low back pain. Common core muscles are associated with back pain because environmental factors can neglect the transverse abdominis muscles. Fatigue in the core muscles can cause repetitive asymmetric loading on the spine, which enhances susceptibility to back pain and other injuries. (Zemkova & Zapletalova, 2021) Since back pain is a multifactorial condition that is one of the leading causes of hospital visits and socio-economic issues, many individuals start to neglect the core muscles over time, causing them to be weak. Some symptoms correlated with weak core muscles include:
When this happens, many people start looking for treatment to reduce their back pain and help strengthen their core muscles.
Discover The Benefits Of Chiropractic Care- Video
Strengthening Core Muscles
Before people reduce their back pain and return to their daily routine, they would have to be assessed by a pain specialist like a chiropractor to assess fully what environmental factors are causing the back pain. After the assessment, a chiropractor can work with a physical therapist to reduce back pain and strengthen the core muscles to prevent back pain from returning. When it comes to core strengthening exercises, they focus on either the deep or superficial muscles of the torso, which might produce different effects on lumbar motion. (Puntumetakul et al., 2021) Additionally, core stability exercises can reduce pain in the back and disability reduction and improve a person’s quality of life. (Kanwal et al., 2021) Engaging the muscles through core strengthening exercises can help achieve optimal strength with twisting and side-bending movements to reduce back pain.
Pay Attention To Engaged Core Muscles
However, individuals need to pay attention to engaging their core muscles while maintaining a neutral spine position for stability and preventing back pain. (Cigdem Karacay et al., 2022) This allows individuals to be consistent with strengthening their core and to commit to short workouts incorporated as part of not only their routine but also as part of their customized treatment plan. When it comes to reducing back pain, it is important to ensure that the core muscles are engaged to help build strength and stability, decrease back pain, and improve functionality. When people start strengthening their core muscles, they will be able to be more mindful about how to present themselves and live healthier lives.
References
Cigdem Karacay, B., Sahbaz, T., Gurtekin, B., Yildiz, S., & Ozcan, E. (2022). Effectiveness of whole-body vibration exercise and core stabilization exercise in chronic non-specific low back pain: A randomized-controlled study. Turk J Phys Med Rehabil, 68(2), 184-194. https://doi.org/10.5606/tftrd.2022.7060
De Troyer, A., Estenne, M., Ninane, V., Van Gansbeke, D., & Gorini, M. (1990). Transversus abdominis muscle function in humans. J Appl Physiol (1985), 68(3), 1010-1016. https://doi.org/10.1152/jappl.1990.68.3.1010
Kanwal, S., Yaqoob, I., Shakil-Ur-Rehman, S., Ghous, M., Ghazal, J., & Namroz, N. (2021). Effects of core muscle stability on low back pain and quality of life in post-menopausal women: A comparative study. J Pak Med Assoc, 71(1(A)), 37-40. https://doi.org/10.47391/JPMA.151
Puntumetakul, R., Saiklang, P., Tapanya, W., Chatprem, T., Kanpittaya, J., Arayawichanon, P., & Boucaut, R. (2021). The Effects of Core Stabilization Exercise with the Abdominal Drawing-in Maneuver Technique versus General Strengthening Exercise on Lumbar Segmental Motion in Patients with Clinical Lumbar Instability: A Randomized Controlled Trial with 12-Month Follow-Up. Int J Environ Res Public Health, 18(15). https://doi.org/10.3390/ijerph18157811
Wattananon, P., Sinsurin, K., & Somprasong, S. (2020). Association between lumbopelvic motion and muscle activation in patients with non-specific low back pain during forward bending task: A cross-sectional study. Hong Kong Physiother J, 40(1), 29-37. https://doi.org/10.1142/S1013702520500043
Zemkova, E., & Zapletalova, L. (2021). Back Problems: Pros and Cons of Core Strengthening Exercises as a Part of Athlete Training. Int J Environ Res Public Health, 18(10). https://doi.org/10.3390/ijerph18105400
Incorrect manual handling and lifting is a leading cause of workplace injuries. Can health and safety training help reduce injuries and lost workdays?
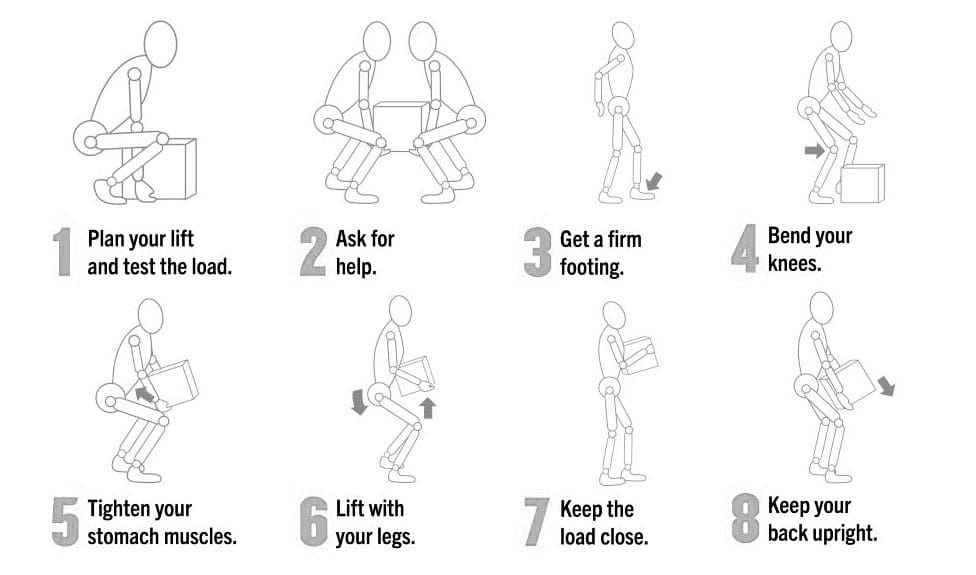
Correct Manual Lifting Technique
Manually lifting objects using incorrect techniques can lead to acute back injuries, herniated discs, sciatica, and long-term issues like increased risk of reinjury, body misalignment, and chronic back pain. Individuals can prevent spinal disc compression and/or lower back muscle strain by learning to use correct manual lifting techniques. (CDC. The National Institute for Occupational Safety and Health (NIOSH). 2007)
Lifting Guide
Individuals can protect their backs and prevent injury by following simple steps when lifting objects.
Support Base
Ensure there is a healthy support base from which to lift.
Keep feet shoulder-width apart with one foot slightly in front of the other.
Ask For Help
If coworkers or colleagues are available, ask for assistance.
If the load is too heavy, ask for help lifting and moving the object/s.
Use Mechanical Assistant Devices
Use hand trucks, dollies, or pushcarts whenever possible for uneven and heavy loads.
Squat To Lift Object
Bend at the hips and knees only, not the back.
Put one knee on the ground to ensure stability before lifting.
Check Posture
Looking straight ahead, maintain posture upright with the chest out, shoulders back, and lower back slightly arched.
Lift Slowly
Lift with the knees and hips only, gradually straightening the lower back.
Load Positioning
Once upright, hold the load close to the body around the stomach.
Move and Maintain Alertness
Always take small steps.
Maintain alertness as to where you are going.
Keep the shoulders square with the hips when changing directions to avoid twisting and losing or shifting balance.
Rest
If you are fatigued, set the load/object down and rest for a few minutes until you can fully engage in the task.
Squat To Set Object Down
Squat with the knees and hips and set the load down slowly.
Avoid quickly rising and jerking movements, and allow the legs, hips, and back muscles to reset.
Planning and Tips
Lifting anything heavy takes planning to prevent muscle spasms, back strain, and other musculoskeletal injuries. Considerations to keep in mind:
Make a Plan Before Lifting
Knowing what object/s are being lifted and where they are going will prevent individuals from making awkward movements while holding and carrying something heavy.
Set and clear a path.
If lifting something with another person, ensure both agree and understand the plan.
Lift Close to The Body
Individuals are stronger and more stable lifters if the object is held close to their body rather than at the end of their reach.
Make sure there is a firm hold on the object.
It is easier to maintain balance close to the body.
Maintain Feet Shoulder-Width Apart
Keep the feet about shoulder-width apart.
Having a solid base of support is important while lifting.
Placing the feet too close together will cause instability while placing them too far apart will hinder movement.
Take short steps.
Visualize The Motions Involved and Practice The Motions Before Lifting
Think about the motion before lifting.
Practice the lifting motion before lifting the object.
Focus on keeping the spine straight.
Raise and lower to the ground by bending the knees.
Avoid bending at the waist or hips.
Tighten the Stomach Muscles
Tightening the abdominal muscles will hold the back in a healthy lifting position and help prevent excessive force on the spine.
Lift With the Legs
The legs are stronger than the back muscles, so let the leg strength do the work.
Lower yourself to the ground by bending the knees, not the back.
Keep Eyes Up
Looking slightly upwards will help maintain a better spine position and help keep the back straight.
Avoid Twisting or Bending
Face in the direction you are walking.
Stop, take small steps, and continue walking if turning is required.
Back Belts
It has become common for many who work in jobs requiring manual lifting to wear back belts or support. However, research does not show that they decrease the risk of a lifting injury. (CDC and The National Institute for Occupational Safety and Health, 2023) Instead, it is recommended that the belt be thought of as a reminder of where the back muscles are positioned to keep the individual aligned, combined with the correct lifting techniques.
Injury Medical Chiropractic and Functional Medicine Clinic
Training the body and maintaining its optimal health for correct manual lifting techniques requires daily efforts through practice, conscious position corrections, and ergonomics. Injury Medical Chiropractic and Functional Medicine Clinic works with primary healthcare providers and specialists to develop an optimal health and wellness solution. We focus on what works for you to relieve pain, restore function, and prevent injury. Regarding musculoskeletal pain, specialists like chiropractors, acupuncturists, and massage therapists can help mitigate the pain through spinal adjustments that help the body realign itself. They can also work with other medical professionals to integrate a treatment plan to resolve musculoskeletal issues.
Chiropractic Care For Injury Recovery
References
CDC. The National Institute for Occupational Safety and Health (NIOSH). (2007). Ergonomic Guidelines for Manual Material Handling. (No. 2007-131). Retrieved from https://www.cdc.gov/niosh/docs/2007-131/pdfs/2007-131.pdf
CDC. The National Institute for Occupational Safety and Health (NIOSH) (2023). Back Belts – Do They Prevent Injury? (No. 94-127). Retrieved from https://www.cdc.gov/niosh/docs/94-127/
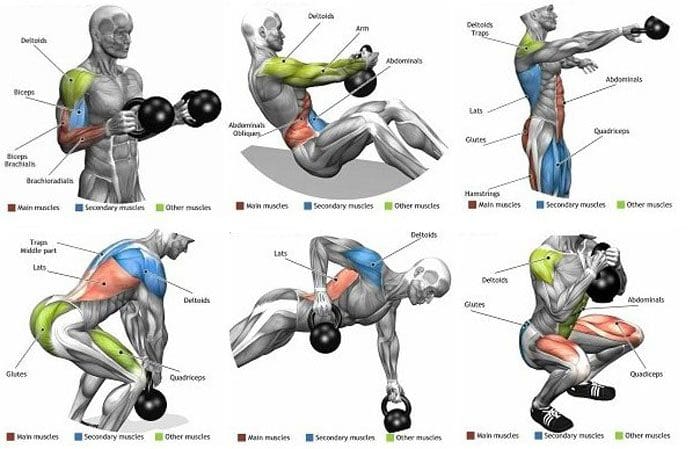
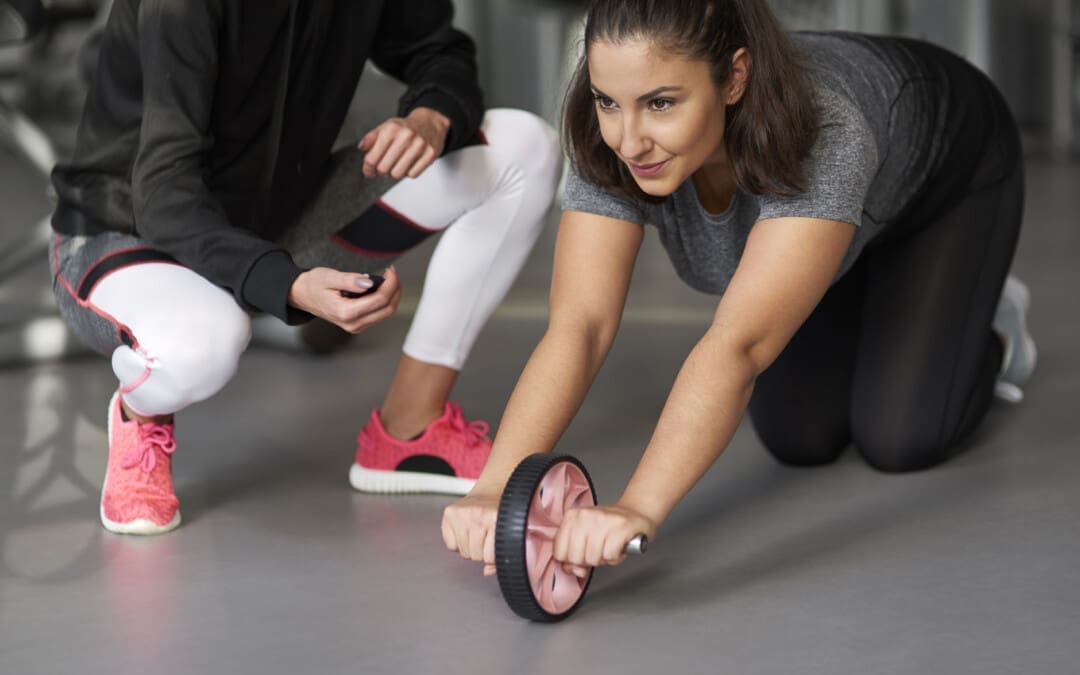
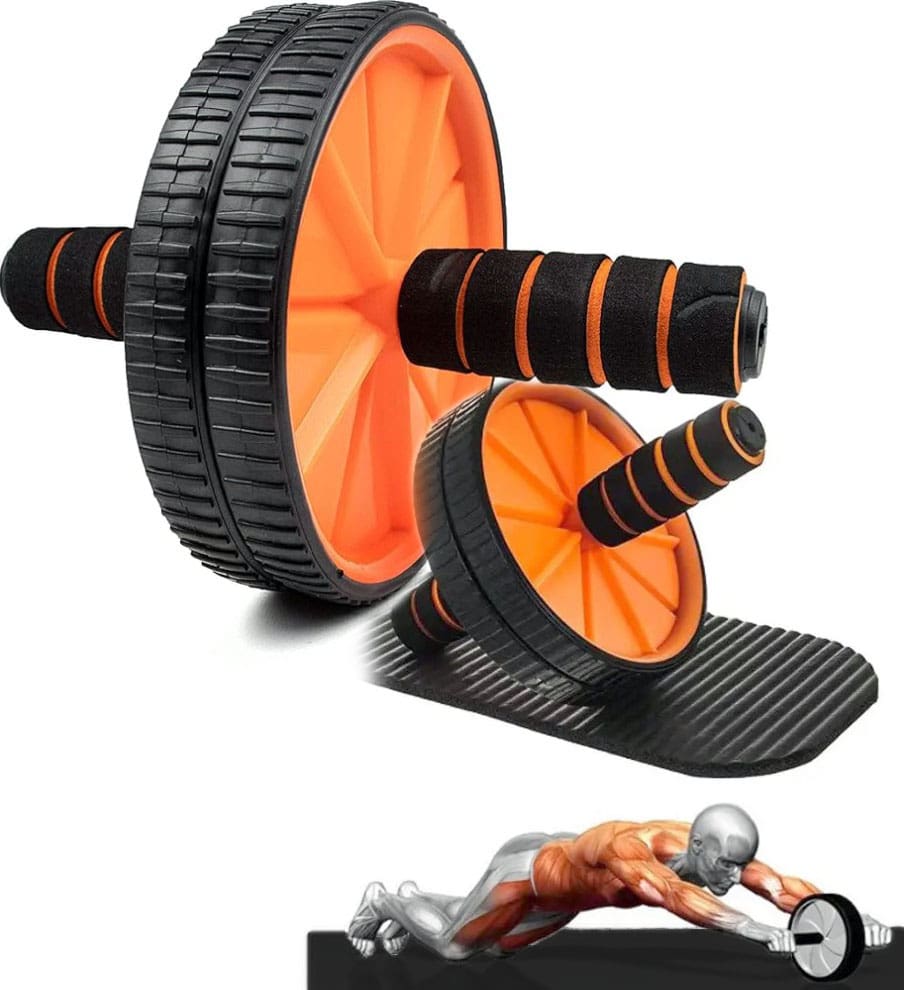
Can incorporating an ab roller help individuals achieve their fitness goal of building stronger core muscles?
Ab Roller
An ab roller is exercise equipment that helps build core strength and stability by engaging the core, including the abs, obliques, and lower back. It’s a small, robust wheel with handles on each side that glides along surfaces. An ab roller makes an excellent addition to any workout routine and benefits those who do not have an established workout routine. Strengthening the core muscles will help in other areas, whether achieving further exercise goals or reducing injuries. It works by holding on to the handles and rolling the entire body forward over the wheel, improving abdominal strength and endurance while activating the shoulders, arms, and upper back muscles. These movements target different areas, including the obliques, rectus abdominis, and serrated anterior muscles.
Benefits
Enhanced Core Muscle Strength
The primary benefit of using an ab roller is improved core strength, which can help build a solid foundation for various other exercises and physical activities that might be done daily. The body uses its core when moving other muscle groups. Strengthening core muscles increases sports performance, speed, and consistency.
Decrease Injury Risks
Building a strong abdominal core will help stabilize other body areas, such as hip flexors and hamstrings, ultimately reducing the likelihood of injuries. (Huxel Bliven, K. C. and Anderson B. E. 2013) This improved strength and stability is especially beneficial as a strong core can help reduce the chance of an exercise, sports, or work-related injury.
Posture Improvement
Most of us know posture is important but may not realize it (Wilkes C. et al., 2017). A healthy posture can help reduce back pain and even boost energy levels. Performing regular abdominal workouts using an ab roller helps to reinforce proper posture. Healthy posture is more than just standing up straight—it involves incorporating core abdominal activity to help strengthen the muscle endurance of the hips and trunk regions, enabling individuals to stand up straight without much effort.
Tips and Advice
It is important to introduce an ab roller gradually into a workout regimen. Here are a few tips for incorporating one.
Duration
As a beginner, start by trying to do one to two sets with six to 10 repetitions. Individuals may notice that their muscles are sore after doing this for the first time. If the soreness is too much, cut back for the next workout and ease into it more gradually. After a few weeks, the body will start getting used to the movement and may be ready to level up to two to four sets. Speed and performing the exercise as fast as possible is not the goal. Individuals should focus on slow but steady motions, core stability, and proper form. Rushing through a workout could increase the chance of an injury.
Frequency
When starting an ab roller workout, the recommendation is to do it once or twice a week, ideally combined with other workouts like walking, running, swimming, or cycling. This will allow the body to get used to the motion. Because this exercise is difficult and requires balance, some may need to adjust to the training, which is perfectly normal.
Intensity
How intense individuals go with the ab roller depends on current activity and fitness level. It takes time to adapt to this particular exercise. For a beginner, start at a mild intensity by kneeling on the ground. As the core gets used to the motion, individuals can progress to putting their legs straight and omit kneeling. This advanced motion will incorporate posture, strength, endurance, and proprioception.
Injury Medical Chiropractic and Functional Medicine Clinic
Ask a qualified fitness coach or personal trainer if you are unsure where to begin. As with any exercise or fitness program, always talk with your healthcare provider. At Injury Medical Chiropractic and Functional Medicine Clinic, we focus on what works for you to relieve pain, restore function, and prevent injury. Regarding musculoskeletal pain, specialists like chiropractors, acupuncturists, and massage therapists can help mitigate the pain through spinal adjustments that help the body realign itself. They can also work with other associated medical professionals to integrate into a treatment plan to improve the body’s flexibility and mobility and resolve musculoskeletal issues.
Core Exercises and Back Pain
References
Huxel Bliven, K. C., & Anderson, B. E. (2013). Core stability training for injury prevention. Sports health, 5(6), 514–522. https://doi.org/10.1177/1941738113481200
Wilkes, C., Kydd, R., Sagar, M., & Broadbent, E. (2017). Upright posture improves affect and fatigue in people with depressive symptoms. Journal of behavior therapy and experimental psychiatry, 54, 143–149. https://doi.org/10.1016/j.jbtep.2016.07.015
IFM's Find A Practitioner tool is the largest referral network in Functional Medicine, created to help patients locate Functional Medicine practitioners anywhere in the world. IFM Certified Practitioners are listed first in the search results, given their extensive education in Functional Medicine