Crossfit Rehabilitation:Daniel Alvarado, owner of Push-as-RX Fitness, discusses how he carries out his CrossFit personal injury rehabilitation and athletic training program as a part of Dr. Alex Jimenez’s chiropractic rehabilitation plan. Daniel Alvarado ensures that his rehabilitation procedures complements well with Dr. Alex Jimenez’s chiropractic treatment in order to help patients return to their original state of well-being. Both Daniel Alvarado and Dr. Alex Jimenez work hard to maintain a strong dynamic between their collaborative services.
Crossfit Rehabilitation & Chiropractic Care
Crossfit Rehabilitation is a big part of Physical therapy (PT), also referred to as physiotherapy, as one of the allied health professions. By utilizing mechanical force and motions (bio-mechanics or kinesiology), manual therapy, exercise therapy, and electrotherapy, remediates impairments and promotes mobility and purpose. Physical therapy is used to enhance a patient’s quality of life through examination, diagnosis, prognosis and physical intervention. It’s performed by physical therapists (called physiotherapists in many countries).
CrossFit originated as a plan for military forces, police and fire departments, as well as other such organizations to keep their members in the very best shape in their lives. CrossFit has taken the country by storm encouraging anyone from grandparents to specialized elite military personnel to join this growing fitness movement, today.
CrossFit is a core strength and conditioning program made to generate wide-ranging responses out of anyone who engages consistently in this training. That is not a specialized program but one designed to optimize physical performance in every one of the ten fitness realms.
The CrossFit program is intended to increase physical performance of athletes in all physical performance jobs. Qualified CrossFit athletes perform at the maximal amount in multiple, physical challenges that are varied, and randomized.
This is actually the kind of strength and fitness called upon in the line of work such as police, fire fighters, as well as the military. CrossFit has been demonstrated time and time again to be successful in these venues.
Nevertheless, you don�t need to be a top athlete to engage and gain from CrossFit. In fact, everyone from highly conditioned athletes to senior citizens have began CrossFit and benefited from the plans profoundly. The load as well as intensity of the workouts predicated on amount of physical fitness although the difference isn�t in the program.
If you have enjoyed this video and/or we have helped you in any way please feel free to subscribe and share us.
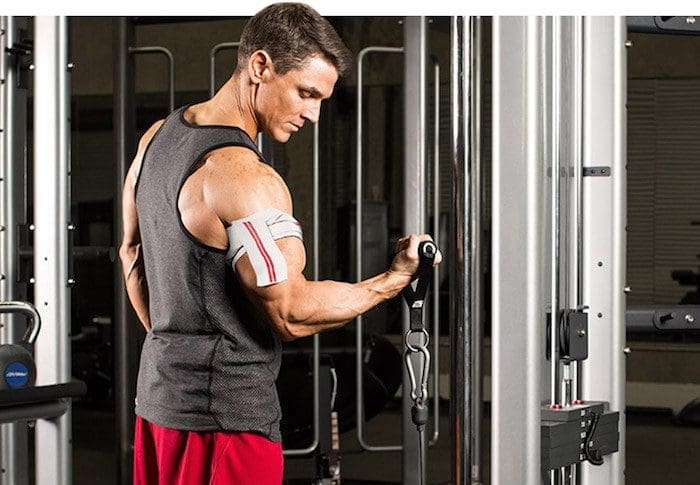
Occlusion training involves restricting the flow of blood to a muscle group while training. That is why it is also commonly called �blood flow restriction training.�
Basically you take a wrap or band and apply it to the top of your limb.
The aim of this�isn�t�to completely cut off circulation to the area as that is dangerous and painful.
This means that you aren�t restricting arterial flow to the area, but you are restricting the venous return from the muscles.
Arteries are what takes the blood from your heart to your muscles and it is then returned to your heart through a system of veins.
Restricting the blood flow back to your heart causes a pooling of the blood in the area that you are working.
This is what occlusion training uses to create an�anabolic effect�on your muscles.�
HOW DOES OCCLUSION TRAINING WORK?
The bloodstream is the network that connects the muscles in your body, providing oxygen and nutrients and carrying away waste products
Muscles require a steady flow of blood to operate.
That is why we aren�t cutting off the flow to the muscle, we are only slowing the rate at which the blood releases from it.
When performing any kind of resistance training your body directs more blood to your muscles performing the exercise.
The reason you get a �pump� when working out is that the speed at which your body is pumping blood into your muscles is faster than the amount of blood going out of them.
Your pump reduces when you rest between your sets as more blood is released from your muscle groups.
Blood flow restriction training prolongs and intensifies your pump.
This is done by placing wraps in one of two places during your working sets.
You wrap above your bicep for movements that involve your bicep�s, triceps, forearms, and even chest and back can benefit from this.
While wrapping in this position it makes sense that it would benefit your arms but how does it help your chest and back?
There is no possible way that you can restrict blood flow to your chest and back because of the positions they are located in.
However wrapping your arm allows you to pre-fatigue your arms and as a result chest and back exercises that you perform are going to require more involvement from those muscles rather than your biceps or triceps.
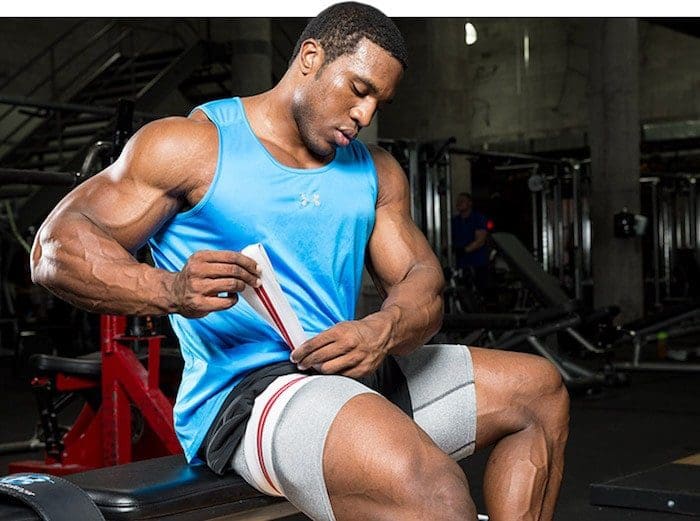
Wrap your upper thigh for movements that involve your quads, hamstrings, glutes and calves.
Building Muscle With Occlusion Training
During training you have two�types of muscle�that are responsible for all muscle growth in the gym.
Fast twitch fibers and slow twitch fibers.
Slow twitch muscle fibers are smaller muscle fibers and generate less power and strength than fast twitch fibers. However slow twitch fibers fatigue slower and can sustain activity for longer.
Fast twitch fibers are larger muscle fibers, generate more power and strength and have the most potential for growth.
Fast twitch fibers are recruited last during contractions and mostly don�t use oxygen. Slow twitch fibers on the other hand use oxygen and are recruited first in the movement.
This means that by restricting the blood flow to a muscle group you are pre-fatiguing the slow twitch fibers and forcing the fast twitch fibers to take control even when you�re using low weights.
Occlusion training seems to�trick your body�into thinking you are lifting heavy weights. This means you can get very�similar benefits�of heavy training by using 20-30% of your 1 rep max.
There are two main factors that lead to muscle growth during training. These are:
Metabolic Stress
Cellular Swelling
Metabolic Stress
When you�re working out your body is burning energy. As your body chews through its fuel stores, metabolic by-product accumulates in your muscles.
Metabolic by-products act as an anabolic signal, telling your body to increase size and strength.
Under normal training most of these by-products would be washed out by blood flow.
Occlusion training keeps them near the muscle helping to increase the anabolic effect that the by-products have on the muscles.�
Cellular Swelling
During resistance training your cells expand and fill with fluid and nutrients. This is known as cellular swelling and has also been shown to be an anabolic�signal for muscle growth.
Occlusion training isn�t a better option than heavy training, but that said it is a nice supplement.
Regularly pushing your muscles to the point of failure or at least close to it (1-2 reps) is an important factor of increasing your strength and muscle mass.
Occlusion training allows you to replicate this without putting anywhere near as much strain on your joints, ligaments and tendons as you would to get the same result from lifting heavy.
This means that you can do more volume without the risk of�overtraining.
Here are a couple of scenarios where this could be really beneficial for you:
If you suffer from joint issues
If you�re travelling and only have access to hotel weights
If you�re injured or have nagging aches and pains.
In short your body might not always feel up to another heavy training day. Occlusion training can be a great way to get a good workout in and help you maintain muscle mass.�
How To Do Blood Flow Restriction Training
As I mentioned earlier you only ever wrap yourself at the top of your biceps and the top of your thighs.
Elastic knee wraps, medical tourniquets and exercise band �are good options to use for your wraps.
Here�s two videos explaining how to wrap your arms and legs
Blood flow restriction training works best when with isolation exercises. If you are going to do compound movements do them at the start of your workout and save the blood flow restricted exercises for the end.
Layne Norton recommends performing lifts at 20%-30% of your 1rm for 20-30 reps of the first set and then the next three sets at 10-15 reps. Have a 30 second rest between sets before going again.
You want to keep the cuffs on your limbs for the entire 4 sets and then release them at the end.
If you�re in pain before the exercise starts that�s a good sign that your wraps are too tight.
Also if you can�t complete the prescribed sets either the wraps are too tight or the weight is too heavy.�
Conclusion
Blood flow restriction training has been getting a lot of hype lately.
While it isn�t better than regular strength training, it is a good supplement for it and can be beneficial when used in conjunction with your regular training.
This is more of an advanced training technique so if you are just starting out lifting it probably won�t give you any more benefits than your normal heavy training.
If you�re an advanced lifter, are injured, or don�t have access to heavier weights than this training technique could benefit you.
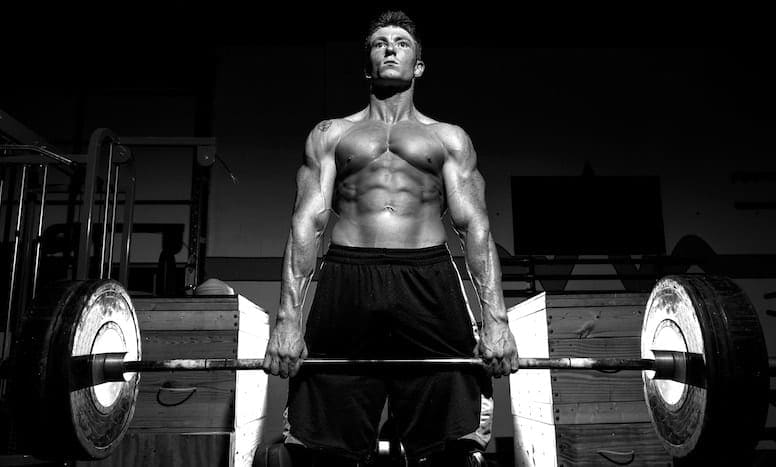
Deadlifts are one of the best strength and mass building exercises that you can perform.
When performing the deadlift you are working more muscles than any other exercise, including the squat.
Deadlifts have many different variations and forms. In this article we are going to focus on the difference between the Romanian Deadlift and standard deadlifts.
There are lots of valid arguments as to which exercise is better in a Romanian Deadlift vs regular deadlift battle.
Keep reading to learn the differences.
Romanian Deadlift Vs. Standard Deadlift
The Romanian Deadlift is one of the most�commonly used among the various deadlift techniques.
In fact a lot of people that think they are performing a deadlift are sometimes actually doing a Romanian Deadlift.
Both the conventional and Romanian Deadlifts are great strength and muscle building exercises.
Even though they are both deadlifts�variations the setup, execution and muscles activated are different.
Here�s a quick video that highlights the differences in form and setup between the two.
Regular Deadlift
As the name suggests the deadlift is a strength training exercise that involves�lifting dead weight.
The regular deadlift is one of the best total body exercises you can do as it works just about every fiber in your body.
The deadlift requires you to lift a weight off the ground�and lower it back down again. Although it may sound simple there is a lot going on in the movement and incorrect form can cause injuries.
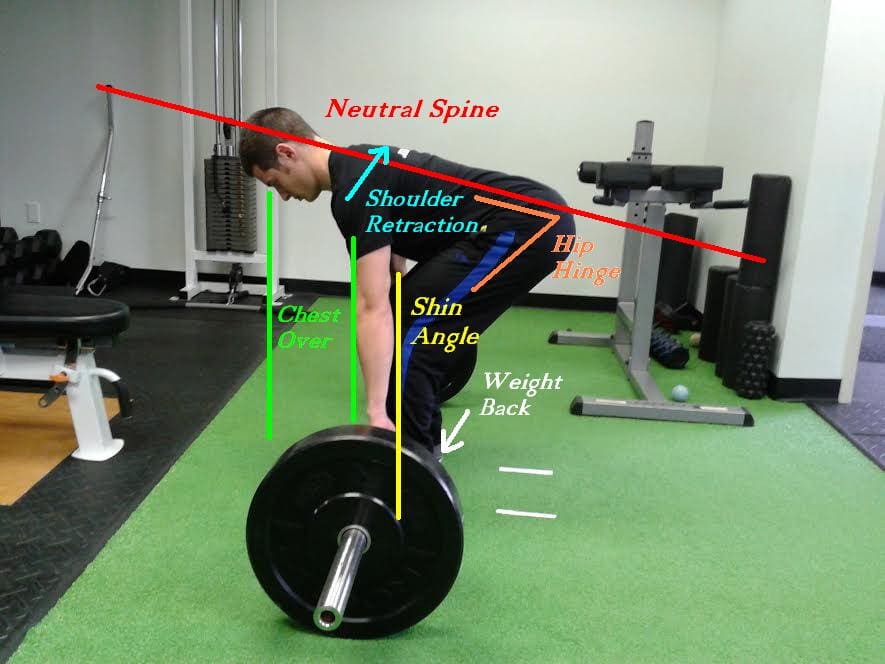
One of the most common causes for injury while deadlifting is rounding the back. Your lower back must stay neutral during the whole movement. Rounding your lower back during heavy deadlifts puts uneven pressure on your spine. Always lift with a neutral lower back, allowing for the natural inward curve of your lower spine.
Don�t try and rush to lift heavier weights. the quickest way to improve your deadlift is through correct form. By pulling more efficiently you can use more muscles and deadlift heavier. So start out practicing correct form and build your way up.
The best way to approach the exercise is to think as if you were leg pressing the floor as opposed to�using your upper body to lift something. This will help you mentally focus on using your legs rather than your back (which can cause rounding) for the exercise.
The �dead� in deadlift stands for dead weight so each rep must start on the floor, from a dead stop. �Deadlifts are different to other exercises like the bench press or squat where the weight starts at the top. The deadlift movement�starts from the bottom and and you pull the weight up then return it to the floor�for one rep.
Here are�Stronglifts�5 steps to proper deadlift form:
Walk to the bar.�Stand with your mid-foot under the bar. Your shins shouldn�t touch it yet. Put your heels hip-width apart, narrower than on Squats. Point�your toes�out 15�.
Grab the bar.�Bend over without bending your legs. Grip the bar narrow, about shoulder-width apart like on the Overhead Press. Your arms must be vertical when looking from the front.
Bend your knees.�Drop into position by bending your knees until your shins touch the bar. Do NOT let the bar move away from your mid-foot. If it moves,�start from scratch with step one.
Lift your chest.�Straighten your back by raising you chest. Do not change your position � keep the bar over your mid-foot, your shins against the bar, and your hips where they are.
Pull.�Take a big breath, hold it and�stand up with the weight. Keep the bar in contact with your legs while you pull. Don�t shrug or lean back at the top.
Lower the bar by moving your hips back while keeping your legs almost straight. Once the bar is past your knees, bend your legs more. The bar will land over your mid-foot, ready for your next rep.
Rest a second between reps while staying in the setup position. Take a deep breath, get tight and pull again. Every rep must start from a dead stop on the floor. Don�t bounce the weight off the floor or you can end up lifting�with�bad form.
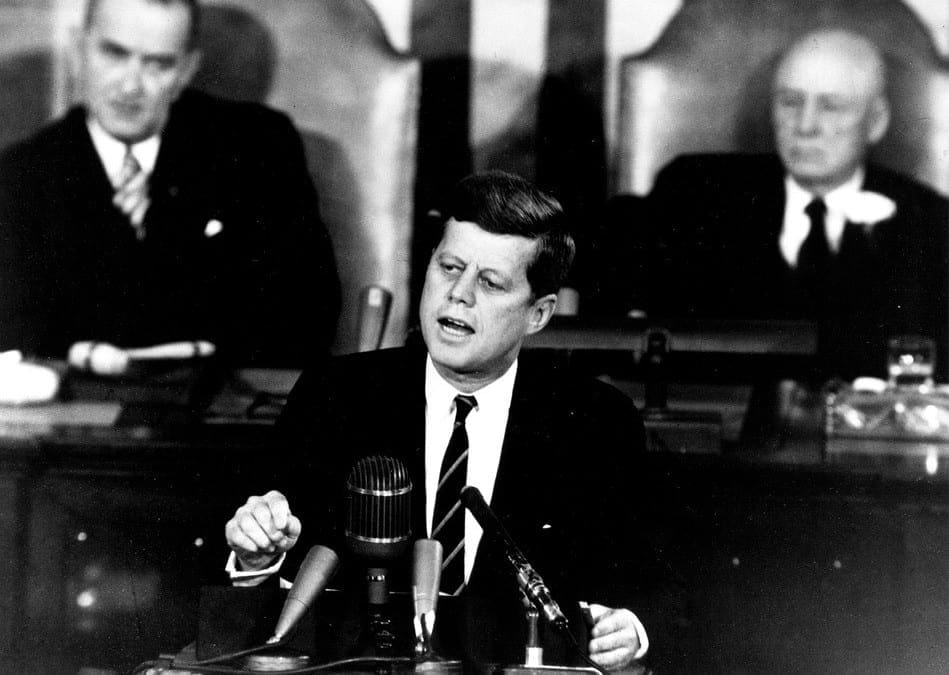
The Narrative Of JFK Shows The Difficulty In Diagnosing & Treating Spinal Disorders.
At age 43, John F. Kennedy was the youngest president elected into U.S. workplace, and has been depicted as full of youth and vitality. But he was far from healthy, and spent most of his adult life fighting with many medical issues, including back pain which started during college and continued until his death, according to a recent review article from the Journal of Neurosurgery: Spine.
John F. Kennedy’s back pain is thought to have started following a football injury, while Kennedy was in undergraduate school at Harvard, clarified coauthor Justin T. Dowdy, MD, who is a neurosurgeon at Hot Springs Neurosurgery Clinic, in Hot Springs, Arkansas.
Based on 10 years of study on Kennedy’s medical documents and reported symptoms, senior author T. Glenn Pait, MD, believes Kennedy had discogenic disease stemming from an accident in his childhood that began a cascade of problems in his low back. Dr. Pait is Director of the Jackson T. Stephens Spine and Neurosciences Institute at the University of Arkansas for Medical Sciences.
Kennedy was originally rejected when trying to enlist in the Army due to his medical issues, such as back pain, but was eventually accepted in the U.S. Naval Reserve during his dad’s connections. “This is a testament to his decision to serve his country,” Dr. Pait said. “Kennedy was originally given a desk job, but that was not enough for him, and he was later admitted into a patrol torpedo program.”
Kennedy’s back issues worsened when his naval boat was hit by a Japanese destroyer, and Kennedy drifted for 5 hours to a nearby island while towing an injured crewman to shore by holding the ring of the man’s life jacket between his teeth, Drs. Dowdy and Pait noted in their newspaper.
The review article refers to a series of 4 ineffective surgeries, including a sacroiliac (SI) and lumbosacral fusion. Various doctors who treated Kennedy had different theories about the reason for his back pain, also suggested a variety of different treatments ranging from trigger point injections and an exercise program (swimming and weight lifting), to massage and a back brace, to methamphetamine-containing shots. The exercise program, started later in his life, produced “dramatic” improvement, according to the researchers. The program consisted of weight lifting three times each week and everyday swimming plus massage and heat therapy.
“JFK’s narrative illustrates the difficulty and complexity in diagnosing and treating spinal disorders, especially in the context of chronic pain,” Dr. Dowdy advised SpineUniverse. “Our spines age as we age if it’s degenerative disk disease, pinched nerves, or spinal stenosis–imaging abnormalities are certain to appear later in life. Treating and preventing these disorders is just as much of an art as it’s a science, particularly in determining those individuals who will probably benefit from surgery.”
Dr. Dowdy noted that much progress has been made in how spinal conditions are diagnosed and treated as the time when Kennedy sought attention, such as “that the refinement of both less-invasive spine surgery methods and diagnostic imaging.” Dr. Dowdy also emphasized an important point that applies to any era: “the significance of having a trusted spine surgeon who is prepared and capable of supplying the right surgery in the appropriate conditions.”
John F. Kennedy’s story also suggests that “the most beneficial methods to prevent chronic back pain may be accessible and affordable,” Dr. Dowdy stated. “Often the most appropriate strategy for chronic low back pain is actively pursuing proper spine hygiene: maintaining healthy body weight, refraining from smoking, and pursuing a nutritious diet and exercise–especially workouts comprising yoga-style stretches,” Dr. Dowdy emphasized. “It boils down to pursuing a healthy and active way of life.”
“Individuals who suffer from chronic pain may hopefully be inspired to know that Kennedy remained physically energetic and driven to accomplish his goals despite his annoyance,” Dr. Dowdy concluded.
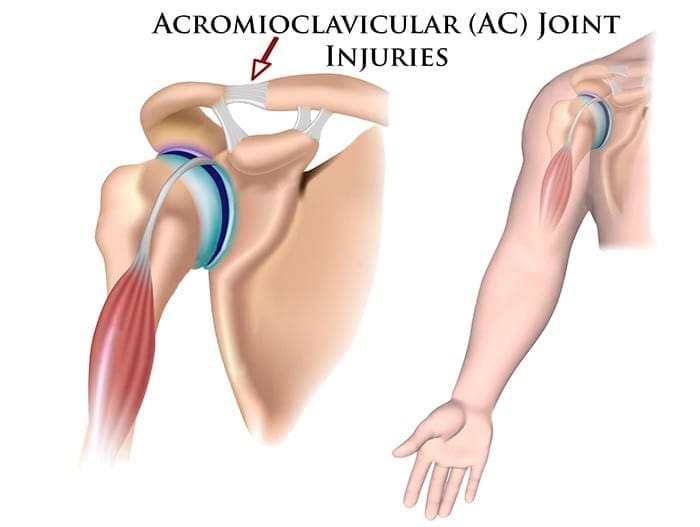
Two surgeons discuss the diagnosis and treatment of acromioclavicular injuries in athletes. El Paso, TX. Chiropractor, Dr. Alexander Jimenez follows the discussion.
Acromioclavicular (AC) joint injuries most often occur in athletic young adults involved in collision sports, throwing sports, along with overhead activities like upper-extremity strength training. They account for 3% of all shoulder injuries and 40% of shoulder sports injuries. Athletes in their second and third decade of life are more often affected(1), and men are injured more commonly than women (5:1 to 10:1)(1,2).
Acromioclavicular dislocation was known as early as 400 BC by Hippocrates(3). He cautioned against mistaking it for glenohumeral (shoulder joint) dislocation and advocated treating with a compressive bandage in an attempt to hold the distal (outer) end of the clavicle in a diminished position. Almost 600 decades later Galen (129 AD) recognized his own acromioclavicular dislocation, which he sustained while wrestling(3). He left the tight bandage holding the clavicle down as it was too uneasy. In today’s era this injury is better known, but its treatment remains a source of fantastic controversy.
Anatomy
The acromioclavicular joint combines the collarbone to the shoulder blade and therefore links the arm to the axial skeleton. The articular surfaces are originally hyaline cartilage, which affects to fibrocartilage toward the end of adolescence. The average joint size is 9mm by 19mm(4). The acromioclavicular joint contains an intra-articular, fibrocartilaginous disc which may be complete or partial (meniscoid). This helps absorb forces in compression. There is marked variability in the plane of the joint.
Stabilizers
There is little inherent bony stability in the AC joint. Stability is provided by the dynamic stabilizers — namely, the anterior deltoid muscle arising from the clavicle and the trapezius muscle arising from the acromion.
Additionally, there are ligamentous stabilizers. The AC ligaments are divided into four — superior, inferior, anterior and posterior. The superior is most powerful and blends with muscles. The acromioclavicular ligaments contribute around two- thirds of the constraining force to superior and posterior displacement; however, with greater displacement the coracoclavicular ligaments contribute the major share of the resistance. The coracoclavicular ligament consists of the conoid and trapezoid. The conoid ligament is fan-shaped and resists forwards motion of the scapula, while the more powerful trapezoid ligament is level and resists backward movement. The coracoclavicular ligament helps bunch scapular and glenohumeral (shoulder joint) motion and the interspace averages 1.3 cm.
Mechanism Of Injury
The athlete who sustains an acromioclavicular injury commonly reports either one of two mechanisms of harm: direct or indirect.
Direct force: This is when the athlete falls onto the point of the shoulder, with the arm usually at the side and adducted. The force drives the acromion downwards and medially. Nielsen(5) found that 70 percent of acromioclavicular joint injuries are caused by an direct injury.
Indirect force: This is when the athlete falls onto an outstretched arm. The pressure is transmitted via the humeral head into the acromion, therefore the acromioclavicular ligament is disrupted and the coracoclavicular ligament is stretched.
On Examination
The athlete presents soon after the severe injury with his arm splinted to his side. The patient may state that the arm feels better using superiorly directed support on the arm. Most motions are limited secondary to pain near the top of the shoulder; the degree varies with the grade of sprain. The hallmark finding is localized swelling and tenderness over the acromioclavicular joint.
In dislocations, the outer part of the collarbone will appear superiorly displaced using a noticeable step deformity (in fact, it is the shoulder which sags beneath the clavicle). Occasionally, the deformity may only be apparent later, if first muscle spasm reduces acromioclavicular separation. Forced cross-body adduction (yanking the affected arm across the opposite shoulder) provokes discomfort. The clavicle can frequently be moved relative to the acromion.
Acromioclavicular Visualisation
The typical joint width measures 1-3mm. It’s regarded as abnormal if it is more than 7mm in men, and 6mm in women. Routine anteroposterior views of the shoulder reveal the glenohumeral jointnonetheless, that the acromioclavicular joint is over penetrated and so dark to interpret. Reduced exposure enhances visualization. The individual stands with both arms hanging unsupported, both acromioclavicular joints on one film. Weighted viewpoints (stress X-rays) are obtained with 10-15 lb weights not held but suspended from the individual’s wrists. They help differentiate type II-III injuries, but are of little clinical significance and therefore are no longer recommended in our practice.
Classification Of AC Separation
The importance of identifying the injury kind can’t be over emphasized because the treatment and prognosis hinge on an accurate diagnosis. The injuries are graded on the basis of that ligaments are injured and how badly they’re torn.
Allman (6) classified acromioclavicular sprains as grades I, II and III, representing respectively, no involvement, partial tearing, and total disruption of the coracoclavicular ligaments. More recently, Rockwood (1) has further classified the more severe injuries as standard III-VI.
The injuries are classified into six categories:
Type I This is the most common injury encountered. Only a mild force is needed to sustain such an injury. The acromioclavicular ligament is sprained with an intact coracoclavicular ligament. The acromioclavicular joint remains stable and symptoms resolve in seven to 10 days. This injury has an excellent prognosis.
Type II The coracoclavicular ligaments are sprained; however, the acromioclavicular ligaments are ruptured. Most players can return to their sport within three weeks. There is anecdotal evidence to suggest that steroid injections into the acromioclavicular joint speed up the resolution of symptoms, but this practice is not universal.
Type III The acromioclavicular joint capsule and coracoclavicular ligaments are completely disrupted. The coracoclavicular interspace is 25-100% greater than the normal shoulder.
Type IV This is a type III injury with avulsion of the coracoclavicular ligament from the clavicle, with the distal clavicle displaced posteriorly into or through the trapezius.
Type V This is type III but with exaggeration of the vertical displacement of the clavicle from the scapula-coracoclavicular interspace 100-300% greater than the normal side, with the clavicle in a subcutaneous position.
Type VI This is a rare injury. This is type III with inferior dislocation of the lateral end of the clavicle below the coracoid
Treatment
The treatment of acromioclavicular joint injuries varies based on the seriousness or grade of the injury.
Initial treatment: These can be quite painful injuries. Ice packs, anti-inflammatories plus a sling are utilized to immobilize the shoulder and then take the weight of the arm. As pain starts to subside, it is important to start moving the fingers, wrist and elbow to prevent shoulder stiffness. Next, it’s important to begin shoulder motion in order to stop shoulder stiffness.
Un-displaced injuries only require rest, ice, and then a slow return to activity over two to six weeks. Major dislocations require surgical stabilization in athletes if their dominant arm is involved, and if they participate in upper-limb sports
Type I & II: Ice pack, anti-inflammatory agents and a sling are used. Early motion based on symptoms is introduced. Pain usually subsides in about 10 days. Range-of-motion exercises and strength training to restore normal motion and strength are instituted as the patient�s symptoms permit. Some symptoms may be relieved by taping (taking stress off acromioclavicular joint). The length of time needed to regain full motion and function depends upon the severity or grade of the injury. The sport and the position played determine when a player can return to a sporting activity. A football player, who does not have to elevate his arm, can return sooner than a tennis or rugby player. When a patient returns to practice and competition in collision sports, protection of the acromioclavicular joint with special padding is important. A simple �doughnut� cut from foam or felt padding can provide effective protection. Special shoulder- injury pads, or off-the-shelf shoulder orthoses, can be used to protect the acromioclavicular joint after injury.
Some Type II injuries may develop late degenerative joint changes and will need a resection of the distal end of the clavicle for pain relief. It is important to note that after a resection of the distal end of the clavicle, particularly in a throwing athlete, there may be formation of heterotopic bone on the under surface of the clavicle which can cause a painful syndrome which presents like shoulder impingement.
Type III: The treatment of type III injury is less controversial than in past years. In the 1970s, most orthopaedic surgeons recommended surgery for type III acromioclavicular sprains(7). By 1991, most type III injuries were treated conservatively(8). This change in treatment philosophy was prompted by a series of retrospective studies(9). These showed no outcome differences between operative and nonoperative groups.
What’s more, the patients treated non-operatively returned to full activity (work or athletics) earlier than surgically treated groups(10, 11). The exceptions to this recommendation include people who perform repetitive, heavy lifting, people who operate with their arms above 90 degrees, and thin patients who have prominent lateral ends of the clavicles. These patients may benefit from surgical repair(12).
Any discussion about the management of acute injuries to the AC joint must deal with which of the many methods of surgical therapy described is the best for their situation, but whether surgery should be considered at all. Surgery is generally avoided in athletes participating in contact sports since they will often re-injure the shoulder later on.
Type IV-VI: Account for more than 10-15% of total acromioclavicular dislocations and should be managed surgically. Failure to reduce and fix these will lead to chronic pain and dysfunction.
Surgery
Surgical repair can be divided into anatomical or non- anatomical, or historically into four types:
? Coracoclavicular repairs (Bosworth screws(13), cerclage, Copeland and Kessel repair).
? Distal clavicular excision.
? Dynamic muscle transfers.
? Disadvantages of surgery are that there are risks of infection, a longer time to return to full function and continued pain in some cases.
For the individual with a chronic AC joint dislocation or subluxation that remains painful after three to six months of closed treatment and rehabilitation, surgery is indicated to improve functioning and comfort.
For sequelae of untreated type IV-VI, or painful type II and III injuries, the Weaver Dunn technique is advocated. This�entails removing the lateral 2cm of the clavicle and reattaching the acromial end of the coracoacromial ligament to the cut end of the clavicle, thus reducing the clavicle to a more anatomical position.
Postoperatively, the arm is supported in a sling for up to six weeks. Following the first two weeks, the patient is permitted to use the arm for daily activities at waist level. After six weeks, the sling or orthosis is discontinued, overhead actions are allowed, formal passive stretching is instituted, and light stretching using elastic straps is initiated. Stretching and strengthening are begun slowly and gradually. The athlete shouldn’t return to their sport without restriction until full strength and range of motion has been recovered. This usually occurs four to six months following operation.
Conclusion
AC joint injuries are an important source of pain at the shoulder area and have to be assessed carefully. The management of these injuries is nonoperative in the majority of cases. Type I and II injuries are treated symptomatically. The present trend in uncomplicated type III injuries are a non operative strategy. In the event the athlete develops following problems, a delayed reconstruction might be undertaken. In athletes involved in heavy lifting or prolonged overhead activities, surgery may be considered acutely. Type IV-VI injuries are generally treated operatively.
No matter what kind of treatment is chosen, the ultimate purpose is to restore painless function to the wounded AC joint so as to reunite the athlete safely and as quickly as possible back to their sport. It is possible in the vast majority of acromioclavicular joint injuries.
References
Reza Jenabzadeh and Fares Haddad
1. Rockwood CA Jr, Williams GR, Young CD. Injuries of the Acromioclavicular Joint. In CA Rockwood Jr, et al (eds), Fractures in Adults. Philadelphia: Lippincott-Raven, 1996; 1341-1431.
2. Dias JJ, Greg PJ. Acromioclavicular Joint Injuries in Sport: Recommendations for Treatment. Sports Medicine 1991; 11: 125-32.
3. Adams FL. The Genuine Works of Hippocrates (Vols 1,2). New York, William Wood 1886.
4. Bosworth BM. Complete Acromioclavicular Dislocation. N Eng J Med 2 41: 221-225,1949.
5. Nielsen WB. Injury to the Acromioclavicular Joint. J Bone Joint Surg 1963; 45B:434-9.
6. Allman FL Jr. Fractures and Ligamentous Injuries of the Clavicle and its Articulation. J Bone Joint Surg Am 1967;
49:774- 784.
7. Powers JA, Bach PJ: Acromioclavicular Separations: Closed or Open Treatment? Clin Orthop 1974; 104 (Oct): 213-223
8. Cox JS: Current Methods of Treatment of Acromioclavicular Joint Dislocations. Orthopaedics 1992; 15(9): 1041-1044
9. Clarke HD, Mc Cann PD: Acromioclavicular Joint Injuries. Orthop Clin North Am 2000; 31(2): 177-187
10. Press J, Zuckerman JD, Gallagher M, et al: Treatment of Grade III Acromioclavicular Separations: Operative versus
Nonoperative Management. Bull Hosp Jt Dis 1997;56(2):77-83
11. Galpin RD, Hawkins RJ, Grainger RW: A Comparative Analysis of Operative versus Nonoperative Treatment of Grade III Acromioclavicular Separations. Clin Orthop 1985; 193 (Mar): 150-155
12. Larsen E, Bjerg-Nielsen A, Christensen P: Conservative or Surgical Treatment of AC Dislocation: A Prospective, Controlled, Randomized Study. J Bone Joint Surg Am 1986;68(4):552-555
13. Bosworth BM. Complete Acromioclavicular Dislocation. N Engl. J. Med. 241: 221-225,1949.
Core chiropractor, Dr. Alexander Jimenez continues from part I through the core stability routines.
Menu 6: Pulley, Standing
This menu challenges pelvic stability during unilateral standing upper body movements. The kinds of arm movements undertaken in many sports create strong rotational forces that have to be controlled by the trunk and pelvic muscles. The aim of these exercises, therefore, is to develop co-ordination and control of the pelvis.
Research has shown that unilateral exercises increase the recruitment of the core musculature. The core and pelvic muscles will all be using static contractions to hold the required postures, while the upper body muscles will be producing the limb movements. The resistance load on the arm is secondary to the stability challenge of the core. Overall this menu is intermediate.
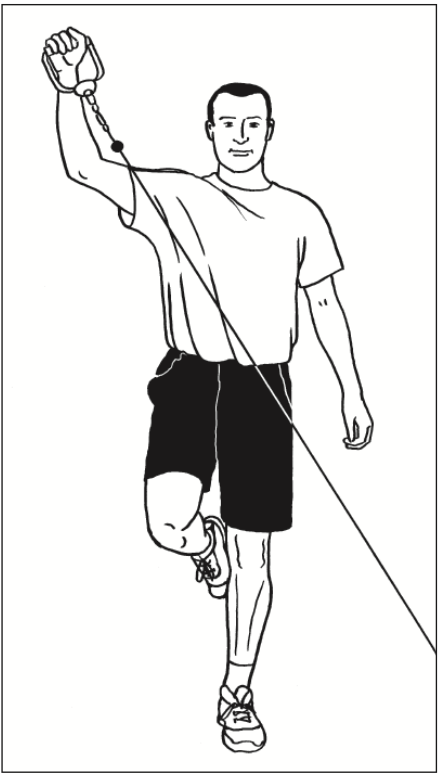
Rear Sling
Overview: The challenge of this exercise and its pair (see opposite) is to establish perfect pelvic alignment, while standing on one leg, against a rotational force from the upper body.
Technique: Stand on one leg to the side of the pulley column. Handle is attached at below-hip height. Grasp the handle with the hand on the opposite side (opposite to standing leg). Set perfect posture and pelvic alignment.
Brace the core and then pull the weight up and around the body, keeping the elbow straight, so that the arm rotates up
and out. Finish with hand above your head and out to the side slightly. The aim is to maintain perfect balance and pelvic
alignment as you raise and lower the arm diagonally. Reposition to repeat exercise for opposite leg/arm.
Perform 10 reps each side increasing to 20 reps; 2 to 3 sets.
Progression: Increase the weight.
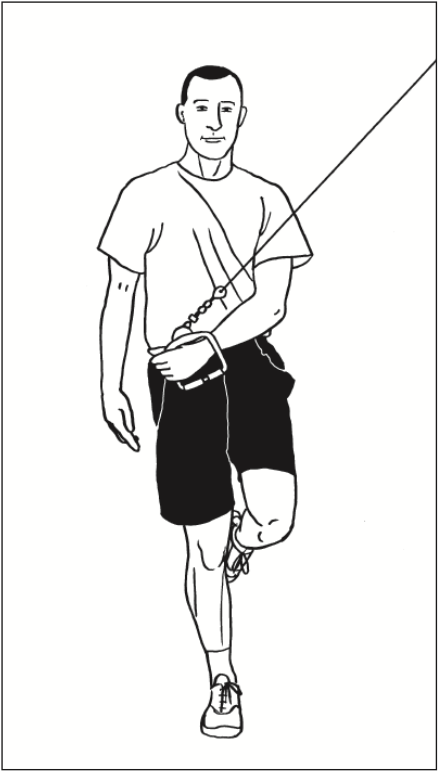
Front Sling
Overview: This is the natural opposite of the rear sling exercise. It involves a forward arm rotation, which must be controlled.
Technique: Stand on one leg to the side of pulley column. Handle is attached at above shoulder height. Grasp the handle with the arm nearest the column (opposite side to standing leg). Set perfect posture and pelvic alignment.
Brace your core; pull the weight down and around the body, keeping the elbow straight so that the arm rotates down and round. Finish with hand next to your hip across your body. The aim is to maintain perfect balance and pelvic alignment as you lower and raise the arm. Reposition to repeat with opposite leg/arm.
Perform 10 reps each side, increasing to 20 reps; 2 to 3 sets.
Progression: Increase the weight.
One Leg, One Arm Rowing
Overview: The challenge of this exercise is to maintain stability while standing on one leg and controlling against a pulling force from the upper body. The pelvis must stay fixed when the upper back and shoulder are pulling backwards.
Technique: Stand on one leg, facing the pulley column. Handle is attached at waist height. Grasp the handle with the opposite arm (same side as lifted leg). Your hand will be out directly in front of you in the start position. Set perfect posture and pelvic alignment, standing tall with shoulders back.
Brace your core; pull on the cable, leading with the elbow in a rowing movement Finish with hand by your side and elbow behind you. The aim is to maintain perfect balance and pelvic alignment as you perform the rowing movement. Reposition to repeat with opposite leg/arm.
Perform 10 reps each side; 2 to 3 sets.
Progression: Increase the weight.
Menu 7: Medicine Ball, Floor
The four exercises in this menu all involve throwing and catching the medicine ball while performing a trunk flexion or rotation movement. The action of throwing the ball during the muscle-shortening phase of each of the exercises increases the force production of the trunk muscles. The action of catching the ball at the start or during the muscle-lengthening phase of each exercise not only increases the force production but also the overall stability challenge.
The impact that the catch has on the upper limb has to be controlled by the trunk. You should be aiming to maintain good spine alignment and correct movement while making the catch. Only use a weight of medicine ball that will allow you to perform the exercises with good technique. If the ball is too heavy, you will sacrifice core stability, irrespective of your arm strength.
Overall these exercises are advanced. However they are also safe and effective for young athletes using light medicine balls to develop dynamic trunk movement and control.
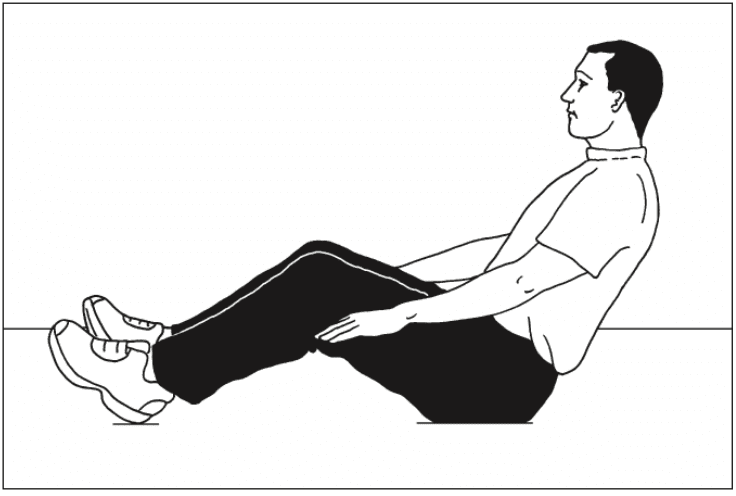
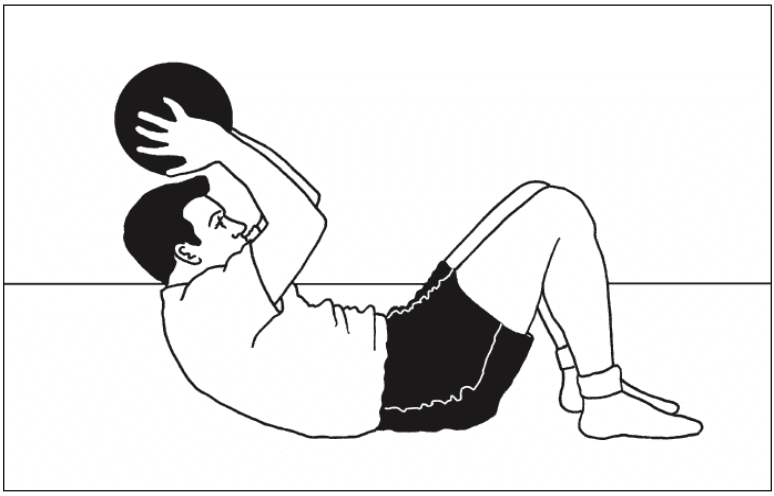
Sit Up & Throw
Overview: An advanced version of a sit-up exercise, in which the throwing action makes the crunch phase faster and the catching action adds load to the return phase.
Level: Advanced
Muscles targeted: Abdominals (Plus upper body)
Technique: You will need a partner to receive and pass the ball. Alternatively perform the exercise in front of a wall and use a medicine ball that will bounce back.
Start in the sit-up position (knees bent) with hands up ready�to receive the ball. Catch the ball and begin to lower back down. Do not collapse back down, control it with the abs and keep hands above the head as you lower down.
Once shoulders are touching the floor (keeping head up and eyes forward), reverse the movement. Throw the ball forward and crunch up at the same time. Follow the throwing action and complete the sit-up as fast as possible. Make sure you crunch as you throw so that the abs contribute to the force of the throw and help you sit up faster. Men should start with a 5kg ball; women with a 3kg ball.
Perform 10 to 20 reps; 2 to 3 sets
Progression: Progress to heavier ball once 3 sets of 20 reps is comfortable
45-degree Sit, Catch and Pass
Overview: A very tough stability exercise that requires massive trunk musculature co-contraction to hold a good spine alignment against the impact of making the catch.
Technique: Sit up with knees bent and lean back at 45 degrees. Aim to hold a �lengthened� spine, with lumbar spine in neutral, shoulders back and neck long and relaxed. It takes a fair amount of control and strength endurance simply to hold this posture perfectly. Aim to get this right before progressing on to the catch and pass.
Raise hands in front of your face and receive a pass from a partner, around this height. As you catch the ball you must hold the long spine position. Do not flex the low back, or become round-shouldered. Gently throw the ball back. Men should start with a 3kg ball; women with a 2kg ball.
Complete a few passes, holding the position for 30 seconds. Perform 2 to 3 sets.
Progression: Raising the hands to above head height makes the stability challenge of the catch significantly harder. Catches made to either side of the head are also more challenging.
Sit & Twist Pass
Overview: A trunk rotation exercise involving catching and passing the medicine ball, which provides a challenge to the obliques to produce powerful rotation, but also pelvic stability, so that the sitting position is stable throughout the movement.
Level: Advanced
Muscles targeted: Abdominals, Obliques
Technique: Sit up with knees bent and lean back at 45 degrees. Aim to hold a �lengthened� spine, with lumbar spine in neutral, shoulders back and neck long and relaxed. Your feet, knees and hips should remain reasonably still throughout this exercise, the rotation coming from your waist and not your hips.
Hold hands to one side ready to receive the ball. Catch the ball to one side and absorb the catch by turning your shoulders further to that side. Reverse the rotation, turning back to the middle and release the ball. Continue rotating to the other side; receive the ball the other side and continue. Ensure you�can hold good posture throughout the movement, with a long spine and wide shoulders. Men should start with a 4 to 5kg ball; women with a 2 to 3kg ball.
Perform 10 to 20 reps.
Progression: Increase the weight of the ball once you can perform a set of 20 reps comfortably with perfect technique.
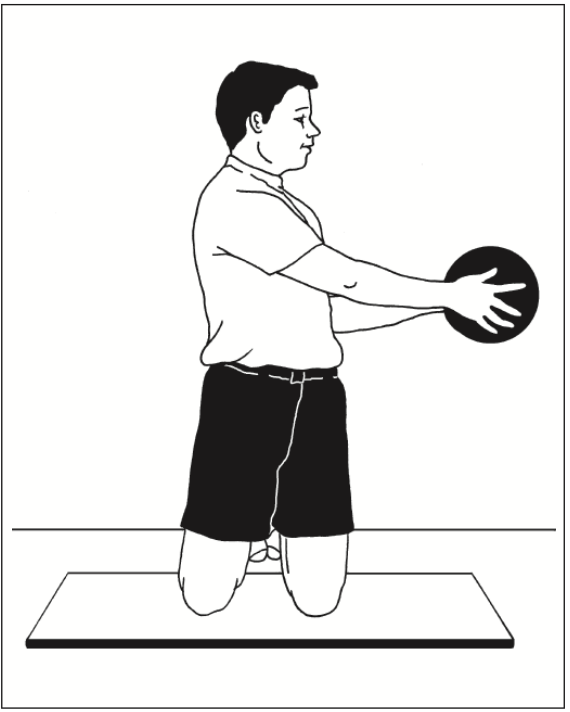
Kneeling Twist Pass
Overview: To perform the rotation movement in this position demands a greater range of motion, helping to develop strength through the full range of trunk rotation. It may also help to develop trunk rotation range of movement.
Level: Intermediate to advanced
Muscles targeted: Obliques
Technique: Kneel upright with good posture (lumbar spine in neutral, chest out, shoulders low). Start with the ball in hands and twist shoulders and head round as far as you can. Then, under control, twist around to the other side as far as possible, and hand the ball to partner. Turn back to the start position, receive the ball again and continue.
The aim of the movement is to rotate through the biggest shoulder turn you have. You can allow the hips to rotate a little with the shoulders, but not too much. You should feel a stretch in the side at the end of each twist.
As you gain greater flexibility and stability you will be able to�fix your pelvis square to the front and rotate through an increasingly full range of motion. Men should start with a 5 to 6kg ball; women with a 3 to 4kg ball.
Perform 10 reps then take the ball to the opposite side and repeat.
Menu 8: Medicine Ball, Standing
The aim of this menu is to perform trunk movements while standing on one leg. This is functional training for balance in sports and daily living activities. These exercises are advanced because of the requirements for lower limb balance and body movement awareness, which makes controlled performance of these trunk movements quite difficult. These moves also use the hip rotator and abductor muscles for control and stability.
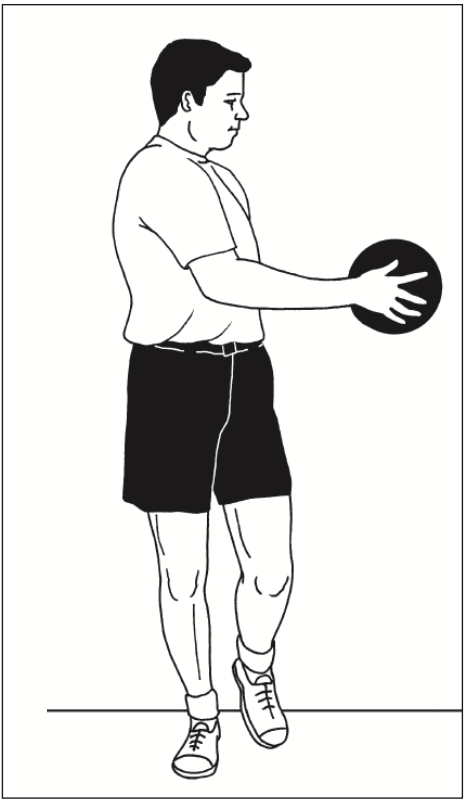
One-leg Twist Pass
Overview: A trunk rotation exercise performed on one leg. This requires good pelvic stability at the hip of the standing leg, for the trunk rotation to be dissociated from the pelvis.
Technique: Stand on one leg with hips facing square to the front. Hold medicine ball slightly out in front. Slowly twist from side to side. The rotation comes from the waist only,�head turning with the shoulders. Keep pelvis fixed square and knee in line with second toe throughout. Men should start with a 5 to 6 kg ball; women with a 3 to 4 kg ball.
Perform 10 slow reps; 2 to 3 sets. Repeat on other leg.
Progression: Swap the ball for a pulley machine and add resistance, once you have mastered the controlled balance on one leg.
One-leg Deadlifts with Rotation
Overview: An advanced exercise for the posterior chain of muscles, which includes rotation to challenge control of pelvis.
Level: Advanced
Muscles targeted: Erector spinae, Gluteals (max and med) Hamstrings, Piriformis
Technique: Stand on one leg. Flex the free leg a little at the knee to lift it off the floor, but do not flex or extend the hip of the free leg throughout the movement, in order to keep pelvis in control. Hold the ball in front of you.
Bend down, flexing at the knee and the hip. Lower down until the ball touches the floor by your foot, all the time keeping your arms straight and without reaching excessively with your upper back (ie, maintain a reasonably flat back). Stand back up, pushing down through the foot to use your gluteals correctly to extend the hips.
Alternate between touching the ball down on the inside and then the outside of the standing foot. This means you are internally or externally rotating the hip on alternate repetitions, challenging control of hip rotation. Keep the knee in line with�second toe as much as possible throughout. Men should use a 5kg ball; women use a 3kg ball.
Start with 5 slow controlled reps, 2 to 3 sets. Build up to 10 reps. Repeat on the opposite leg.
Progression: Increase the weight of the ball or use a dumb-bell as you get stronger.
One-leg Catch & Pass
Overview: The main aim of this exercise is to control the impact of the catch without losing balance or rotating excessively at the hips. It�s all about how effectively you can anticipate the impact and produce the required stiffness throughout the body to retain good posture and control. This is a very useful �reaction�-type stability exercise.
Level: Advanced
Muscles targeted: Everything
Technique: Stand on one leg with good posture (lumbar spine neutral, chest out, shoulders wide) and with hips square to the front. Hold hands up ready to catch. Receive catches anywhere within arm�s reach. Make sure the passes are varied in their placement. Aim to restrict movement to arms and/or turning your shoulders, keeping the pelvis and lower limb stable. Use a 2 to 3kg ball that is not too big, so it is easy to catch.
Start with 30 sec bouts of catch and pass on each leg; 2 to 3 sets.
Progression: Receive more forceful passes so the impact of the catch is greater.
Menu 9: Resistance-Based
Menu rationale
The aim of these three exercises is to progress the loading in order to build high-level trunk muscle strength. These exercises can be performed in the 5- to 10-repetition range with a suitably high weight for this number of reps. As you get stronger, you should prioritize an increase in weight rather than an increase in the number of reps. Overall, these exercises are very advanced.
Crunch with Weight
Overview: The standard isolated abdominal exercise with increased load.
Level: Advanced
Muscles targeted: Abdominals
Technique: Perform the crunch in the usual way: knees bent, low back flat, head up and looking forward. Curl the shoulders up and down using just the abdominals. The weight (medicine ball, dumb-bell or barbell weight plate) should be held above or behind the head. Arms are fixed, all they do is hold the weight in place. Do not use arms to move the weight relative to head as the crunch is performed. Keeping the elbows out helps to achieve this.
Perform 5 to10 reps; 2 to 3 sets.
Progression: Increase weight, maintaining the range of 5 to 10 reps per set.
Reverse Hypers
Overview: An excellent hip and back extension exercise to which it is very simple to add load.
Level: Advanced
Muscles targeted: Erector spinae, Gluteals
Technique: Lie on your front on a horizontal bench, with hips just off the end of the bench. Grasp bench legs firmly for support. Your legs should be straight with a dumb-bell between the ankles for resistance. Squeezing the gluteals, extend hips and lift legs and the dumb-bell off the floor. Stop when your back is slightly hyper-extended and hips are fully extended. Lower slowly until feet are just off the floor and continue.
Perform 8 to 10 reps; 2 to 3 sets.
Progression: Increase weight, maintaining the range of 8 to 10 reps per set.
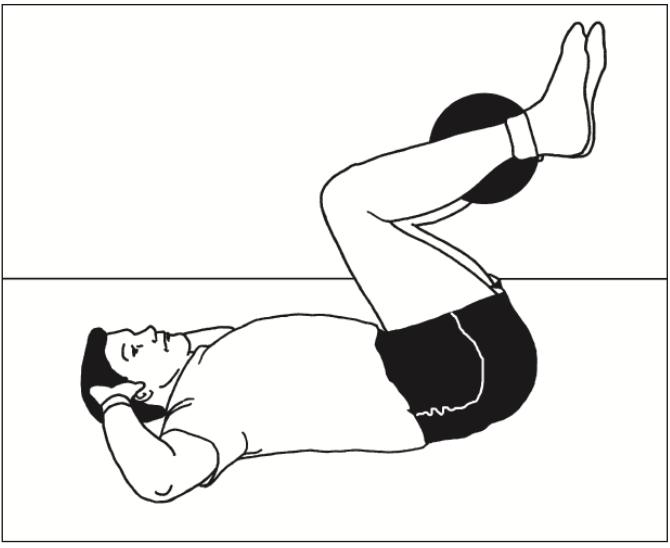
Reverse Crunch with Weight
Overview: This is a great exercise, as it requires good co- ordination and strength. Research shows that the obliques as well as the abdominals work very hard during this exercise, making it excellent value.
Level: Advanced
Muscles targeted: Abdominals, Obliques
Technique: Lie on back with hands behind head and elbows out to the sides. Knees should be bent and heels close to bum. Hold weight between your legs. Initiate the movement by curling the pelvis upwards (flattening the back into
the floor) and then continue to use the abs to pull the low back and pelvis off the floor. This is the bit that requires good co- ordination, as the temptation is to kick with the legs and pull the hips up with the hip flexors. Learn to focus on the abs before you add weight, as if you do this strictly it is very tough, especially for women (whose pelvises are relatively heavier).
Perform 5 to 10 reps; 2 to 3 sets.
Progression: Increase weight, maintaining the range of 5 to 10 reps per set.
Menu 10: Hanging Bar
Menu rationale
The aim of these three exercises is to work the abdominals as hard as possible with very advanced, gymnastic-style movements. Reasonable upper body strength is required for these exercises.
Hanging Leg Lifts
Overview: This exercise requires you to lift the full weight of your legs and (if possible) your pelvis, while hanging from a bar. Anyone who can perform these movements well through a good range of motion has achieved good strength.
Level: Advanced
Muscles targeted: Abdominals, Obliques, Hip flexors
Technique: Hang from a bar with arms straight. Lift knees, bringing them up as high as possible. At the top of the movement the knees should be near the chest and pelvis should be curled upwards (low back flexed). This extra curl of the pelvis ensures that the abdominals are working maximally. Do not kick legs up or swing the body excessively. Simply draw up knees, crunching as you lift. It is important to feel that the abdominals are doing the lion�s share of the work rather than the hip flexors or front of thigh muscles.
Perform 5 to 10 reps;, 2 to 3 sets.
Progression: Perform the same exercise with straight legs, lifting them up to 90 degrees in front of you, curling the pelvis at the top of the movement.
Windscreen Wipers
Overview: The ultimate ab-buster. Anyone who can do 10 reps of this exercise with good technique has a very strong core!
Level: Super advanced
Muscles targeted: Abdominals, Obliques, Hip flexors
Technique: Hang from bar with arms straight. Lift legs up in the air until feet are at approx head height. Maintaining the height of the lift, take the legs from side to side in an arc. The movement will look like a windscreen wiper, moving from side to side. Aim for at least 45 degrees of movement to each side.
Perform 5 to10 reps; 2 to 3 sets.
Progression: The straighter the legs, the harder the exercise. Increasing the range of movement to each side also makes it tougher.
Candlesticks
Overview: Another beauty! Lots of strength required to control this movement; only for the very strong.
Level: Super advanced
Muscles targeted: Abdominals, Obliques, Hip flexors
Technique: Lie flat and raise yourself up to a shoulder stand position, holding on to a bench/table leg/partner’s leg with your hands above your head. Establish a fully extended hip and leg position and then begin to lower your body down slowly to the floor. The body should move in an arc as a single unit (no sagging in the back, or bending at the hips or knees). Lower under control from vertical to just above horizontal.
Gripping firmly for stability, lift your body back up into shoulder stand, again keeping everything straight and aligned in a single unit.
Slow and controlled movement on the way down will help, and a maximal contraction of everything will get you back up.
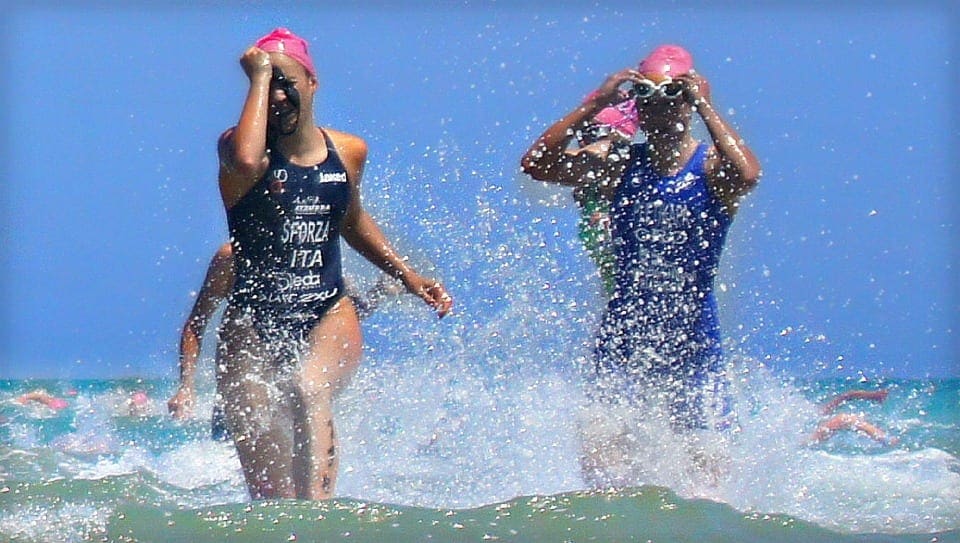
For many athletes following any major endurance event they will return to their houses, to recover, celebrate, reflect and rebuild to their next career step. Some, like the athlete in this case study will need to now focus attention on delayed decisions concerning whether to go under the knife to sort out a chronic injury.�El Paso, TX’s Injury scientist, Dr. Alexander Jimenez takes a look at the study.
My client has been competing in triathlon for 10 or more years, although his career has included a range of serious injuries which have kept him from races for months on end. In the previous two to three decades, however, he’s enjoyed a sustained period of injury-free training and racing, and has climbed to the peak of the world rankings. But the emergence of hip pain has seen him once more return to the physio’s table.
The triathlete’s accident history highlights a common pattern among sportspeople: 2 tibial stress fractures, a femoral neck stress fracture and a serious ankle sprain — every one of these on his right side. The significant contributing element to the bone stress injuries is a 1.5cm leg-length gap (his right leg is shorter).
He’d first experienced comparable hip pain in 2004; it kept him from running for three months. At that time, nothing was detected on a bone scan or MRI, or so the pain went paralyzed. An intra-articular cortisone injection (CSI) elicited no improvement. The athlete remembers that he chose to train on his painful hip, never allowing the symptoms to settle. The nearest he ever came into an investigation was a hypothesis that he could have a little, undetected, labral lesion.
The present episode of hip pain began initially at night after a hard three-hour bicycle ride. Earlier this, however, he hadn’t cycled for five times. He described his initial symptom as a profound hip tightness (lateral and lateral), together with slight pain in his groin. He was able to continue to train however, was feeling that the hip tightness and pain following both cycling and running (swimming was symptom-free).
A week later his symptoms dramatically worsened when he flew from Australia to Singapore, on his way to a French high- altitude camp. As he got off the airplane, he felt deep hip pain as well as the tightness. As elite athletes tend to do, he coached anyway, running a tricky track session, which made the hip much worse: he was unable to ride or run without pain. He instantly started a course of anti- inflammatories.
I met him in Singapore and evaluated him in the airport, initially ruling out any prospect of a disease or systemic matter. He explained he had been feeling an ache during the night, lying in bed; on waking, the hip would be OK, but got worse the longer he walked.
On assessment, he had the following physical signs:
� walking with obvious limp
� pain on hopping (6/10)
�painful right hip quadrant/impingement test (full hip flexion/adduction)
� reduced right hip flexion (-10 degrees compared to left)
� reduced right hip internal rotation (-10 degrees compared to left)
� increased tone on palpation of TFL, adductors, hip flexors, gluteal, piriformis and deep rotators
� lumbar spine and SIJ were OK
� femoral shaft bone stress test was OK � leg length discrepancy (right side 1.5cm shorter)
� right innominate (pelvis) anteriorly rotated
� weakness in right hip abductors/extensors
� reduced calf endurance on right side (-5 reps)
� ankle dorsiflexion range of movement was OK
� reduced proprioception on right (single leg stance, eyes closed).
I thought the differential diagnoses were:
� femoral neck stress fracture
� labral tear, possibly with hip synovitis
� FAI (femoro-acetabular impingement), possibly with hip synovitis.
I initially treated the triathlete with soft- tissue techniques to reduce the tone around the hip joint. Trigger-point releases were performed on his TFL, adductors, gluteals, piriformis, deep rotators and iliopsoas.�This reduced his jump pain into 3/10. Manual long-leg grip further decreased the strain on hopping (2/10). He still had pain and stiffness on walking but it sensed “simpler. As he prepared to embark on his long run flight to Europe, I counseled him to not sit for too long and maintain his stylish as straight as possible to decrease any potential impingement from hip flexion.
Luckily, the hip didn’t get worse throughout the flight. On arrival at the French high-altitude training centre, we initiated a strategy of two swims and two intensive treatments a day, aiming at reducing muscle tone, restoring his range of hip movement and normal muscle control and stamina. We had been expecting that the problem was not a stress fracture, but just minor hip synovitis that could settle quickly. Following a week of conservative treatment, though, we were just able to keep his hop pain in 2/10, and that he still could not run 20 meters without any pain and limping.
In collaboration with medics, we flew to London to see a sports doctor and get MRI scans. The scans revealed no bone stress reaction, fracture or labral ripping — which was a big relief; however, it did show signs consistent with FAI (femoro-acetabular impingement). He had hip synovitis with a rectal lesion on his femur.
Hip injuries aren’t much reported among triathletes — in fact they are notably absent from reports on Olympic and Ironman triathlons, which mention knee, back, H/ Achilles, lower leg, ankle and shoulder as the most common accidents (1-3).
In this state, when the hip is in maximum flexion and internal rotation, the labrum and cartilage abut and impinge; damage to the articular cartilage and acetabular labrum results from this pathologic bony contact. The contact generally results in a structural abnormality of the femur (“camera impingement”) along with the acetabulum (“pincer impingement”) or a combination of both (“mixed impingement”). Over time, via repetitive micro-trauma, the aggravating motion hurts the hip cartilage or labrum (or both) during normal joint motion. This happens along the anterior femoral neck and the anterior–superior acetabular rim. FAI is a possible trigger of early hip joint degeneration (4).
Arthroscopic surgery is the direction of choice for FAI if symptoms do not settle; however as his next Competition was only three and a half a year off, surgery was not an option. Instead, over a five-day interval, the athlete had two cortisone (CSI) and local anesthetic injections into the hip joint (under ultrasound guidance) to settle the indicators.
Our aim was to grow the hip range of motion and extend the capsule to reduce any additional impingement, slowly returning to regular training. Following the competition, the athlete would then should see a hip arthroscopic surgeon to acquire a surgical opinion to the best option for long-term direction.
Injection Relief
After both shots my customer felt sore for five days. The initial CSI settled his pain on hopping to 1/10 and after seven days he managed to operate without symptoms. But minor hip stiffness and aching at the end of the day prevented him from progressing to optimal training, so that he then underwent a second steroid injection. This settled the hop pain into 0/10 and decreased the aching; so after five times he returned to mild cycling and after seven days he started running again, also.
The athlete admitted that, following the first shot, he had done more and gone tougher in training than directed, as he had felt “good. This mistake of “too much too soon — all too common in elite athletes — had led to excessive inflammation and aching in the hip nightly after training. After the next injection he returned to normal intensity slower and more gradually.
My client built his training up to regular levels by four months following the final injection (swimming five times per week, cycling four days and running six to seven days). He began with very easy cycling on a wind trainer for 30 minutes, building slowly to 90 minutes before cycling on the street. He cycled two days on and one day away and avoided hills to the first two weeks. He started jogging on the apartment for 15 minutes and slowly built up to 90 minutes after three weeks. He did not run hills or about the track; and as he ran only on every single day, he would diligently concentrate on technique.
From week six to week 11, my client remained on anti inflammatory medication and underwent two treatments a day.
The hands-on treatment continued to:
� increase hip range of movement
� stretch the hip capsule
� normalise pelvic symmetry and hip muscle tone
� improve muscle control and strength � improve proprioception
� ensure optimal biomechanics via video assessment (cycling and running).
Eleven weeks after he first felt his hip pain, the triathlete returned to racing; however he failed to finish the first race, partially because of minor hip stiffness but mainly due to “fitness. Fortunately there were not any prolonged symptoms after the race and a week after he successfully returned to competition, coming second in a really strong field. His very minor ongoing symptoms were handled with anti-inflammatory drugs and hands-on treatments.
If this athlete wants to pursue a long- term triathlon career up to the London Olympics, then he will now require surgery. The arthroscopic surgical technique initially assesses the cartilage and labral surfaces, debrides any abnormalities of the hip joint cartilage and hip labrum, removes the non-spherical segments of the femoral head�and any prominent sections of the anterior femoral neck and bony growths on the acetabular rim that may continue to contribute to hip joint impingement.�The alternative is early joint degeneration and onset of osteoarthritis.
References:
1. Wilk B et al: �The incidence of musculoskeletal injuries in an amateur triathlete racing club�. J Orthop Sports Phys
Ther 1995 Sep;22(3):108-12.
2. Collins K et al: �Overuse injuries in triathletes. A study of the 1986 Seafair Triathlon�. Am J Sports Med 1989 SepOct;17(5):675-80.
3. Korkia PK et al: �An epidemiological investigation of training and injury patterns in British triathletes�. Br J Sports Med 1994 Sep;28(3):191-6.
4. Ganz R. et al (2003): �Femoroacetabular impingement: a cause for osteoarthritis of the hip�. Clin Orthop Relat Res. 417:112�120. For more information see: www.hipfai.com
IFM's Find A Practitioner tool is the largest referral network in Functional Medicine, created to help patients locate Functional Medicine practitioners anywhere in the world. IFM Certified Practitioners are listed first in the search results, given their extensive education in Functional Medicine
 CrossFit originated as a plan for military forces, police and fire departments, as well as other such organizations to keep their members in the very best shape in their lives. CrossFit has taken the country by storm encouraging anyone from grandparents to specialized elite military personnel to join this growing fitness movement, today.