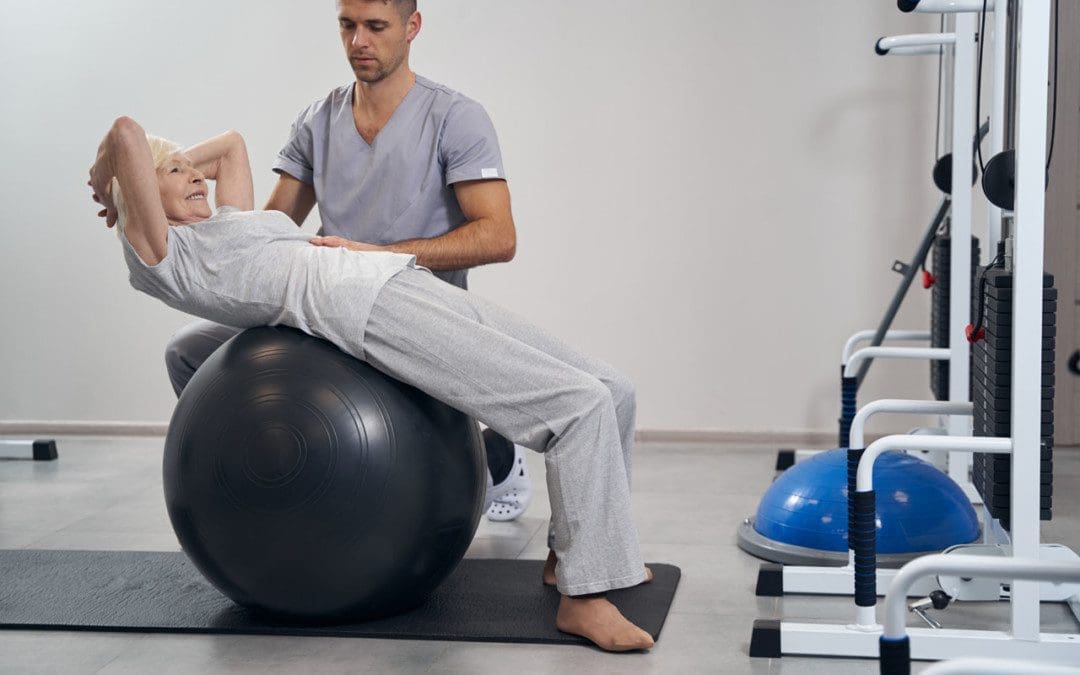
Body Flexibleness: The body loses a small amount of flexibility during normal aging. Decreased body flexibility can negatively impact everyday life by preventing normal function. If the muscles are not taken through their full range of motion to maintain length, strength is lost, and decreased flexibility increases. This can happen from:
Water loss in the tissues and spine.
Increased stiffness in the joints.
Loss of elasticity throughout the muscle tendons and surrounding tissues.
Body Flexibleness
Individuals of all ages struggle with flexibility, but there is a difference in age stiffness. However, a sedentary lifestyle can make everyday activities feel more strenuous than before. Less flexibleness can also cause pain. For example, if the muscles in the front of the legs become tight, it can limit movement in the pelvis and hips, leading to low back pain.
Several problems can result from decreased flexibility, including:
Shorter steps while walking.
Slower walking speed.
Back pain.
Increased risk of falls.
Flexibleness improves overall movement and helps prevent simple strains and injuries, including:
Back injury.
Muscle strains.
Shoulder injury.
Hip injury.
Leg injury.
A stretching program for the hip muscles can improve walking speed and step length. This will result in improved walking function with improved and increased control, decreasing the risk of injury. Step length is also critical in preventing injuries. More distance while walking and longer steps mean better balance, making it essential to maintain flexibility in the leg muscles.
Chiropractic Decompression
Routine chiropractic adjustments and spinal decompression can slow the progression of joint degeneration, improve movement, and decrease the risk of injury. When the vertebrae are properly aligned, the entire body operates at its optimal level. There is proper lubrication of joints and muscles, improving mobility and function and removing stress on the nerves, muscles, ligaments, and tendons. Chiropractic treats the joints, bones, and muscles to improve body flexibleness through manual and motorized decompression, adjustments, and massage, combined with health coaching, nutrition, stretching, and exercises to do at home.
DRX Spinal Decompression
References
“American College of Sports Medicine Position Stand. The recommended quantity and quality of exercise for developing and maintaining cardiorespiratory and muscular fitness, and flexibility in healthy adults.” Medicine and science in sports and exercise vol. 30,6 (1998): 975-91. doi:10.1097/00005768-199806000-00032
Choi, Jioun, et al. “Influences of spinal decompression therapy and general traction therapy on the pain, disability, and straight leg raising of patients with intervertebral disc herniation.” Journal of physical therapy science vol. 27,2 (2015): 481-3. doi:10.1589/jpts.27.481
Tseng, Shiuan-Yu, et al. “Effect of Two Frequencies of Whole-Body Vibration Training on Balance and Flexibility of the Elderly: A Randomized Controlled Trial.” American journal of physical medicine & rehabilitation vol. 95,10 (2016): 730-7. doi:10.1097/PHM.0000000000000477
All around the world, everybody suffers from low back pain at some point in their lives. Due to strenuous activities, injuries, or accidents that cause strain on the back, many individuals will feel a wide range of symptoms that are caused by low back pain. From a dull, mild ache to a sudden, sharp, throbbing pain can hinder a person’s quality of life. This is due to disc herniation on the spine and can cause painful symptoms to pop up over time if it is not treated. Luckily there are treatments for spinal disc herniation that can improve the quality of life for a person. In, today’s article, we will be taking a look at posterolateral herniation, its symptoms, and how prone decompression therapy can help alleviate posterolateral herniation for many suffering individuals. By referring patients to qualified and skilled providers specializing in spinal decompression therapy. To that end, and when appropriate, we advise our patients to refer to our associated medical providers based on their examination. We find that education is the key to asking valuable questions to our providers. Dr. Alex Jimenez DC provides this information as an educational service only. Disclaimer
Can my insurance cover it? Yes, it may. If you are uncertain, here is the link to all the insurance providers we cover. If you have any questions, please call Dr. Jimenez at 915-850-0900.
What Is Posterolateral Herniation?
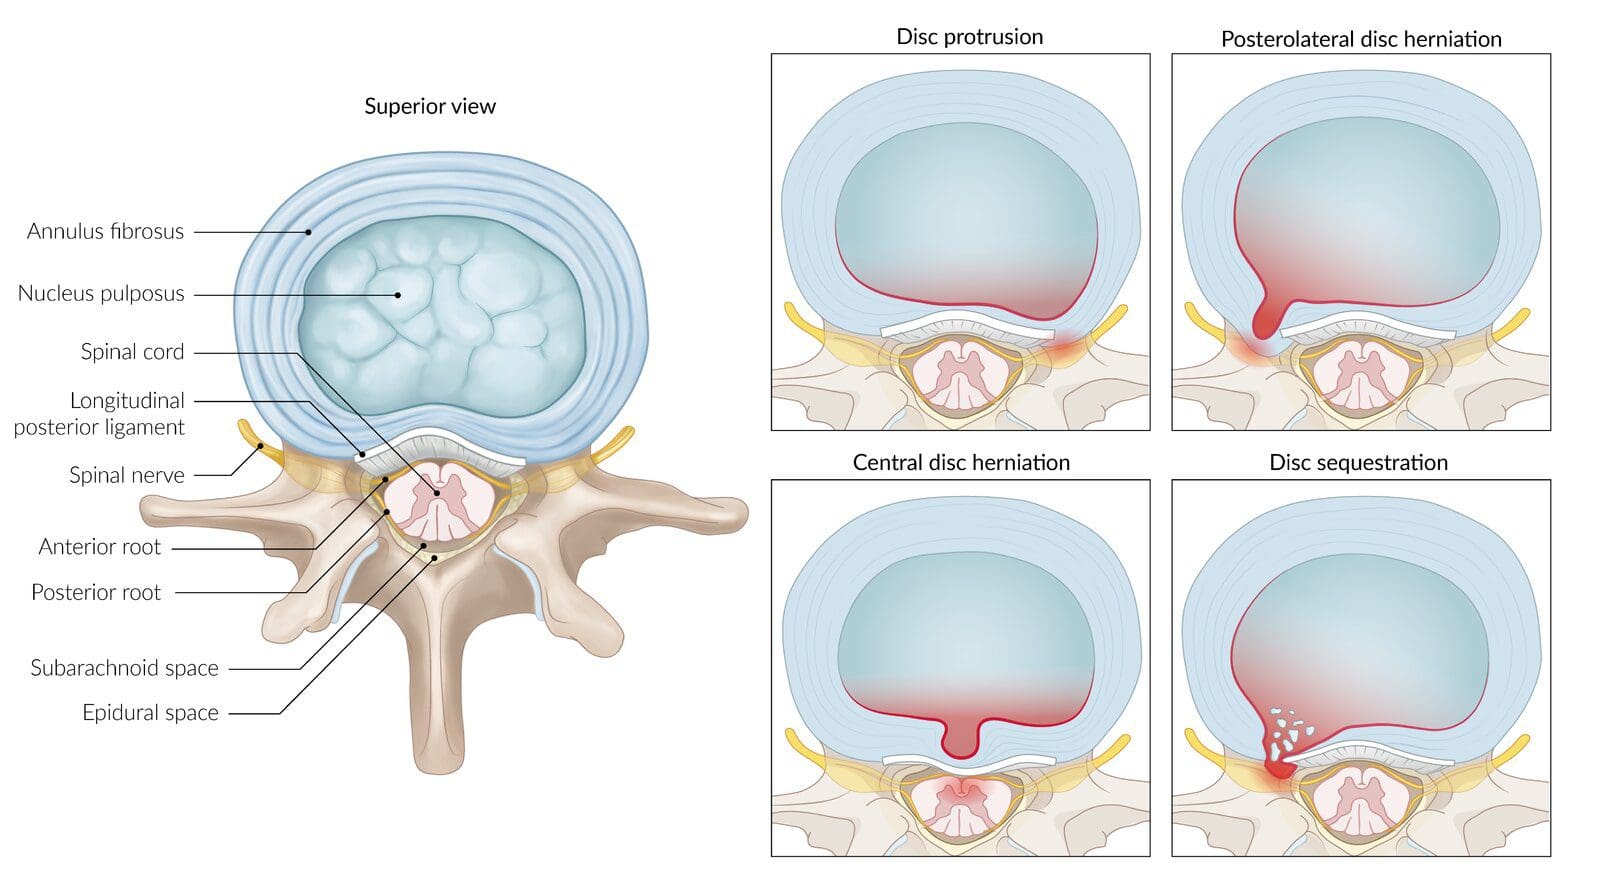
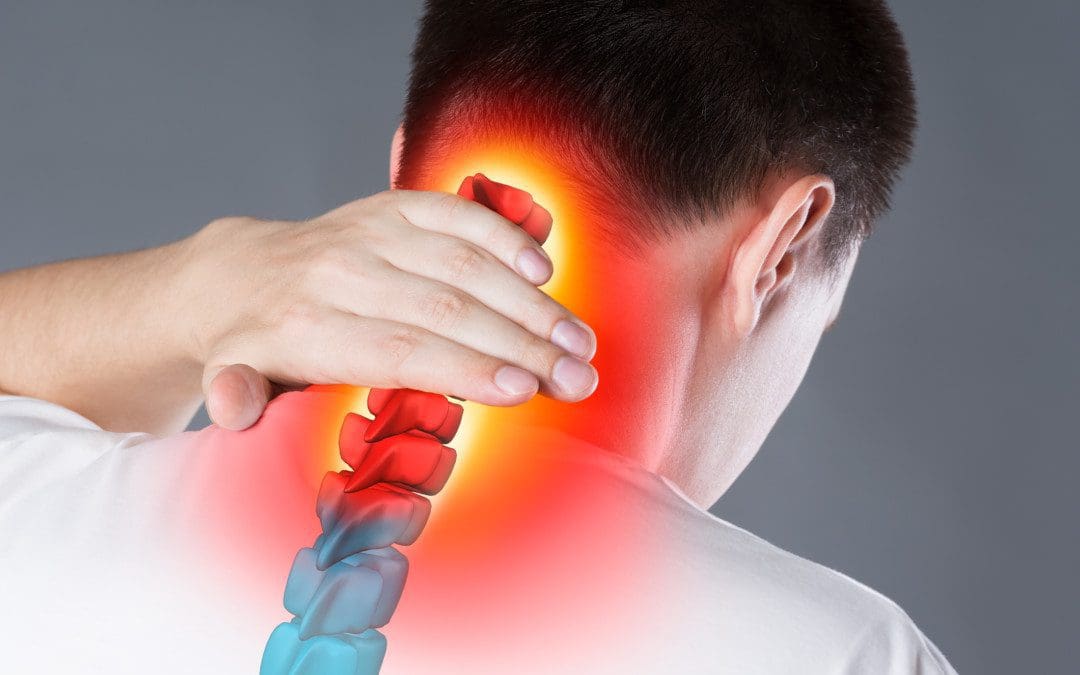
Do you ever feel discomfort in your back from staying in a position for too long? How about your lower back feeling tender to the touch when you are getting examined by your primary physician? Or how about feeling a wide variety of painful symptoms that can cause you to constantly lay down all day to get rid of the pain? You could be suffering from posterolateral herniation. Research studies have stated that when the inside of the spinal disc known as the nucleus pulposus is injured, it can protrude out to where the spinal nerve roots and the spinal cord are and compress them to cause the individual to be in pain. This will cause the spinal disc to be herniated, which usually happens during a spinal injury. It compresses the lowest spinal nerve root for posterolateral herniation to occur.
Posterolateral herniation usually occurs around the lumbar and cervical spine more than the thoracic spine. Other research studies have found that when posterolateral herniation occurs, it is due to the annulus fibrosis, which is the outer layer of the spinal disc, losing its integrity, causing the nucleus pulposus to protrude out compress the spinal nerve. Since the pressure is on the lumbar spinal nerve, research studies have also found that when the annulus fibrosis becomes thin on the posterolateral, it causes the nucleus pulposus to compress the nearest nerve root and causes the lack of support to the posterior ligaments on the spine.
The Symptoms Of Posterolateral Herniation
The symptoms of posterolateral herniation usually vary on how severe the pain is on the person, and where it is located plays a factor. For the lumbar spine, research studies have stated that the signs and symptoms of posterolateral herniation on the lumbar spine can cause sensory abnormalities, weakness in the lumbosacral nerve roots, and restricted flexion. When this happens, the person suffers from lower levels of disability, leg pain, and pain in the posterior knee. For the cervical spine, more research studies have stated that posterolateral cervical herniation on the cervical spine can cause ipsilateral pain to the neck, which can be dull or sharp. While also causes direct compression of the spinal cord and causes inflammation of the cervical nerve root creating numbness or tingling sensation down the arms and fingers.
Prone Decompression Therapy-Video
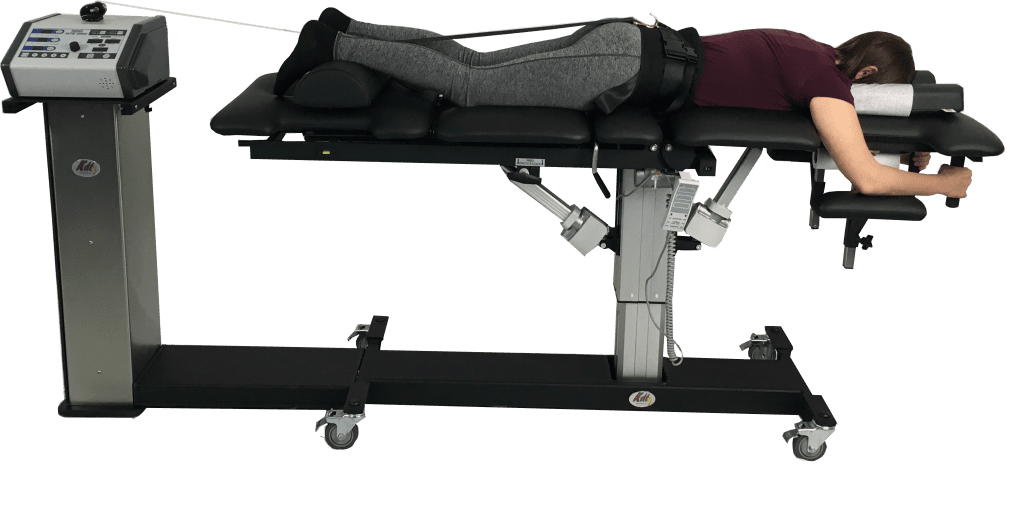
Feeling discomfort in your back after staying in a position for too long? How about feeling pain in your lower back, legs, and neck? Is the pain a dull, mild ache or a sudden, sharp nuisance? If you are experiencing any of these symptoms, then decompression therapy might be the answer you are looking for. The video above explains how decompression therapy can help alleviate the symptoms caused by posterolateral herniation on the spine. Decompression therapy utilizes traction to gently stretch the spine to take the pressure off the nerve root and decompress the herniated discs. This will allow the spinal disc to increase its height on the spine and allow the inner walls of the discs that are herniated to return to their original form. If you want to learn more about decompression therapy, this link will explain its benefits and how it can alleviate posterolateral herniation symptoms.
How Prone Decompression Therapy Alleviates Posterolateral Herniation
Since posterolateral herniation is primarily located in the lumbar spine, studies have stated that the loss of hydration and collapse of discs causes a strain on the fibers of the annulus fibrosis, making them become herniated and causing tears and fissures. When there are protrusions and herniations on the spine, prone decompression therapy can help alleviate those symptoms and help restore the spine. Research studies have found that prone decompression therapy allows more of a noticeable separation on the intervertebral discs and causes a decrease in muscle tension as well. With prone decompression, the posterolateral herniation will decrease since it takes the pressure off the nerve roots, causing the person to be in pain.
Conclusion
Overall, everybody has dealt with low back pain at some point. With a wide range of symptoms associated with low back pain, posterolateral herniation on the spine can cause many problems like pain, numbness, and tension on the nerve roots, ligaments, and muscles encompassing the spine. With prone decompression therapy, it can help relieve the herniated disc by taking it off the nerve root and alleviating the painful symptoms. Prone decompression therapy gently stretches the spine to return nutrients and oxygen to the compressed herniated discs. This allows many individuals suffering from herniated discs to feel instant relief and get back their quality of life.
References
De Cicco, Franco L, and Gaston O Camino Willhuber. “Nucleus Pulposus Herniation – Statpearls – NCBI Bookshelf.” In: StatPearls [Internet]. Treasure Island (FL), StatPearls Publishing, 11 Aug. 2021, https://www.ncbi.nlm.nih.gov/books/NBK542307/.
Al Qaraghi, Mustafa I, and Orlando De Jesus. “Lumbar Disc Herniation- StatPearls- NCBI Bookshelf.” In: StatPearls [Internet]. Treasure Island (FL), StatPearls Publishing, 30 Aug. 2021, https://www.ncbi.nlm.nih.gov/books/NBK560878/.
Amin, Raj M, et al. “Lumbar Disc Herniation.” Current Reviews in Musculoskeletal Medicine, Springer US, Dec. 2017, https://www.ncbi.nlm.nih.gov/pmc/articles/PMC5685963/.
Dydyk, Alexander M, et al. “Disc Herniation – Statpearls – NCBI Bookshelf.” In: StatPearls [Internet]. Treasure Island (FL): StatPearls Publishing, 18 Jan. 2022, https://www.ncbi.nlm.nih.gov/books/NBK441822/.
Khan, Rehan Ramzan, et al. “Effectiveness of Mechanical Traction in Supine versus Prone Lying Position for Lumbosacral Radiculopathy.” Pakistan Journal of Medical Sciences, Professional Medical Publications, 2021, https://www.ncbi.nlm.nih.gov/pmc/articles/PMC8377889/.
Schoenfeld, Andrew J, and Bradley K Weiner. “Treatment of Lumbar Disc Herniation: Evidence-Based Practice.” International Journal of General Medicine, Dove Medical Press, 21 July 2010, https://www.ncbi.nlm.nih.gov/pmc/articles/PMC2915533/.
Yeung, Jacky T, et al. “Cervical Disc Herniation Presenting with Neck Pain and Contralateral Symptoms: A Case Report.” Journal of Medical Case Reports, BioMed Central, 28 June 2012, https://www.ncbi.nlm.nih.gov/pmc/articles/PMC3411405/.
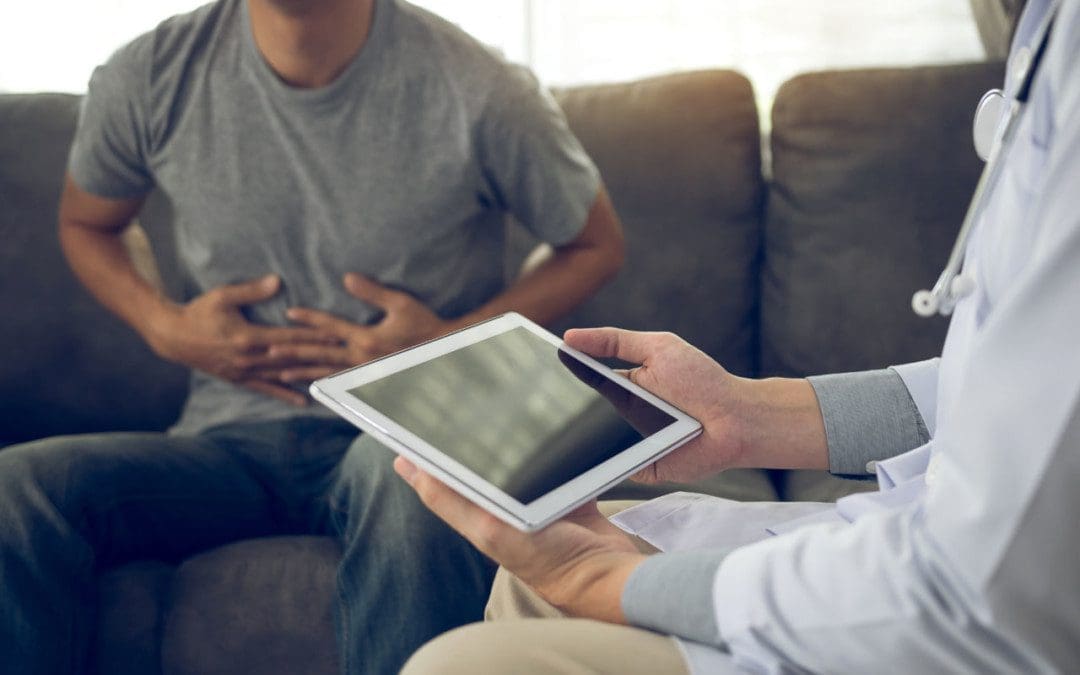
Spinal decompression and Digestion. No one wants to worry about stomach issues. A rich and unhealthy diet can cause digestive issues, stomach pain, and back pain. This can turn into a severe chronic condition; studies have found links between spinal problems and gastrointestinal tract symptoms, which include:
Abdominal pain that radiates.
Constipation.
Difficulty controlling bowel movements.
Diarrhea.
Nausea.
Vomiting.
Chiropractic treats the spine that is essential to the function of the central nervous system, which is responsible for digestion. When the nervous system is not functioning correctly, the other systems begin to malfunction. Chiropractic manual and motorized spinal decompression can help with digestion by releasing trapped gas from joints while improving blood circulation that is natural and non-invasive.
Spinal Decompression and Digestion
Spinal alignment and digestion are closely connected. The nerves in the thoracic and lumbar regions affect digestion. When the spine is out of alignment, it stresses the nerves. Nerves that are pinched or constricted are inhibited/disrupted from sending the proper signals to the digestive system. This can lead to new or worsening digestive problems. Spinal conditions that can cause digestive issues:
Herniated discs
Ankylosing spondylosis
Spinal cord injuries
Tumors
Studies have found that digestive issues, including discomfort, heartburn, and bloating, have decreased with regular chiropractic and spinal decompression and decreased constipation and irregular bowel movements. This comes from chiropractic reactivating the body’s natural ability to heal itself.
Increased Circulation
When the spine gets decompressed, it opens up the spine to circulate fluids throughout the body.
This flushes the lymphatic system, increasing the immune system’s function.
Increasing the circulation also provides additional oxygen and nutrients to the brain, improving signaling, memory, and concentration.
Improved Digestion
Poor posture compresses the abdomen and cramps the space the gastrointestinal tract needs to process food properly.
Decompressing the spine and correcting posture allows room for the muscles to contract, expand, and properly circulate waste.
Bowel Program
Treatment focuses on preventing further injuries and helping improve the individual’s quality of life. A doctor, chiropractor, health coach, or nutritionist can recommend a bowel program to help retrain the body to maintain regular bowel movements. These programs are personalized to the individual’s specific condition that takes into account:
Level of the spine injury or condition
Food and drink intake
Bowel movement pattern
Digestive problems
General health
Individual preferences
A bowel program sets up the timing of food intake, fluid intake, medications, and techniques to help bowel movements. The objective is to prevent spontaneous bowel movements, help pass stools regularly, and empty the rectum daily.
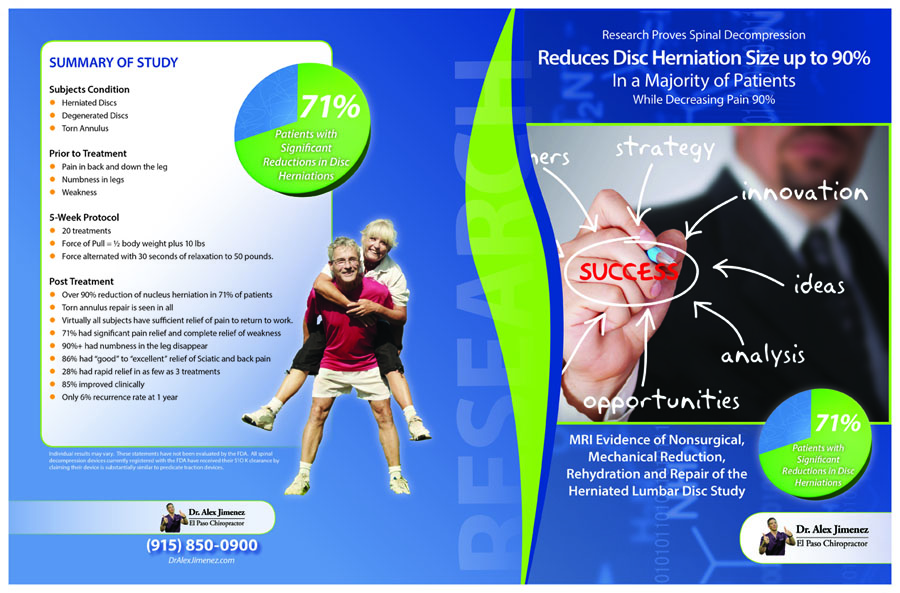
Spinal Decompression Reduced Disc Herniation UP To 90%
DRX9000 Decompression Treatment
References
Browning, Kirsteen N, and R Alberto Travagli. “Central nervous system control of gastrointestinal motility and secretion and modulation of gastrointestinal functions.” Comprehensive Physiology vol. 4,4 (2014): 1339-68. doi:10.1002/cphy.c130055
Holmes, Gregory M, and Emily N Blanke. “Gastrointestinal dysfunction after spinal cord injury.” Experimental neurology vol. 320 (2019): 113009. doi:10.1016/j.expneurol.2019.113009
Kehl, Amy S et al. “Relationship between the gut and the spine: a pilot study of first-degree relatives of patients with ankylosing spondylitis.” RMD open vol. 3,2 e000437. 16 Aug. 2017, doi:10.1136/rmdopen-2017-000437
Lara, Francisco Javier Pérez et al. “Chronic abdominal syndrome due to nervous compression. Study of 100 cases and proposed diagnostic-therapeutic algorithm.” Journal of gastrointestinal surgery: official journal of the Society for Surgery of the Alimentary Tract vol. 19,6 (2015): 1059-71. doi:10.1007/s11605-015-2801-8
All around the world, most everyone has some form of headache that can affect their mood. Headaches can range from a dull ache on the forehead like cluster headaches to sudden excruciating headaches like migraines. Headaches can also be associated with neck pain as they can cause a person to have a limited range of motion when turning their heads, as well as causing stiff neck muscles and compressed cervical spinal discs that can lead to herniation. Having these issues in the neck can dampen a person’s quality of life; however, treatments like cervical decompression therapy can help alleviate headaches and neck pain from a person giving them instant relief. In today’s article, we will be looking at what causes tension headaches and how cervical decompression traction can help alleviate tension headaches for many people. By referring patients to qualified and skilled providers specializing in spinal decompression therapy. To that end, and when appropriate, we advise our patients to refer to our associated medical providers based on their examination. We find that education is the key to asking valuable questions to our providers. Dr. Alex Jimenez DC provides this information as an educational service only. Disclaimer
Can my insurance cover it? Yes, it may. If you are uncertain, here is the link to all the insurance providers we cover. If you have any questions, please call Dr. Jimenez at 915-850-0900.
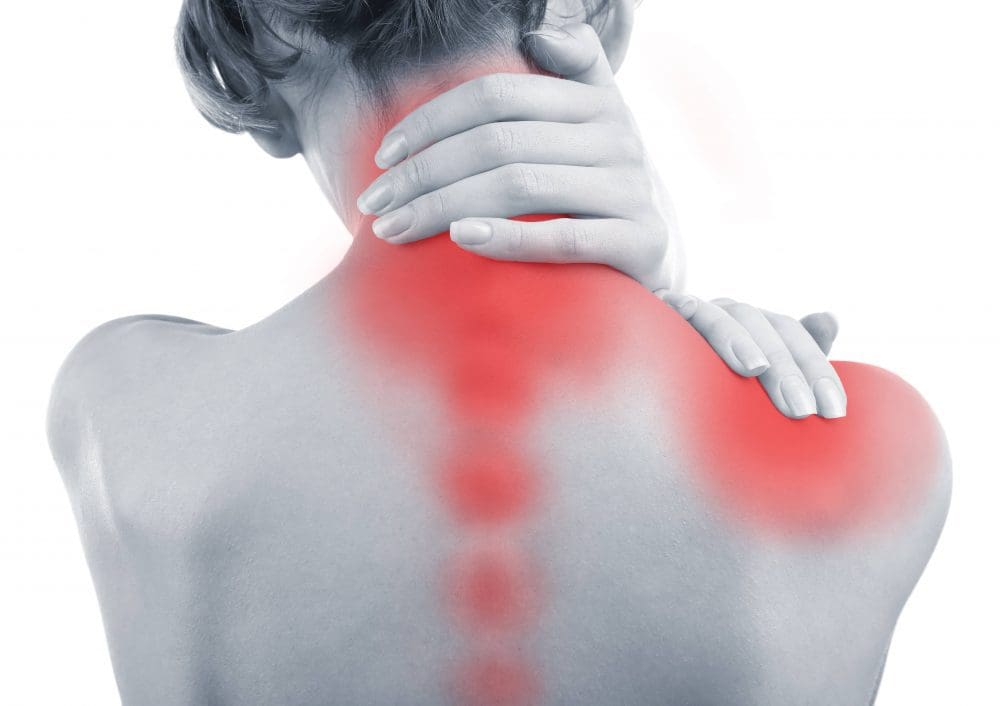
What Causes Tension Headaches?
Have you ever wondered why your neck muscles feel tense after a stressful day, or there is a constant dull aching pain that throbbing on the neck or the side of your head? How about getting some relief after taking a break after a stressful day? This is a tension headache, and research studies have stated that tension headaches are common and can range from mild to moderate depending on the pain. Unlike migraines, tension headaches are bilateral and don’t worsen when a person is exercising. Another thing that tension headaches can do to a person is that even though they are common for many people, they can become frequent or even chronic and cause significant health issues if it is not treated right away.
Other research studies have found that tension headaches can be caused by many factors impacting a person’s life. Environmental and muscular factors like stress and posture can cause the neck muscles to strain themselves, causing the person to be hunched over. This will cause the neck muscles to become stiff and tender to the touch as the neck muscles have a limited range of motion for the head to turn. When the neck has a limited range of motion, it can cause a person to have muscle tightness around the neck area, and if it is not treated soon, it can develop into chronic issues over time.
Chronic Tension Headaches
Since tension headaches usually last between 30 minutes to 7 days, the pain can last for more than a month when it turns into chronic tension headaches. Research studies have found that since tension headaches are common when chronic tension headaches, the pain severity will cause a bilateral pressure sensation that can last for days, even months. Chronic tension headaches also have severe muscle tightness around the headband of the person’s head. Individuals suffering from chronic tension headaches would continue to function with their daily activities but have severely impaired performance when this happens. Luckily there are ways to treat both tension and chronic tension headaches, and that is through cervical decompression therapy.
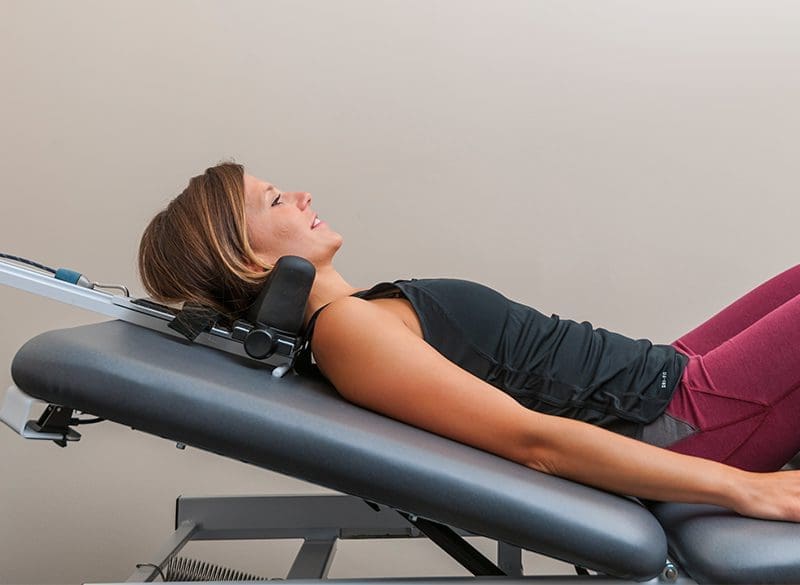
Neck Decompression Therapy- Video
Having tightness around the neck muscles can be difficult when affecting a person’s daily activity. How about tension headaches that won’t go away and cause you to feel miserable. Then maybe cervical decompression can be the answer to all your cervical issues. The video above shows how cervical traction can help alleviate neck issues that are causing problems to the cervical spine. What traction does is that it gently stretches the cervical spine, causing instant relief to the compressed disc and getting the pressure off the cervical nerve root. Any headaches like migraines and tension headaches will be gone from the person’s head when this happens. Utilizing cervical decompression can help alleviate the pain caused by tension headaches and restore a person’s quality of life. If you want to learn more about cervical decompression therapy, this link will explain the benefits of decompression and how it can alleviate cervical pain symptoms.
How Cervical Decompression Traction Alleviates Tension Headaches
So there are ways to alleviate chronic tension headaches. Many people have used ice/heat packs to ease the tension from the affected area; some take medication to get rid of the headaches to continue to go about their day. At the same time, others incorporate daily physical activities to release all the tension they were holding in. However, one form of treatment has been making its way to help ease the symptoms of tension headaches and alleviate other issues affecting the neck and cervical spine, including cervical decompression traction therapy. Research studies have found that cervical traction is a non-surgical treatment used to provide relief by reducing cervical-related injuries while also widening the intervertebral foramen. Cervical traction also helps eliminate the pressure on the cervical nerve root and even alleviates cervical radiculopathy. Other research studies have found that cervical traction is a conservative method to increase the cervical blood vessels’ circulation by stretching the muscles and causing them to relax. Cervical traction also allows pain relief, increases cervical range of motion, and relieves headaches caused by neck pain.
Conclusion
Overall, headaches are a nuisance to many people and can impact a person’s quality of life. Since headaches range from a dull ache to excruciating throbbing pain, the pain can vary, and where it is located can affect the body. Since there are many forms of headaches, there are many treatments that can help alleviate the symptoms of chronic headaches. Cervical decompression therapy can help alleviate chronic headaches and reduce neck pain symptoms that are affecting the cervical spine. Cervical decompression therapy allows traction to gently pull on the cervical spine causing the compressed spinal discs to be taking the pressure off the cervical nerve root and instantly causing the relief to the neck. When people utilize decompression therapy as part of their wellness journey, they can regain their lives.
References
Abi-Aad, Karl R, and Armen Derian. “Cervical Traction – Statpearls – NCBI Bookshelf.” In: StatPearls [Internet]. Treasure Island (FL): StatPearls Publishing, 13 Aug. 2021, https://www.ncbi.nlm.nih.gov/books/NBK470412/.
Chowdhury, Debashish. “Tension-Type Headache.” Annals of Indian Academy of Neurology, Medknow Publications & Media Pvt Ltd, Aug. 2012, https://www.ncbi.nlm.nih.gov/pmc/articles/PMC3444224/.
Lee, Chang-Hyung, et al. “The Functional and Morphological Changes of the Cervical Intervertebral Disc after Applying Lordotic Curve Controlled Traction: A Double-Blind Randomized Controlled Study.” International Journal of Environmental Research and Public Health, MDPI, 19 June 2019, https://www.ncbi.nlm.nih.gov/pmc/articles/PMC6617374/.
Loder, Elizabeth, and Paul Rizzoli. “Tension-Type Headache.” BMJ (Clinical Research Ed.), BMJ Publishing Group Ltd., 12 Jan. 2008, https://www.ncbi.nlm.nih.gov/pmc/articles/PMC2190284/.
Everybody all over the world suffers from some headache. It can come in various forms, and the pain can range from a dull ache that can go away in a few hours to an excruciating throbbing pain that can make a person stay in bed all day and last for weeks. Headaches can also cause muscle tension on the neck and can dampen a person’s daily life if it is not treated right away. Luckily the use of cervical decompression therapy can help alleviate any pain that the cervical spine is suffering from and can cause instant relief to many individuals suffering from headaches. This article looks at different types of headaches, including migraines, and how cervical decompression therapy can help relieve migraine headaches for many individuals. By referring patients to qualified and skilled providers specializing in spinal decompression therapy. To that end, and when appropriate, we advise our patients to refer to our associated medical providers based on their examination. We find that education is the key to asking valuable questions to our providers. Dr. Alex Jimenez DC provides this information as an educational service only. Disclaimer
Can my insurance cover it? Yes, it may. If you are uncertain, here is the link to all the insurance providers we cover. If you have any questions, please call Dr. Jimenez at 915-850-0900.
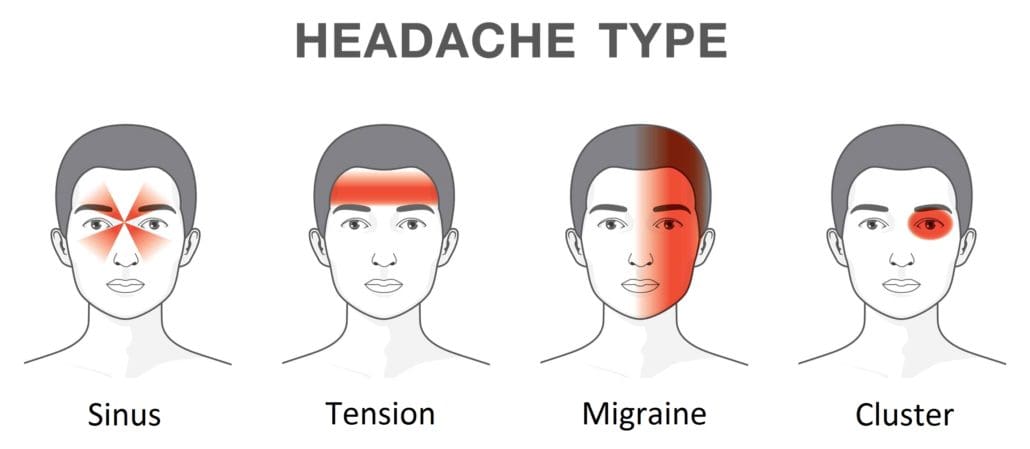
Different Forms Of Headaches
Have you ever felt excruciating throbbing pain from the forehead that becomes a nuisance throughout the day? How about tension and pain on either side of the face that constantly pounds that laying in a dark, quiet room can only be the cure? Or turning your head causes muscle restriction on the neck and limits the range of motion? These are the many forms of headaches that can affect anybody on any given day. Research studies have defined headaches as pain from various disorders that usually affect the cervical spine. These disorders can range from muscle tension around the neck, being overly stressed, having an inadequate sleep, to wearing something tight around the head. Having headaches in their acute form can last for a few hours until they dissipate, but their chronic condition can cause severe neck and cervical spine issues.
When a person starts to feel pain in their neck, it can cause them to have a limited range of motion and cause reoccurring headaches known as cervicogenic headaches. Research studies have shown that cervicogenic headaches are mainly caused when the cervical root is compressed on the lower parts of the cervical spine, causing cervical radiculopathy. When this happens, it can cause many individuals to have neck pain and headaches from the neck to the head. Cervicogenic headaches can limit a person’s range of motion when they turn their head and irritate the cervical nerve root spread out from the neck to the shoulders.
Migraine Headaches
Have you ever felt a severe headache that makes you feel nauseated and become sensitive to light and that you only feel relief by just laying down in a dark, quiet room? This type of headache is known as a migraine, and research studies classified migraines as headaches with moderate to severe episodes considered unilateral. Having migraines can affect a person’s quality of life as they can last from a few days to a few weeks, depending on how severe the migraine is. Other research studies have shown that since migraines are the commonest causes of severe headaches, the pain is accompanied by a constellation of symptoms that can affect the body and the neck. Some of the common symptoms that are accompanied by migraines are:
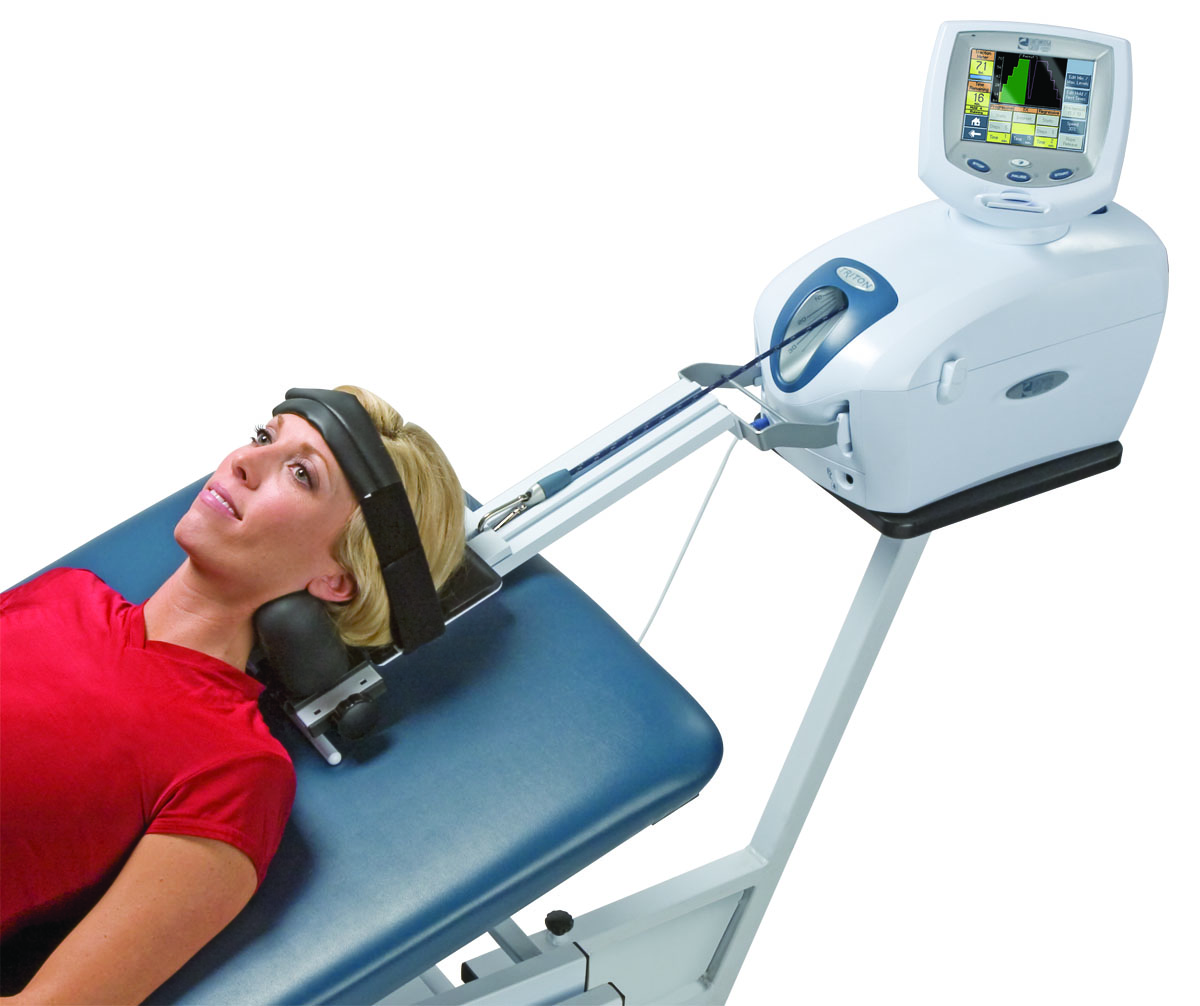
Non-surgical Decompression Therapy For Cervical Spine- Video
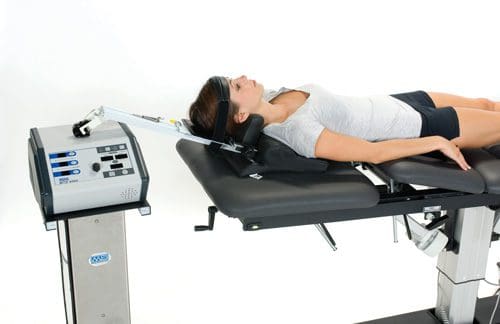
Still feeling excruciating pain from the neck, and it is causing you headaches? How about a limited range of motion when turning your head? Well, cervical decompression therapy could be the answer to alleviating headaches and neck pain. The video above shows what cervical decompression therapy does by using the DRX9000. Cervical decompression allows the individual to lay on a traction table, strapping their head. In contrast, the traction table gently stretches the cervical spine to enable the compressed spinal discs to return to their original form and relieve the pressure on the cervical nerve root. This will alleviate neck pain symptoms like muscle stiffness and help treat severe headaches like migraines. If you want to learn more about spinal decompression therapy, this link will explain the benefits of spinal decompression and how it can alleviate cervical pain symptoms.
Cervical Decompression Therapy For Relieving Migraines
Finding any kind of relief for migraines usually involves a quiet, dark room to minimize the associated symptoms that can dampen a person’s day. Since research studies have stated that when the greater occipital nerve is being entrapped and compressed, it can actually cause the posterior part of the head excruciating pain. This can affect the upper parts of the cervical spine and cause migraines to become much worst. The best way to get the pressure off the greater occipital nerve and the cervical spine nerve root is through cervical decompression therapy.
Research studies have shown that cervical decompression has often been used to help treat many individuals suffering from neck pain. What cervical decompression does, is that it allows traction to be utilized on the cervical spine causing the muscles, tendons, and ligaments that encompass the cervical spine to be gently stretched. This will cause them to relax and reduce the sensory fibers’ pain transmission, causing instant relief. This gentle stretching from cervical decompression takes the compressed disc from the cervical spine and releases the pressure of the cervical nerve root, thus alleviating severe headaches like migraines.
Conclusion
When a person has a headache and neck pain, it can affect a person’s quality of life. Having headaches can dampen a person’s quality of life, depending on the severity. Headaches can range from a dull ache like a cluster headache to excruciating throbbing pain like a migraine. Luckily cervical decompression therapy allows the individual to have their cervical spine be gently stretched and takes the pressure off the cervical nerve root. This will cause the cervical spinal discs to be decompressed and allow an increase in disc height, alleviating the symptoms that are causing a person to have migraines and headaches. Incorporating cervical decompression therapy as part of your wellness journey will give you the relief you need to get by with your daily activities.
References
Bogduk, Nikolai. “The Neck and Headaches.” Neurologic Clinics, U.S. National Library of Medicine, Feb. 2004, https://pubmed.ncbi.nlm.nih.gov/15062532/.
Eskilsson, Anja, et al. “Decompression of the Greater Occipital Nerve Improves Outcome in Patients with Chronic Headache and Neck Pain – a Retrospective Cohort Study.” Acta Neurochirurgica, Springer Vienna, Sept. 2021, https://www.ncbi.nlm.nih.gov/pmc/articles/PMC8357752/.
Lee, Chang-Hyung, et al. “The Functional and Morphological Changes of the Cervical Intervertebral Disc after Applying Lordotic Curve Controlled Traction: A Double-Blind Randomized Controlled Study.” International Journal of Environmental Research and Public Health, MDPI, 19 June 2019, https://www.ncbi.nlm.nih.gov/pmc/articles/PMC6617374/.
Persson, Liselott C G, et al. “Headache in Patients with Cervical Radiculopathy: A Prospective Study with Selective Nerve Root Blocks in 275 Patients.” European Spine Journal: Official Publication of the European Spine Society, the European Spinal Deformity Society, and the European Section of the Cervical Spine Research Society, Springer-Verlag, July 2007, https://www.ncbi.nlm.nih.gov/pmc/articles/PMC2219654/.
Pescador Ruschel, Marco A, and Orlando De Jesus. “Migraine Headache – Statpearls – NCBI Bookshelf.” In: StatPearls [Internet]. Treasure Island (FL): StatPearls Publishing, 30 Aug. 2021, https://www.ncbi.nlm.nih.gov/books/NBK560787/.
Weatherall, Mark W. “The Diagnosis and Treatment of Chronic Migraine.” Therapeutic Advances in Chronic Disease, SAGE Publications, May 2015, https://www.ncbi.nlm.nih.gov/pmc/articles/PMC4416971/.
Posture is the positioning of the body. There are two types of posture. Dynamic posture is how individuals position themselves when moving, like walking, running, or bending to lift an object. And static posture is how individuals position themselves when not in motion, like standing, sitting, or sleeping. Minimal stress is applied to the muscles and joints when practicing healthy posture. High-stress work and school combined with unhealthy body positions can cause health consequences to the spine, extremities, and musculoskeletal imbalances.
Health Consequences
Poor postures do not always present with spine or extremity pain right away. This is because individuals will feel discomfort and have the strength and mobility to correct unhealthy/awkward positions and minimize stress. However, eventually, the pain will begin to present as the muscles and joints can only take so much that the ability to correct poor positioning does not matter as there is a developing injury taking place, causing inflammation, letting the body know there is something not right. This often leads to chronic stress and the unnecessary wearing down of the joints to compensate for the unhealthy positions.
Early Signs
Early signs of postural problems can include:
Inability to sit or stand for a long time.
Stiffness when rising from a chair.
Feeling of added physical exhaustion.
Leaving the condition untreated often leads to:
Muscle imbalances.
Loss of normal flexibility.
Discomfort and pain present for no apparent reason.
Unhealthy Posture Symptoms
Symptoms can include:
Slouching
Rounded shoulders.
Potbelly.
Bent knees when standing or walking.
Muscle fatigue.
Aches and pains.
Back pain.
Headache.
Postural Structure
Poor posture interferes and disrupts several of the body’s posture structures. These include:
The static slow-twitch muscle fibers help maintain posture without exerting too much energy and contribute to balance by sensing the body’s position.
Static muscle fibers burn energy slowly and can work for a long time without tiring.
The fast-twitch or phasic muscle fibers are used for movement and activity. These fibers quickly use up their energy.
Because the phasic fibers have to work overtime instead of the static fibers to maintain the body’s position, muscle fatigue, weakness, and pain begin to set in.
Health
Health consequences can include:
Misaligned musculoskeletal system.
The advanced wearing of the spine making it fragile and prone to injury.
Chronic pain.
Decreased flexibility.
Joint mobility is affected.
Balance issues.
Increased risk of falling.
Difficulty digesting food.
Difficulty breathing.
Chiropractic and Physical Therapy
Chiropractors and physical therapists specialize in evaluating and treating musculoskeletal dysfunctions and disorders, identifying and screening for postural dysfunction. Chiropractic adjustments can be highly effective combined with other treatment modalities like massaging the soft tissues to improve circulation, reduce swelling inflammation, and promote healing. Spinal decompression therapy can help stretch and realign the spine to relieve back and/or leg pain. A customized exercise program will stretch and strengthen the body to maintain a healthy posture. Health coaching combined with dietary management can help with pain and inflammation and strengthen muscles and bones.
DRX9000 Spinal Decompression
References
American Chiropractic Association. Maintaining good posture. https://acatoday.org/content/posture-power-how-to-correct-your-body-alignment. Accessed Jan. 28, 2019.
American Academy of Orthopaedic Surgeons. Spine basics. https://orthoinfo.aaos.org/en/diseases–conditions/spine-basics/. Accessed Jan. 30, 2019.
Bauer BA. Chiropractic or osteopathic manipulation. In: Mayo Clinic Guide to Integrative Medicine. Rochester, Minn.: Mayo Foundation for Medical Education and Research; 2017.
Muscolino JE. Posture and the gait cycle. In: Kinesiology: The Skeletal System and Muscle Function. 3rd ed. Elsevier; 2017.
Wang G. Powered traction devices for intervertebral decompression: Health technology assessment update. Washington Department of Labor and Industries, June 14, 2004.
Waters, Thomas R, and Robert B Dick. “Evidence of health risks associated with prolonged standing at work and intervention effectiveness.” Rehabilitation nursing: the official journal of the Association of Rehabilitation Nurses vol. 40,3 (2015): 148-65. doi:10.1002/rnj.166
Do you ever get that stiff feeling just by turning your head, or do your shoulders start to feel tense after a stressful day at work? How about feeling a headache coming on for no apparent reason? This is due to neck pain, and many factors can cause a person to have neck pain. Even though neck pain can be a nuisance to many individuals, there are therapeutic ways to alleviate neck pain: one of them is cervical decompression therapy. This article will look at what neck pain is, its symptoms, and how decompression therapy can help alleviate neck pain for many individuals. By referring patients to qualified and skilled providers specializing in spinal decompression therapy. To that end, and when appropriate, we advise our patients to refer to our associated medical providers based on their examination. We find that education is the key to asking valuable questions to our providers. Dr. Alex Jimenez DC provides this information as an educational service only. Disclaimer
Can my insurance cover it? Yes, it may. If you are uncertain, here is the link to all the insurance providers we cover. If you have any questions, please call Dr. Jimenez at 915-850-0900.
What Is Neck Pain?
As part of the cervical spine, the neck supports the head while surrounding and protecting the spinal cord and allows a wide range of motion. Research studies have found that the neck has a coordinated network of nerves, bones, joints, and muscles that have an essential job but have several problems that can cause pain. Neck pain is a common complaint among many individuals, as the neck muscles are strained for long periods due to poor posture. Other research studies have found any injuries or conditions affecting the neck, causing a restricted range of motion. This can be scary for many individuals due to being hunched over by looking at their phones, being on the computer, even minor things like reading a book or suffering from an auto accident, and having rheumatoid arthritis can affect the neck.
The Symptoms For Dealing With Neck Pain
Pain can come in two types of forms, which are acute and chronic. Acute pain can become a dull, mild ache that can last from a few hours to a few days, depending on where the person is injured. Chronic pain, however, can become a nuisance as it can send constant radiating pain that can cause a hindrance to any part of the body. As research has shown, the pain can vary for neck pain as it can become mild and uncomfortable to excruciating, where excess movement can make it worst. Some of the most common neck pain symptoms usually involve:
Even though neck pain can become a nuisance for many individuals, there are ways to alleviate the symptoms of neck pain and provide relief.
Cervical Decompression Therapy-Video
Research studies have found that manipulation, stretching, and strengthening of the neck muscle can reduce the chronic pain symptoms that it has caused. The video above shows what cervical decompression does for many individuals suffering from cervical pain and neck pain. Cervical decompression therapy lets individuals lay their heads on the traction table and are strapped in. The traction machine gently stretches the cervical spine to release the compressed spinal disc. Cervical decompression therapy allows the compressed spinal nerve roots to be alleviated from the cervical spine. It will enable the beneficial oxygen to come back into the spinal disc and increase the disc height for the neck. If you want to learn more about spinal decompression therapy, this link will explain the benefits of spinal decompression and how it can alleviate low back pain symptoms.
How Can Decompression Therapy Help With Neck Pain
As stated earlier in the article, feeling stiffness when turning your head, feeling the tension in the shoulders, and having headaches pop up out of nowhere is scary when you don’t know how they happened. When these symptoms start to turn into chronic issues, it can be hard to find relief to get rid of the pain. Luckily there is a solution for alleviating neck pain, and cervical decompression therapy could help get rid of the pain. Cervical decompression therapy allows individuals to lay their heads on the traction table and be strapped in, causing the traction machine to stretch the neck to alleviate the painful symptoms gently. Research studies have found that cervical decompression therapy can relieve tension headaches and improve the range of motion. This will cause the spinal disc to be stretched and alleviate symptoms caused by cervical herniated discs. Combined with light stretching, cervical decompression therapy can also improve cervical disc herniation symptoms. Research shows that this combination of treatments promotes neuromuscular tissue edema and inflammatory absorption from the cervical herniated disc. This will allow the restoration of the curvature of the cervical vertebrae and reduce disc pressure by improving it.
Conclusion
Having any neck pain is a nuisance, and if it is not treated right away, it can become an issue over time. Neck pain can cause stiffness to the neck muscles and disrupt the range of motion, making it unbearable for the individual to turn their heads from left to right and up and down. Luckily treatments like cervical decompression therapy allow individuals to feel relief from neck pain. Cervical decompression therapy provides traction to the individual by stretching the neck ligament gently to release the compressed cervical spinal discs and will enable the reduction of pain that is causing discomfort to the neck. When this happens, many individuals suffering from neck pain will feel instant relief and an improvement in their range of motion from their necks.
References
Binder, Allan I. “Neck Pain.” BMJ Clinical Evidence, BMJ Publishing Group, 4 Aug. 2008, https://www.ncbi.nlm.nih.gov/pmc/articles/PMC2907992/.
Landers, Merrill R, et al. “Anterior Cervical Decompression and Fusion on Neck Range of Motion, Pain, and Function: A Prospective Analysis.” The Spine Journal: Official Journal of the North American Spine Society, U.S. National Library of Medicine, Nov. 2013, https://pubmed.ncbi.nlm.nih.gov/24041918/.
Staff, Mayo Clinic. “Neck Pain.” Mayo Clinic, Mayo Foundation for Medical Education and Research, 31 July 2020, https://www.mayoclinic.org/diseases-conditions/neck-pain/symptoms-causes/syc-20375581.
Xu, Qing, et al. “Nonsurgical Spinal Decompression System Traction Combined with Electroacupuncture in the Treatment of Multi-Segmental Cervical Disc Herniation: A Case Report.” Medicine, Lippincott Williams & Wilkins, 21 Jan. 2022, https://www.ncbi.nlm.nih.gov/pmc/articles/PMC8772752/.
IFM's Find A Practitioner tool is the largest referral network in Functional Medicine, created to help patients locate Functional Medicine practitioners anywhere in the world. IFM Certified Practitioners are listed first in the search results, given their extensive education in Functional Medicine