These assessment and treatment recommendations represent a synthesis of information derived from personal clinical experience and from the numerous sources which are cited, or are based on the work of researchers, clinicians and therapists who are named (Basmajian 1974, Cailliet 1962, Dvorak & Dvorak 1984, Fryette 1954, Greenman 1989, 1996, Janda 1983, Lewit 1992, 1999, Mennell 1964, Rolf 1977, Williams 1965).
Clinical Application of Neuromuscular Techniques: Pectoralis Major and Latissimus Dorsi
Assessment of Shortened Pectoralis Major and Latissimus Dorsi
Latissimus and pectoral test (a) Observation is as accurate as most palpation for evidence of pectoralis major shortening. The patient will have a rounded shoulder posture � especially if the clavicular aspect is involved.
Or
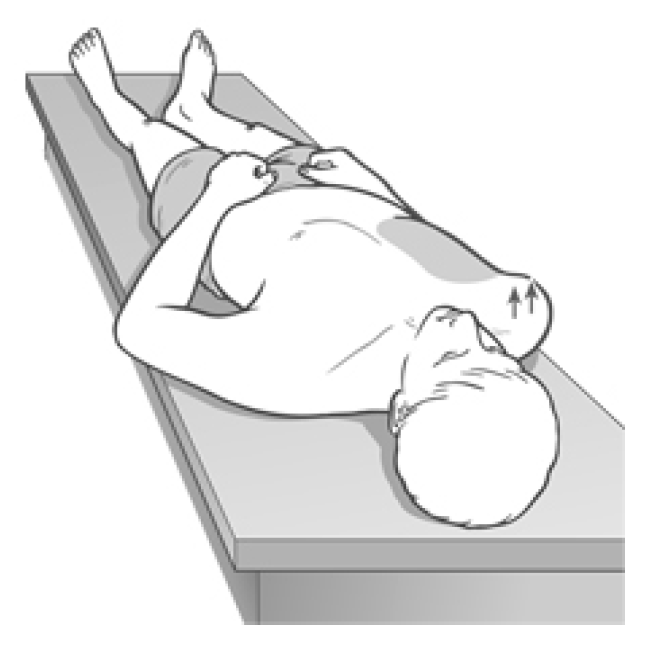
The patient lies supine with upper arms on the table, hands resting palm down on the lower abdomen. The practitioner observes from the head and notes whether either shoulder is held in an anterior position in relation to the thoracic cage. If one or both shoulders are forward of the thorax, pectoralis muscles are short (Fig. 4.24).
Figure 4.24 Observation assessment in which pectoral shortness on the right is suggested by the inability of the shoulder to rest on the table.
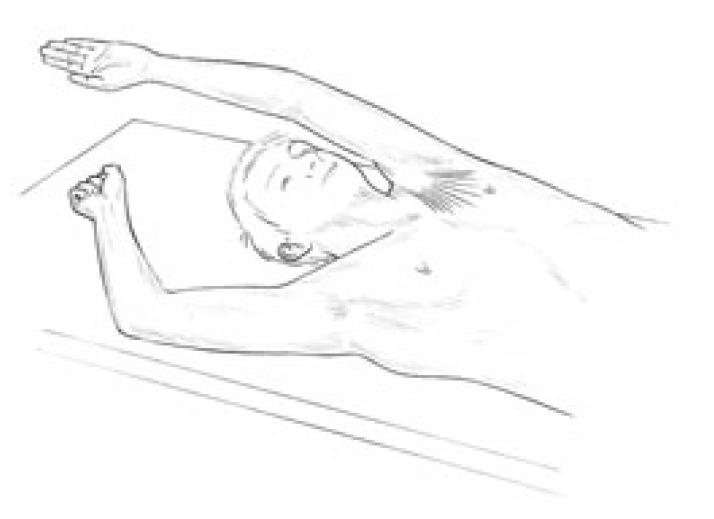
Latissimus and pectoral test (b) The patient lies supine with the head several feet from the top edge of the table, and is asked to rest the arms, extended above the head, on the treatment surface, palms upwards (Fig. 4.25).
Figure 4.25 Assessment of shortness in pectoralis major and latissimus dorsi. Visual assessment is used: if the arm on the tested side is unable to rest along its full length, shortness of pectoralis major is probable; if there is obvious deviation of the elbow laterally, probable latissimus shortening is indicated.
If these muscles are normal, the arms should be able to easily reach the horizontal when directly above the shoulders, and also to be in contact with the surface for almost all of the length of the upper arms, with no arching of the back or twisting of the thorax.
If either arm cannot reach the vertical above the shoulder, but is held laterally, elbow pulled outwards, then latissimus dorsi is probably short on that side. If an arm cannot rest with the dorsum of the upper arm in contact with the table surface without effort, then pectoral fibres are almost certainly short.
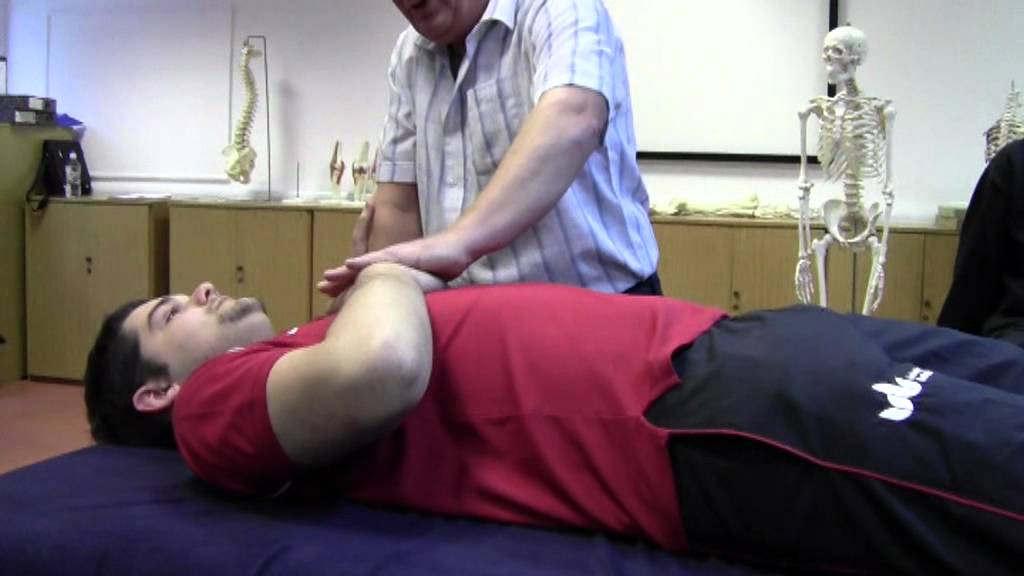
Pectoralis major test. Assessment of shortness in pectoralis major (Fig. 4.26) Assessment of the subclavicular portion of pectoralis major involves abduction of the arm to 90� (Lewit 1985b). In this position the tendon of pectoralis major at the sternum should not be found to be unduly tense, even with maximum abduction of the arm, unless the muscle is short.
Figure 4.26 Palpation assessment for shortness of subclavicular portion of pectoralis major.
For assessment of sternal attachment the arm is brought into elevation and abduction as the muscle, as well as the tendon on the greater tubercle of the humerus, is palpated. If the sternal fibres have shortened, tautness will be visible and tenderness of the tissues under palpation will be reported.
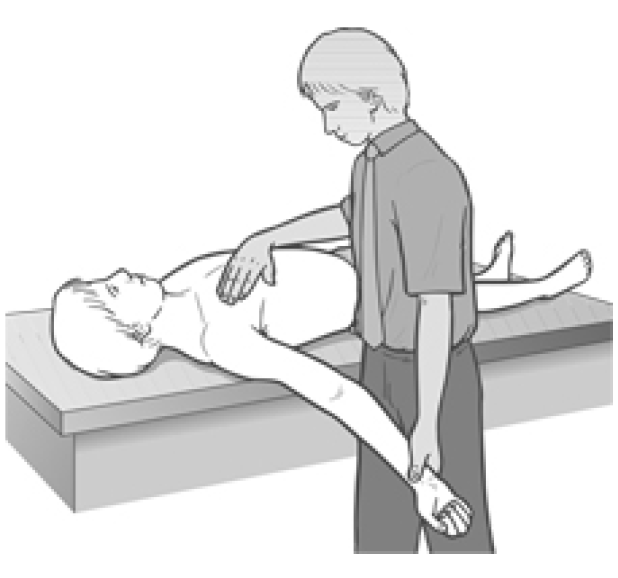
Pectoralis Major Test: Assessment for Strength of Pectoralis Major
Patient is supine with arm in abduction at the shoulder joint and medially rotated (palm is facing down) with the elbow extended. The practitioner stands at the head and secures the opposite shoulder with one hand to prevent any trunk torsion and contacts the dorsum of the distal humerus, on the tested side, with the other.
The patient attempts to lift the arm and to adduct it across the chest, against resistance, as strength is assessed in the sternal fibres.
Different arm positions can be used to assess clavicular and costal fibres: for example with an angle of abduction/elevation of 135� costal and abdominal fibres will be involved; with abduction/elevation of 45� the clavicular fibres will be assessed. The practitioner should palpate to ensure that the �correct� fibres contract when assessments are being made.
If this postural muscle tests as weak it may be useful to use Norris�s (1999) approach of strengthening it by means of a slowly applied isotonic eccentric (isolytic) contraction, before proceeding to an MET stretching procedure.
MET Treatment of Short Pectoralis Major
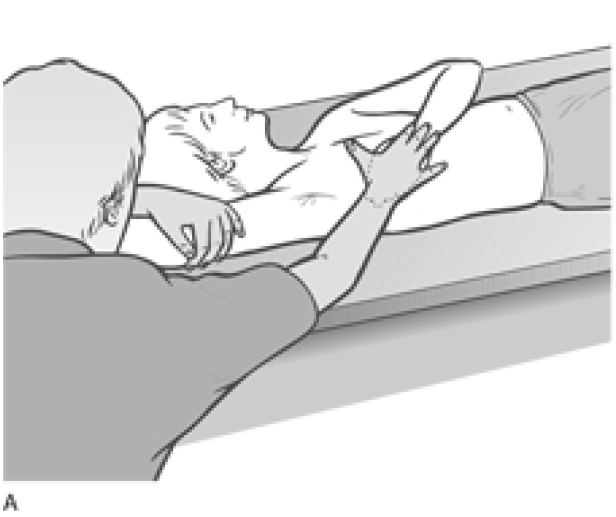
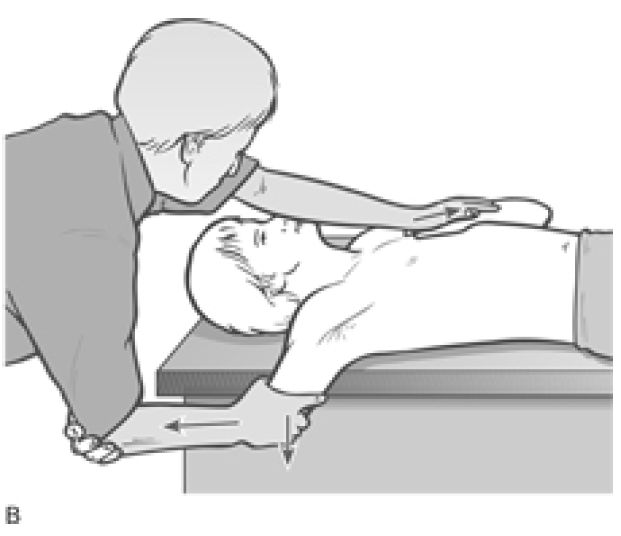
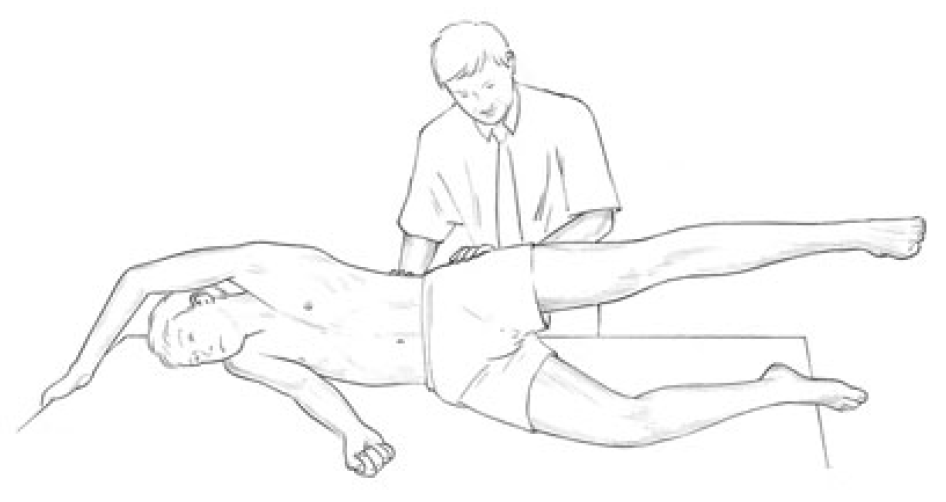
Pectoralis major MET method (a) (Fig. 4.27A, B) The patient lies supine with the arm abducted in a direction which produces the most marked evidence of pectoral shortness (assessed by palpation and visual evidence of the particular fibres involved as described in tests above). The more elevated the arm (i.e. the closer to the head), the more focus there will be on costal and abdominal fibres. With a lesser degree of abduction (to around 45�), the focus is more on the clavicular fibres. Between these two extremes lies the position which influences the sternal fibres most directly.
Figure 4.27A MET treatment of pectoral muscle � abdominal attachment. Note that the fibres being treated are those which lie in line with the long axis of the humerus.
Figure 4.27B An alternative hold for application of MET to pectoral muscle � sternal attachment. Note that the patient needs to be close to the edge of the table in order to allow the arm to be taken towards the floor once the slack has been removed, during the stretching phase after the isometric contraction.
The patient lies as close to the side of the table as possible so that the abducted arm can be brought below the horizontal level in order to apply gravitational pull and passive stretch to the fibres, as appropriate. The practitioner stands on the side to be treated and grasps the humerus.
A useful arm hold, which depends upon the relative size of the patient and the practitioner, involves the practitioner grasping the anterior aspect of the patient�s flexed upper arm just above the elbow, while the patient cups the practitioner�s elbow and holds this contact throughout the procedure (see Fig. 4.27B).
The patient�s hand is placed on the contact (attachments of shortened fibres) area on the thorax so that the hand acts as a �cushion�. This is both more physically comfortable and also prevents physical contact with emotionally sensitive areas such as breast tissue. The practitioner�s thenar or hyperthenar eminence is placed over the patient�s �cushion� hand in order to stabilise the area during the contraction and stretch, preventing movement of it.
Commencing with the patient�s arm in a position which takes the affected fibres to just short of their restriction barrier (for a chronic problem), the patient introduces a light contraction (20% of strength) involving adduction against resistance from the practitioner, for 7�10 seconds.
As a rule the long axis of the patient�s upper arm should be in a straight line with the fibres being treated. If a trigger point has previously been identified in pectoralis, the practitioner should ensure � by means of palpation if necessary, or by observation � that the fibres housing the triggers are involved in the contraction.
As the patient exhales following complete relaxation of the area, a stretch through the new barrier is activated by the patient and maintained by the practitioner. Stretch is achieved via the positioning and leverage of the arm as the contact hand on the thorax acts as a stabilising point only.
The stretch needs to be one in which the arm is first pulled away (distracted) from the thorax, with the patient�s assistance (�ease your arm away from your shoulder�), before the stretch is introduced which involves the humerus being taken below the horizontal (�ease your arm towards the floor�).
During the stretching phase it is important for the entire thorax to be stabilised. No rolling or twisting of the thorax in the direction of the stretch should be permitted. The stretching procedure should be thought of as having two phases: first the slack being removed by distracting the arm away from the contact/stabilising hand on the thorax; second, movement of the arm towards the floor, initiated by the practitioner bending his knees.
Stretching (after an isometric contraction) should be repeated two or three times in each position. All attachments should be treated, which calls for the use of different arm positions, as discussed above, each with different stabilising (�cushion�) contacts as the various fibre directions and attachments are isolated.
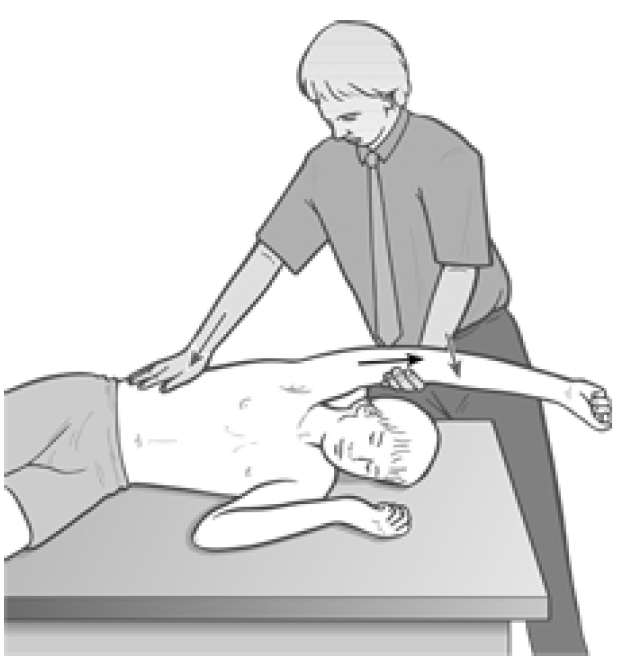
Pectoralis major MET method (b) (Fig. 4.28) The patient is prone with face in a face hole or cradle. Her right arm is abducted to 90� and the elbow flexed to 90� palm towards the floor, with the upper arm supported by the table. The practitioner stands at waist level, facing cephalad, and places his non-table-side hand palm to palm with the patient�s so that the patient�s forearm is in contact with the ventral surface of the practitioner�s forearm. The practitioner�s table-side hand rests on the patient�s right scapula area, ensuring that no trunk rotation occurs.
Figure 4.28 MET for pectoralis major in prone position.
The practitioner eases the patient�s arm into extension at the shoulder until he senses the first sign of resistance from pectoralis. It is important when extending the arm in this way to ensure that no trunk rotation occurs and that the anterior surface of the shoulder remains in contact with the table throughout.
The patient is asked, using no more than 20% of strength, to bring her arm towards the floor and across her chest, with the elbow taking the lead in this attempted movement, which is completely resisted by the practitioner. The practitioner ensures that the patient�s arm remains parallel with the floor throughout the isometric contraction.
Following release of the contraction effort, and on an exhalation, the arm is taken into greater extension, with the patient�s assistance, and held at stretch for not less than 20 seconds.
This procedure is repeated two or three times, slackening the muscle slightly from its end-range before each subsequent contraction to reduce discomfort and for ease of application of the contraction.
Variations in pectoralis fibre involvement can be achieved by altering the angle of abduction � with a more superior angle (around 140�) the lower sternal and costal fibres, and with a lesser angle (around 45�) the clavicular fibres will be committed.
Pectoralis major MET method (c) Bilateral MET stretching of pectoralis major (sternocostal aspects) involves having the patient supine, knees and hips flexed, in order to provide stability to the spinal regions, preventing lumbar lordosis. A shallow but firm cushion should be placed between the scapulae, allowing a better excursion of the shoulders during this stretch. The chin should be tucked in and, if more comfortable, a small cushion placed under the neck. Ideally a strap/belt should be used to fix the thorax to the table, but this is not essential.
The practitioner stands at the head of the table and grasps the patient�s elbows or forearms, which are flexed, laterally rotated and held in a position to induce the most taut aspects of the muscles to become prominent.
Starting from such a barrier or short of it (acute/chronic), the patient is asked to contract the muscles by bringing the arms upwards and towards the table for 10 seconds or so during a held breath.
Following the contraction and complete relaxation, the arms are taken to a new or through the restriction barrier, as appropriate, during an exhalation. Repeat as necessary several times more.
Pectoralis major MET method (d) By adopting the same positions � but with the arms of the patient more laterally placed so that they are laterally rotated and in 90� abduction from the shoulder (upper arms are straight out sideways from the shoulder) and there is 90� flexion at the elbows, with the practitioner contacting the area just proximal to the flexed elbows � a more direct stretch of the clavicular insertions of the muscle can be achieved, using all the same contraction and stretch elements as in (b) above.
Latissimus Dorsi Test for Shortness
To screen latissimus dorsi (12), the standing patient is asked to bend forwards and allow the arms to hang freely from the shoulders as she holds a half-bend position, trunk parallel with the floor.
If the arms are hanging other than perpendicular to the floor there is probably some muscular restriction involved, and if this involves latissimus the arms will be held closer to the legs than perpendicular (if they hang markedly forward of such a position then trapezius shortening is probable, see below).
To screen latissimus in this position, one side at a time, the practitioner stands in front of the patient (who remains in this half-bend position) and, stabilising the scapula area with one hand, grasps the arm at elbow level and gently draws the tested side (straight) arm forwards. It should, without undue effort or excessive bind in the tissues being held, allow itself to be taken to a position where the elbow is higher than the level of the back of the head. If this is not possible, then latissimus is short.
MET Treatment of Short Latissimus Dorsi
Short latissimus dorsi MET method (a) The patient lies supine with the feet crossed (the side to be treated crossed under the non-treated side leg at the ankle). The patient is arranged in a light sidebend away from the side to be treated so that the pelvis is towards that side, and the feet and head away from that side. The heels are placed just off the edge of the table, so anchoring the lower extremities.
The patient places her arm on the side to be treated behind her neck, as the practitioner, standing on the side opposite that to be treated, slides his cephalad hand under the patient�s shoulders to grasp the treated side axilla. The patient grasps the practitioner�s cephalad arm at the elbow, making this contact more secure. The patients treated side elbow should point superiorly. The practitioner�s caudad hand is placed on the anterior superior iliac spine on the side being treated.
The patient is instructed to very lightly take the pointed elbow towards the sacrum and also to lightly try to bend backwards and towards the treated side. This should produce a light isometric contraction in latissimus dorsi on the side to be treated. After 7 seconds they are asked to relax completely as the practitioner transfers his body weight from the cephalad leg to the caudad leg, to sidebend the patient. Simultaneously the practitioner stands more erect and leans in a caudad direction.
This effectively lifts the patient�s thorax from the table surface and introduces a stretch into latissimus (especially if the patient has maintained a grasp on the practitioner�s elbow and the practitioner has a firm hold on the patient�s axilla).
This stretch is held for 15�30 seconds allowing a lengthening of shortened musculature in the region. (Note: starting position is as for Fig. 4.22.) Repeat as necessary.
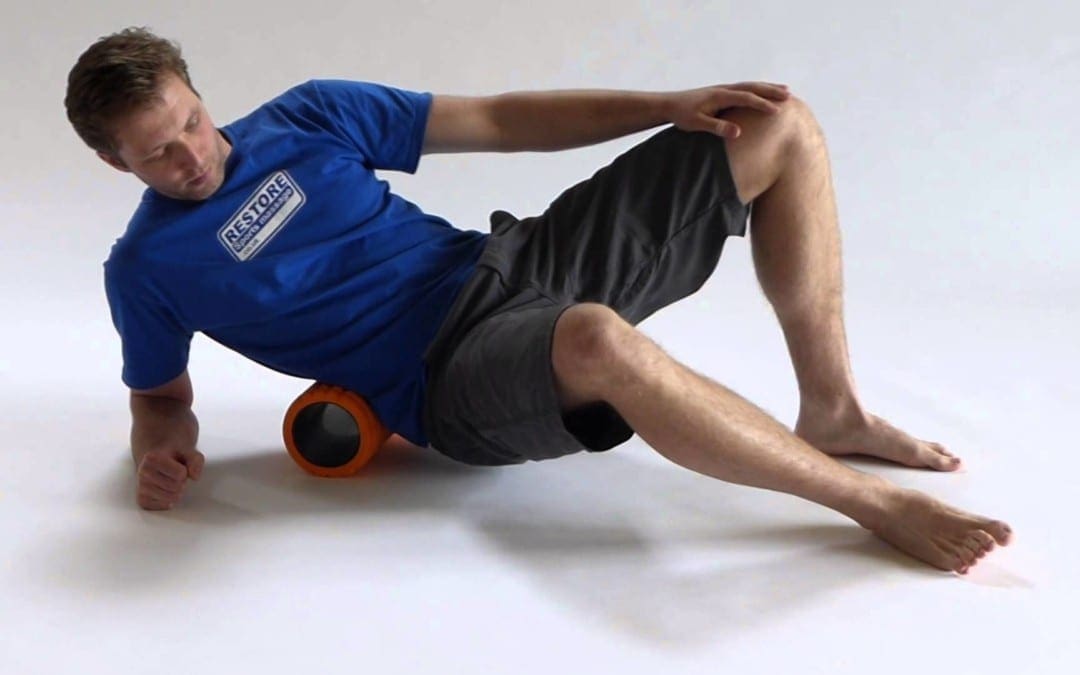
Short latissimus dorsi MET method (b) The patient is side-lying, affected side up. The arm is taken into abduction to the point of resistance, so that it is possible to visualise, or palpate, the insertion of the shortened fibres on the lateral chest wall.
The condition is treated in either the acute or chronic mode of MET, at or short of the barrier, as appropriate.
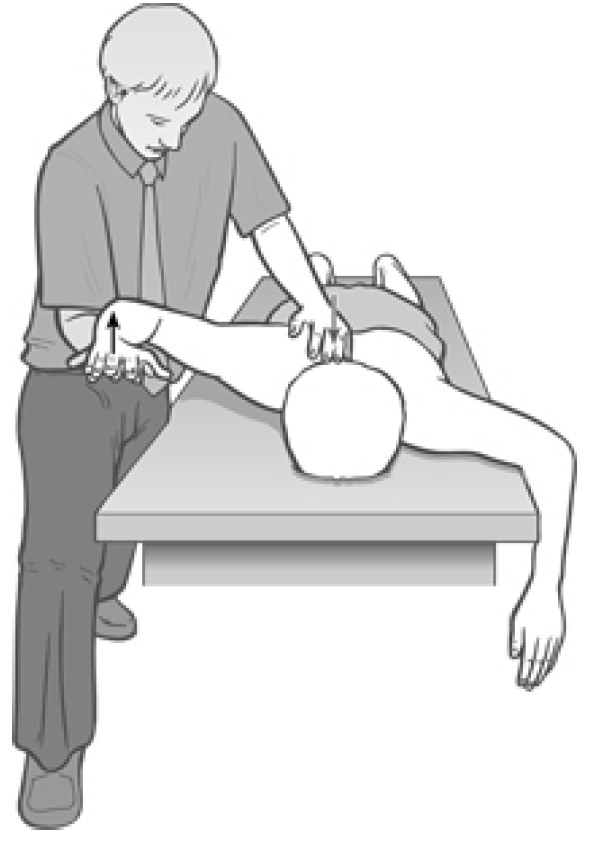
As shown in Figure 4.29, the practitioner stands near the head of the patient, slightly behind, and holds the upper arm in the chosen position while applying the other hand to stabilise the posterior thorax area, or the pelvic crest, from where the stretch will be made.
Figure 4.29 Treatment of latissimus dorsi. A variety of different positions are required for the stabilising hand (on the chest wall as well as on the crest of the pelvis) to allow for precise application of stretches of fibres with different attachments, following the sequence of isometric contractions.
A build-up of tension should be palpated under the stabilising hand as the patient introduces an isometric contraction by attempting to bring the arm towards the ceiling, backwards and down (towards their own lower spine) against firm resistance, using only a modest amount of effort (20%) and holding the breath if appropriate (see notes on breathing, Box 4.2).
After 7�10 seconds, both the effort and breath are released and the patient relaxes completely, at which time the practitioner introduces stretch to or through the barrier (acute/chronic), bringing the humerus into greater adduction while applying a stretching/stabilising contact on the trunk (with separate contractions and stretches for each contact) anywhere between the lateral chest wall and the crest of the pelvis.
A downward movement of the humerus, towards the floor, assists the stretch following a separation of the practitioner�s two contact hands to remove all slack. As in the stretch of pectoralis major, there should be two phases � a distraction, taking out the slack, and a movement towards the floor of the practitioner, by flexing the knees � to induce a safe stretch. Repeat as necessary.
Ultimately, it should be possible to achieve complete elevation of the arm without stress or obvious shortness in latissimus fibres so that the upper arm can rest alongside the ear of the supine patient.
Dr. Alex Jimenez offers an additional assessment and treatment of the hip flexors as a part of a referenced clinical application of neuromuscular techniques by Leon Chaitow and Judith Walker DeLany. The scope of our information is limited to chiropractic and spinal injuries and conditions. To discuss the subject matter, please feel free to ask Dr. Jimenez or contact us at 915-850-0900 .
By Dr. Alex Jimenez
Additional Topics: Wellness
Overall health and wellness are essential towards maintaining the proper mental and physical balance in the body. From eating a balanced nutrition as well as exercising and participating in physical activities, to sleeping a healthy amount of time on a regular basis, following the best health and wellness tips can ultimately help maintain overall well-being. Eating plenty of fruits and vegetables can go a long way towards helping people become healthy.
These assessment and treatment recommendations represent a synthesis of information derived from personal clinical experience and from the numerous sources which are cited, or are based on the work of researchers, clinicians and therapists who are named (Basmajian 1974, Cailliet 1962, Dvorak & Dvorak 1984, Fryette 1954, Greenman 1989, 1996, Janda 1983, Lewit 1992, 1999, Mennell 1964, Rolf 1977, Williams 1965).
Clinical Application of Neuromuscular Techniques: Quadratus Lumborum
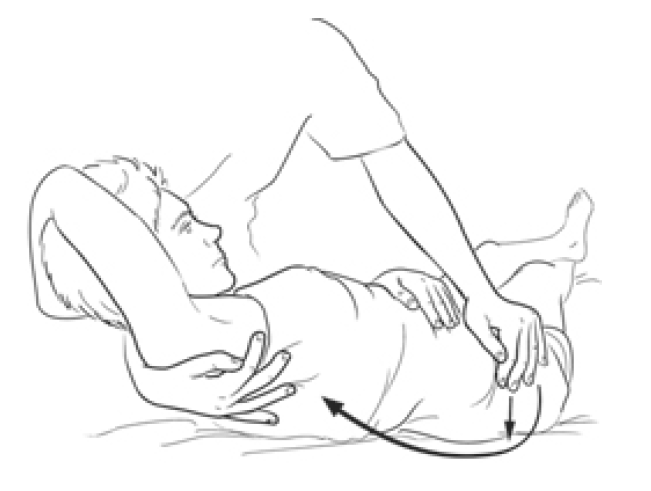
Assessment of Shortness in Quadratus Lumborum (Figure 4.21)
Figure 4.21 Palpation assessment for quadratus lumborum overactivity. The muscle is palpated, as is gluteus medius, during abduction of the leg. The correct firing sequence should be gluteus, followed at around 25� elevation by quadratus. If there is an immediate �grabbing� action by quadratus it indicates overactivity, and therefore stress, so shortness can be assumed (see details of similar functional assessments in Ch. 5).
Review Lewit�s functional palpation test described under the heading assessment and treatment of tensor fascia lata.
When the leg of the side-lying patient is abducted, and the practitioner�s palpating hand senses that quadratus becomes involved in this process before the leg has reached at least 25� of elevation, then it is clear that quadratus is overactive. If it has been overactive for any length of time then it is almost certainly hypertonic and short, and a need for MET can be assumed.
Quadratus lumborum test (a) (See also Fig. 5.11A, B.) The patient is side-lying and is asked to take the upper arm over the head to grasp the top edge of the table, �opening out� the lumbar area. The practitioner stands facing the back of the patient, and has easy access for palpation of quadratus lumborum�s lateral border � a major trigger point site (Travell & Simons 1992) � with the cephalad hand.
Activity of quadratus is tested (palpated for) with the cephalad hand as the leg is abducted, while also palpating gluteus medius with the caudad hand. If the muscles act simultaneously, or if quadratus fires first, then it is stressed, probably short, and will benefit from stretching.
Quadratus lumborum test (b) The patient stands, back towards crouching practitioner. Any leg length disparity (based on pelvic crest height) is equalised by using a book or pad under the short leg side heel. With the patient�s feet shoulder-width apart, a pure sidebending is requested, so that the patient runs a hand down the lateral thigh/calf. (Normal level of sidebending excursion allows the fingertips to reach to just below the knee.) (See Fig. 3.2A, B, C.)
The side to which the fingertips travel furthest is assessed. If sidebending to one side is limited then quadratus on the opposite side is probably short. Combined evidence from palpation (test a) and this sidebending test indicate whether or not it is necessary to treat quadratus.
Box 4.8 Notes on Quadratus Lumborum
Norris (2000) describes the divided roles in which quadratus is involved: The quadratus lumborum has been shown to be significant as a stabiliser in lumbar spine movements (McGill et al 1996) while tightening has also been described (Janda 1983). It seems likely that the muscle may act functionally differently in its medial and lateral portions, with the medial portion being more active as a stabiliser of the lumbar spine, and the lateral more active as a mobiliser [see stabiliser/mobiliser discussion Ch. 2]. Such subdivision is seen in a number of other muscles for example the gluteus medius where the posterior fibres are more posturally involved (Jull 1994) the internal oblique where the posterior fibres attaching to the lateral raphe are considered stabilisers (Bergmark 1989) the external oblique where the lateral fibres work during flexion in parallel with the rectus abdominis (Kendall et al 1993).
Janda (1983) observes that, when the patient is sidebending (as in method (b)) �when the lumbar spine appears straight, with compensatory motion occurring only from the thoracolumbar region upwards, tightness of quadratus lumborum may be suspected�. This �whole lumbar spine� involvement differs from a segmental restriction which would probably involve only a part of the lumbar spine.
Quadratus fibres merge with the diaphragm (as do those of psoas), which makes involvement in respiratory dysfunction a possibility since it plays a role in exhalation, both via this merging and by its attachment to the 12th rib.
Shortness of quadratus, or the presence of trigger points, can result in pain in the lower ribs and along the iliac crest if the lateral fibres are affected. Shortness of the medial fibres, or the presence of trigger points, can produce pain in the sacroiliac joint and the buttock.
Bilateral contraction produces extension and unilateral contraction produces extension and sidebending to the same side.
The important transition region, the lumbodorsal junction (LDJ), is the only one in the spine in which two mobile structures meet, and dysfunction results in alteration of the quality of motion between these structures (upper and lower trunk/dorsal and lumbar spines). In dysfunction there is often a degree of spasm or tightness in the muscles which stabilise the region, notably: psoas and erector spinae of the thoracolumbar region, as well as quadratus lumborum and rectus abdominis.
Symptomatic differential diagnosis of muscle involvement at the LDJ is possible as follows: psoas involvement usually triggers abdominal pain if severe and produces flexion of the hip and the typical antalgesic posture of lumbago; erector spinae involvement produces low back pain at its caudad end of attachment and interscapular pain at its thoracic attachment (as far up as the mid-thoracic level); quadratus lumborum involvement causes lumbar pain and pain at the attachment of the iliac crest and lower ribs; and rectus abdominis contraction may mimic abdominal pain and result in pain at the attachments at the pubic symphysis and the xiphoid process, as well as forwardbending of the trunk and restricted ability to extend the spine.
There is seldom pain at the site of the lesion in LDJ dysfunction. Lewit (1992) points out that even if a number of these muscles are implicated, it is seldom necessary, using PIR methods, to treat them all since, as the muscles most involved (discovered by tests for shortness, overactivity, sensitivity and direct palpation) are stretched and normalised, so will others begin automatically to normalise.
MET for Shortness in Quadratus Lumborum (�banana�)
Quadratus lumborum MET method (a) (Fig. 4.22) The patient lies supine with the feet crossed (the side to be treated crossed under the non-treated side leg) at the ankle. The patient is arranged in a light sidebend, away from the side to be treated, so that the pelvis is towards that side, and the feet and head away from that side (�banana shaped�). As this sidebend is being achieved the affected quadratus can be palpated for bind so that the barrier is correctly identified.
Figure 4.22 MET treatment of quadratus lumborum utilising �banana� position.
The patient�s heels are placed just off the side of the table, anchoring the lower extremities and pelvis. The patient places the arm of the side to be treated behind her neck as the practitioner, standing on the side opposite that to be treated, slides his cephalad hand under the patient�s shoulders to grasp the treated side axilla. The patient grasps the practitioner�s cephalad arm at the elbow, with the treated side hand, making the contact more secure.
The patient�s treated side elbow should, at this stage, be pointing superiorly. The practitioner�s caudad hand is placed firmly but carefully on the anterior superior iliac spine, on the side to be treated. The patient is instructed to very lightly sidebend towards the treated side. This should produce an isometric contraction in quadratus lumborum on the side to be treated.
After 7 seconds the patient is asked to relax completely, and then to sidebend towards the nontreated side, as the practitioner simultaneously transfers his bodyweight from the cephalad leg to the caudad leg and leans backwards slightly, in order to sidebend the patient. This effectively stretches quadratus lumborum. The stretch is held for 15�20 seconds, allowing a lengthening of shortened musculature in the region. Repeat as necessary.
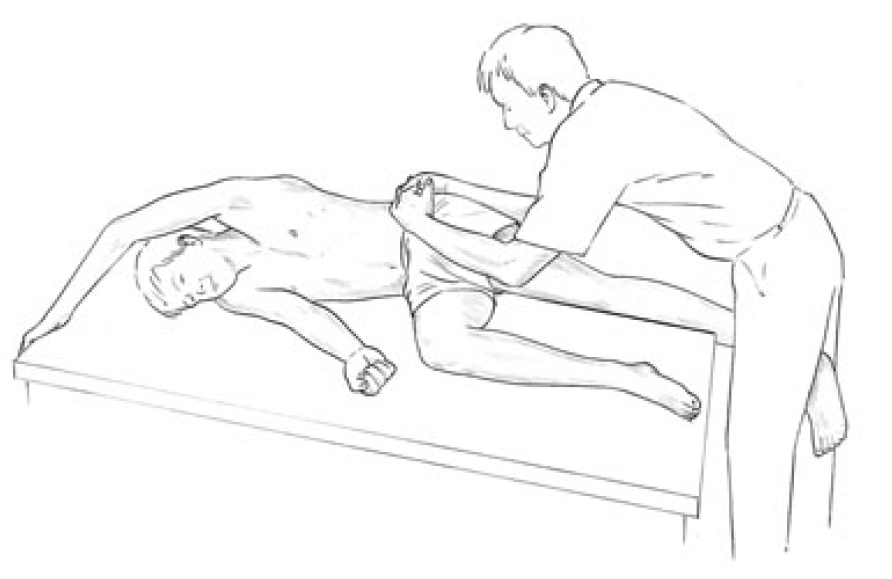
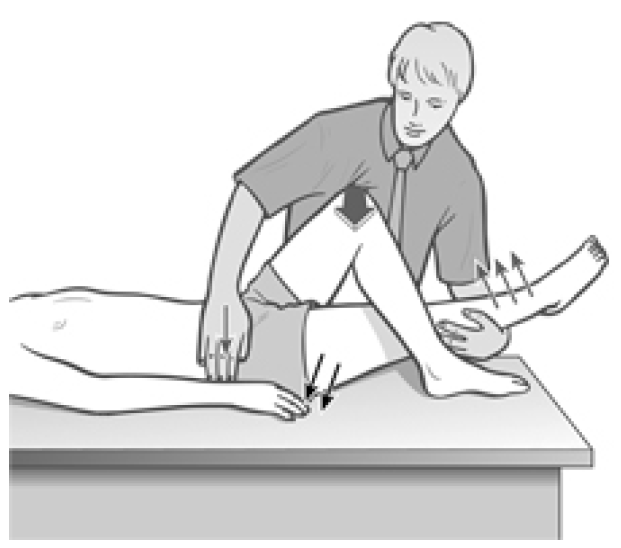
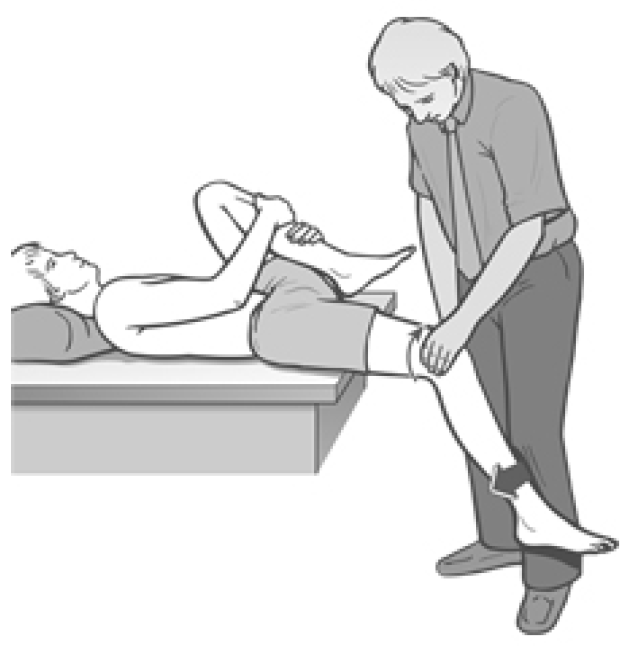
Quadratus lumborum MET method (b) (Fig 4.23) The practitioner stands behind the side-lying patient, at waist level. The patient has the uppermost arm extended over the head to firmly grasp the top end of the table and, on an inhalation, abducts the uppermost leg until the practitioner palpates strong quadratus activity (elevation of around 30� usually).
Figure 4.23 MET treatment of quadratus lumborum. Note that it is important after the isometric contraction (sustained raised/abducted leg) that the muscle be eased into stretch, avoiding any defensive or protective resistance which sudden movement might produce. For this reason, body weight rather than arm strength should be used to apply traction.
The patient holds the leg (and, if appropriate, the breath, see Box 4.2) isometrically in this manner, allowing gravity to provide resistance. After the 10-second (or so) contraction, the patient allows the leg to hang slightly behind him over the back of the table. The practitioner straddles this and, cradling the pelvis with both hands (fingers interlocked over crest of pelvis), leans back to take out all slack and to �ease the pelvis away from the lower ribs� during an exhalation.
The stretch should be held for between 10 and 30 seconds. (The method will only be successful if the patient is grasping the top edge of the table, so providing a fixed point from which the practitioner can induce stretch.)
Contraction followed by stretch is repeated once or twice more with raised leg in front of, and once or twice with raised leg behind the trunk in order to activate different fibres. The direction of stretch should be varied so that it is always in the same direction as the long axis of the abducted leg. This calls for the practitioner changing from the back to the front of the table for the best results. When the leg hangs to the back of the trunk the long fibres of the muscle are mainly affected; and when the leg hangs forward of the body the diagonal fibres are mainly involved.
Quadratus lumborum MET method (c) Gravity-induced postisometric relaxation of quadratus lumborum � self-treatment (See Fig. 3.2A�C and captions) The patient stands, legs apart, bending sideways. The patient inhales and slightly raises the trunk (a few centimetres) at the same time as looking (with the eyes only) away from the side to which side-flexion is taking place. On exhalation, the sidebend is allowed to slowly go further to its elastic limit, while the patient looks towards the floor, in the direction of the side-flexion. (Care is needed that very little, if any, forward or backward bending is taking place at this time.) This sequence is repeated a number of times.
Eye positions influence the tendency to flex and sidebend (eyes look down) and extend (eyes look up) (Lewit 1999). Gravity-induced stretches of this sort require holding the stretch position for at least as long as the contraction, and ideally longer. More repetitions may be needed with a large muscle such as quadratus, and home stretches should be advised several times daily. Quadratus lumborum MET method (d) The side-lying treatment of latissimus dorsi described below also provides an effective quadratus stretch when the stabilising hand rests on the pelvic crest (see Fig. 4.29).
Dr. Alex Jimenez offers an additional assessment and treatment of the hip flexors as a part of a referenced clinical application of neuromuscular techniques by Leon Chaitow and Judith Walker DeLany. The scope of our information is limited to chiropractic and spinal injuries and conditions. To discuss the subject matter, please feel free to ask Dr. Jimenez or contact us at 915-850-0900 .
By Dr. Alex Jimenez
Additional Topics: Wellness
Overall health and wellness are essential towards maintaining the proper mental and physical balance in the body. From eating a balanced nutrition as well as exercising and participating in physical activities, to sleeping a healthy amount of time on a regular basis, following the best health and wellness tips can ultimately help maintain overall well-being. Eating plenty of fruits and vegetables can go a long way towards helping people become healthy.
These assessment and treatment recommendations represent a synthesis of information derived from personal clinical experience and from the numerous sources which are cited, or are based on the work of researchers, clinicians and therapists who are named (Basmajian 1974, Cailliet 1962, Dvorak & Dvorak 1984, Fryette 1954, Greenman 1989, 1996, Janda 1983, Lewit 1992, 1999, Mennell 1964, Rolf 1977, Williams 1965).
Clinical Application of Neuromuscular Techniques: Piriformis
Assessment of Shortened Piriformis
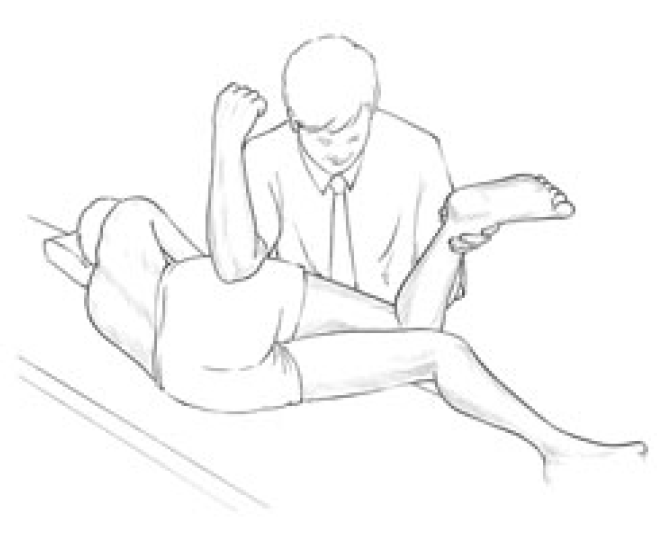
Test (a) Stretch test. When short, piriformis will cause the affected side leg of the supine patient to appear to be short and externally rotated. With the patient supine, the tested leg is placed into flexion at the hip and knee so that the foot rests on the table lateral to the contralateral knee (the tested leg is crossed over the straight non-tested leg, in other words as shown in Fig. 4.17). The angle of hip flexion should not exceed 60� (see notes on piriformis in Box 4.6).
Figure 4.17 MET treatment of piriformis muscle with patient supine. The pelvis must be maintained in a stable position as the knee (right in this example) is adducted to stretch piriformis following an isometric contraction.
The non-tested side ASIS is stabilised to prevent pelvic motion during the test and the knee of the tested side is pushed into adduction to place a stretch on piriformis. If there is a short piriformis the degree of adduction will be limited and the patient will report discomfort behind the trochanter.
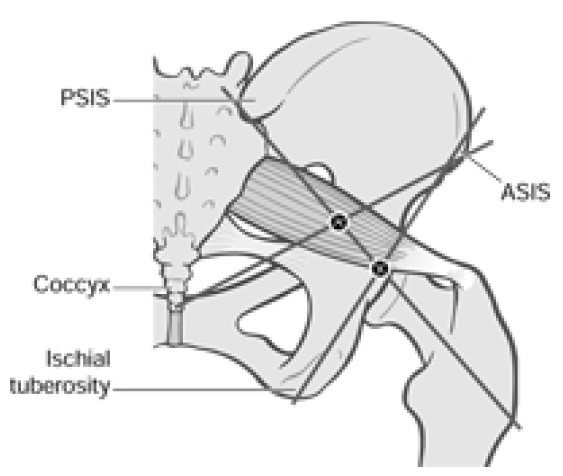
Test (b) Palpation test (Fig. 4.18) The patient is side-lying, tested side uppermost. The practitioner stands at the level of the pelvis in front of and facing the patient, and, in order to contact the insertion of piriformis, draws imaginary lines between:
ASIS and ischial tuberosity, and
PSIS and the most prominent point of trochanter.
Where these reference lines cross, just posterior to the trochanter, is the insertion of the muscle, and pressure here will produce marked discomfort if the structure is short or irritated.
Figure 4.18 Using bony landmarks as coordinates the commonest tender areas are located in piriformis, in the belly and at the attachment of the muscle.
If the most common trigger point site in the belly of the muscle is sought, then the line from the ASIS should be taken to the tip of the coccyx rather than to the ischial tuberosity. Pressure where this line crosses the other will access the mid-point of the belly of piriformis where triggers are common. Light compression here which produces a painful response is indicative of a stressed muscle and possibly an active myofascial trigger point.
Piriformis Strength Test
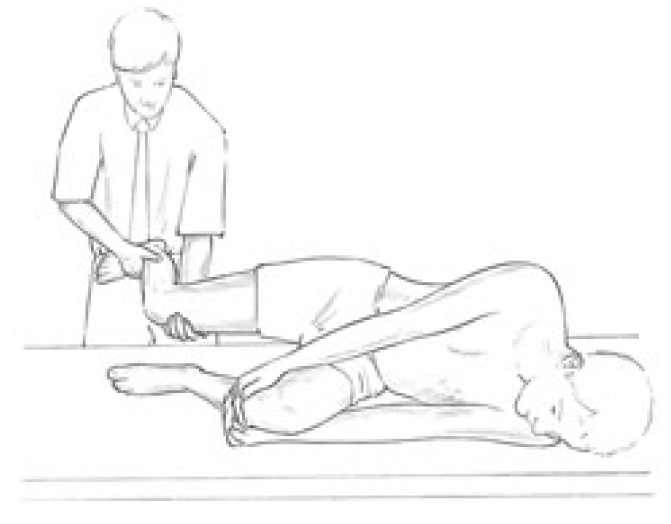
The patient lies prone, both knees flexed to 90�, with practitioner at foot of table grasping lower legs at the limit of their separation (which internally rotates the hip and therefore allows comparison of range of movement permitted by shortened external rotators such as the piriformis).
The patient attempts to bring the ankles together as the practitioner assesses the relative strength of the two legs. Mitchell et al (1979) suggest that if there is relative shortness (as evidenced by the lower leg not being able to travel as far from the mid-line as its pair in this position), and if that same side also tests strong, then MET is called for. If there is shortness but also weakness then the reasons for the weakness need to be dealt with prior to stretching using MET.
Box 4.6 Notes on Piriformis
Piriformis paradox. The performance of external rotation of the hip by piriformis occurs when the angle of hip flexion is 60� or less. Once the angle of hip flexion is greater than 60� piriformis function changes, so that it becomes an internal rotator of the hip (Gluck & Liebenson 1997, Lehmkuhl & Smith 1983). The implications of this are illustrated in Figures 4.17 and 4.19.
This postural muscle, like all others which have a predominence of type l fibres, will shorten if stressed. In the case of piriformis, the effect of shortening is to increase its diameter and because of its location this allows for direct pressure to be exerted on the sciatic nerve, which passes under it in 80% of people. In the other 20% the nerve passes through the muscle so that contraction will produce veritable strangulation of the sciatic nerve.
In addition, the pudendal nerve and the blood vessels of the internal iliac artery, as well as common perineal nerves, posterior femoral cutaneous nerve and nerves of the hip rotators, can all be affected.
If there is sciatic pain associated with piriformis shortness, then on straight leg raising, which reproduces the pain, external rotation of the hip should relieve it, since this slackens piriformis. (This clue may, however, only apply to any degree if the individual is one of those in whom the nerve actually passes through the muscle.)
The effects can be circulatory, neurological and functional, inducing pain and paraesthesia of the affected limb as well as alterations to pelvic and lumbar function. Diagnosis usually hinges on the absence of spinal causative factors and the distributions of symptoms from the sacrum to the hip joint, over the gluteal region and down to the popliteal space. Palpation of the affected piriformis tendon, near the head of the trochanter, will elicit pain and the affected leg will probably be externally rotated.
The piriformis muscle syndrome is frequently characterised by such bizarre symptoms that they may seem unrelated. One characteristic complaint is a persistent, severe, radiating low back pain extending from the sacrum to the hip joint, over the gluteal region and the posterior portion of the upper leg, to the popliteal space. In the most severe cases the patient will be unable to lie or stand comfortably, and changes in position will not relieve the pain. Intense pain will occur when the patient sits or squats since this type of movement requires external rotation of the upper leg and flexion at the knee.
Compression of the pudendal nerve and blood vessels which pass through the greater sciatic foramen and re-enter the pelvis via the lesser sciatic foramen is possible because of piriformis contracture. Any compression would result in impaired circulation to the genitalia in both sexes. Since external rotation of the hips is required for coitus by women, pain noted during this act could relate to impaired circulation induced by piriformis dysfunction. This could also be a basis for impotency in men. (See also Box 4.7.)
Piriformis involvement often relates to a pattern of pain which includes: pain near the trochanter; pain in the inguinal area; local tenderness over the insertion behind trochanter; SI joint pain on the opposite side; externally rotated foot on the same side; pain unrelieved by most positions with standing and walking being the easiest; limitation of internal rotation of the leg which produces pain near the hip; and a short leg on the affected side.
The pain itself will be persistent and radiating, covering anywhere from the sacrum to the buttock, hip and leg including inguinal and perineal areas.
Bourdillon (1982) suggests that piriformis syndrome and SI joint dysfunction are intimately connected and that recurrent SI problems will not stabilise until hypertonic piriformis is corrected.
Janda (1996) points to the vast amount of pelvic organ dysfunction to which piriformis can contribute due to its relationship with circulation to the area.
Mitchell et al (1979) suggest that (as in psoas example above) piriformis shortness should only be treated if it is tested to be short and stronger than its pair. If it is short and weak (see p. 110 for strength test), then whatever is hypertonic and influencing it should be released and stretched first (Mitchell et al 1979). When it tests strong and short, piriformis should receive MET treatment.
Since piriformis is an external rotator of the hip it can be inhibited (made to test weak) if an internal rotator such as TFL is hypertonic or if its pair is hypertonic, since one piriformis will inhibit the other.
Box 4.7 Notes on Working and Resting Muscles
Richard (1978) reminds us that a working muscle will mobilise up to 10 times the quantity of blood mobilised by a resting muscle. He points out the link between pelvic circulation and lumbar, ischiatic and gluteal arteries and the chance this allows to engineer the involvement of 2400 square metres of capillaries by using repetitive pumping of these muscles (including piriformis).
The therapeutic use of this knowledge involves the patient being asked to repetitively contract both piriformis muscles against resistance. The patient is supine, knees bent, feet on the table; the practitioner resists their effort to abduct their flexed knees, using pulsed muscle energy approach (Ruddy�s method) in which two isometrically resisted pulsation/contractions per second are introduced for as long as possible (a minute seems a long time doing this).
Figure 4.19 MET treatment of piriformis with hip fully flexed and externally rotated (see Box 4.6, first bullet point).
Figure 4.20 A combined ischaemic compression (elbow pressure) and MET side-lying treatment of piriformis. The pressure is alternated with isometric contractions/stretching of the muscle until no further gain is achieved.
MET Treatment of Piriformis
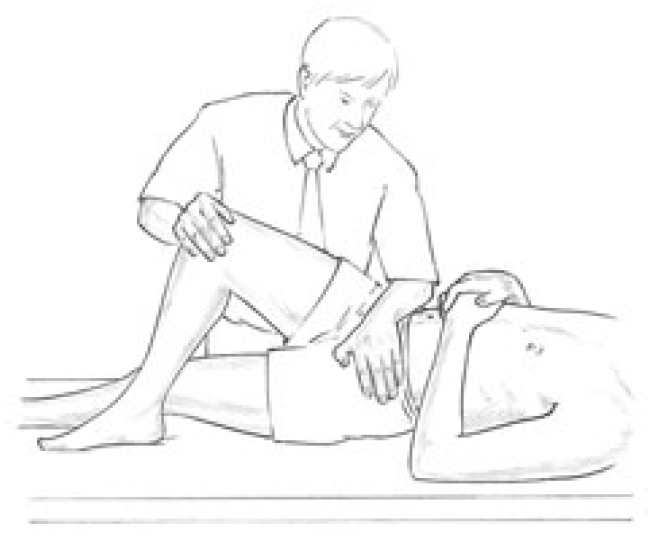
Piriformis method (a) Side-lying The patient is side-lying, close to the edge of the table, affected side uppermost, both legs flexed at hip and knee. The practitioner stands facing the patient at hip level.
The practitioner places his cephalad elbow tip gently over the point behind trochanter, where piriformis inserts. The patient should be close enough to the edge of the table for the practitioner to stabilise the pelvis against his trunk (Fig. 4.20). At the same time, the practitioner�s caudad hand grasps the ankle and uses this to bring the upper leg/hip into internal rotation, taking out all the slack in piriformis.
A degree of inhibitory pressure (sufficient to cause discomfort but not pain) is applied via the elbow for 5�7 seconds while the muscle is kept at a reasonable but not excessive degree of stretch. The practitioner maintains contact on the point, but eases pressure, and asks the patient to introduce an isometric contraction (25% of strength for 5�7 seconds) to piriformis by bringing the lower leg towards the table against resistance. (The same acute and chronic rules as discussed previously are employed, together with cooperative breathing if appropriate, see Box 4.2.)
After the contraction ceases and the patient relaxes, the lower limb is taken to its new resistance barrier and elbow pressure is reapplied. This process is repeated until no further gain is achieved.
Piriformis method (b)1 This method is a variation on the method advocated by TePoorten (1960) which calls for longer and heavier compression, and no intermediate isometric contractions.
In the first stage of TePoorten�s method the patient lies on the non-affected side with knees flexed and hip joints flexed to 90�.The practitioner places his elbow on the piriformis musculotendinous junction and a steady pressure of 20�30 lb (9�13 kg) is applied. With his other hand he abducts the foot so that it will force an internal rotation of the upper leg.
The leg is held in this rotated position for periods of up to 2 minutes. This procedure is repeated two or three times. The patient is then placed in the supine position and the affected leg is tested for freedom of both external and internal rotation.
Piriformis method (b)2 The second stage of TePoorten�s treatment is performed with the patient supine with both legs extended. The foot of the affected leg is grasped and the leg is flexed at both the knee and the hip. As knee and hip flexion is performed the practitioner turns the foot inward, so inducing an external rotation of the upper leg. The practitioner then extends the knee, and simultaneously turns the foot outward, resulting in an internal rotation of the upper leg.
During these procedures the patient is instructed to partially resist the movements introduced by the practitioner (i.e. the procedure becomes an isokinetic activity). This treatment method, repeated two or three times, serves to relieve the contracture of the muscles of external and internal hip rotation.
Piriformis method (c) A series of MET isometric contractions and stretches can be applied with the patient prone and the affected side knee flexed. The hip is rotated internally by the practitioner using the foot as a lever to ease it laterally, so putting piriformis at stretch. Acute and chronic guidelines described earlier are used to determine the appropriate starting point for the contraction (at the barrier for acute and short of it for chronic).
The patient attempts to lightly bring the heel back towards the midline against resistance (avoiding strong contractions to avoid knee strain in this position) and this is held for 7�10 seconds. After release of the contraction the hip is rotated further to move piriformis to or through the barrier, as appropriate. Application of inhibitory pressure to the attachment or belly of piriformis is possible via thumb, if deemed necessary.
Piriformis method (d) A general approach which balances muscles of the region, as well as the pelvic diaphragm, is achieved by having the patient squat while the practitioner stands and stabilises both shoulders, preventing the patient from rising as this is attempted, while the breath is held. After 7�10 seconds the effort is released; a deeper squat is performed, and the procedure is repeated several times.
Piriformis method (e) This method is based on the test position (see Fig. 4.17) and is described by Lewit (1992). With the patient supine, the treated leg is placed into flexion at the hip and knee, so that the foot rests on the table lateral to the contralateral knee (the leg on the side to be treated is crossed over the other, straight, leg). The angle of hip flexion should not exceed 60� (see notes on piriformis, Box 4.6, for explanation).
The practitioner places one hand on the contralateral ASIS to prevent pelvic motion, while the other hand is placed against the lateral flexed knee as this is pushed into resisted abduction to contract piriformis for 7�10 seconds. Following the contraction the practitioner eases the treated side leg into adduction until a sense of resistance is noted; this is held for 10�30 seconds.
Piriformis method (f) Since contraction of one piriformis inhibits its pair, it is possible to self-treat an affected short piriformis by having the patient lie up against a wall with the non-affected side touching it, both knees flexed (modified from Retzlaff 1974). The patient monitors the affected side by palpating behind the trochanter, ensuring that no contraction takes place on that side.
After a contraction lasting 10 seconds or so of the non-affected side (the patient presses the knee against the wall), the patient moves away from the wall and the position described for piriformis test (see Fig. 4.17) above is adopted, and the patient pushes the affected side knee into adduction, stretching piriformis on that side. This is repeated several times.
Dr. Alex Jimenez offers an additional assessment and treatment of the hip flexors as a part of a referenced clinical application of neuromuscular techniques by Leon Chaitow and Judith Walker DeLany. The scope of our information is limited to chiropractic and spinal injuries and conditions. To discuss the subject matter, please feel free to ask Dr. Jimenez or contact us at 915-850-0900 .
By Dr. Alex Jimenez
Additional Topics: Wellness
Overall health and wellness are essential towards maintaining the proper mental and physical balance in the body. From eating a balanced nutrition as well as exercising and participating in physical activities, to sleeping a healthy amount of time on a regular basis, following the best health and wellness tips can ultimately help maintain overall well-being. Eating plenty of fruits and vegetables can go a long way towards helping people become healthy.
These assessment and treatment recommendations represent a synthesis of information derived from personal clinical experience and from the numerous sources which are cited, or are based on the work of researchers, clinicians and therapists who are named (Basmajian 1974, Cailliet 1962, Dvorak & Dvorak 1984, Fryette 1954, Greenman 1989, 1996, Janda 1983, Lewit 1992, 1999, Mennell 1964, Rolf 1977, Williams 1965).
Clinical Application of Neuromuscular Techniques: Tensor Fascia Lata
�Assessment of shortness in tensor fascia lata (TFL)
The test recommended is a modified form of Ober�s test (see Fig. 4.14).
Figure 4.14 Assessment for shortness of TFL � modified Ober�s test. When the hand supporting the flexed knee is removed the thigh should fall to the table if TFL is not short.
Patient is side-lying with back close to the edge of the table. The practitioner stands behind the patient, whose lower leg is flexed at hip and knee and held in this position, by the patient, for stability. The tested leg is supported by the practitioner, who must ensure that there is no hip flexion, which would nullify the test.
The leg is extended only to the point where the iliotibial band lies over the greater trochanter. The tested leg is held by the practitioner at ankle and knee, with the whole leg in its anatomical position, neither abducted nor adducted and not forward or backward of the body.
Box 4.5 Notes on TFL
Mennell (1964) and Liebenson (1996) say that TFL shortness can produce all the symptoms of acute and chronic sacroiliac problems.
Pain from TFL shortness can be localised to the posterior superior iliac spine (PSIS), radiating to the groin or down any aspect of the thigh to the knee.
Although the pain may arise in the sacroiliac (SI) joint, dysfunction in the joint may be caused and maintained by taut TFL structures.
Pain from the band itself can be felt in the lateral thigh, with referral to hip or knee.
TFL can be �riddled� with sensitive fibrotic deposits and trigger point activity.
There is commonly a posteriority of the ilium associated with short TFL.
TFL�s prime phasic activity (all postural structures also have some phasic function) is to assist the gluteals in abduction of the thigh.
If TFL and psoas are short they may, according to Janda, �dominate� the gluteals on abduction of the thigh, so that a degree of lateral rotation and flexion of the hip will be produced, rotating the pelvis backwards.
Rolf (1977) points out that persistent exercise such as cycling will shorten and toughen the fascial iliotibial band �until it becomes reminiscent of a steel cable�. This band crosses both hip and knee, and spatial compression allows it to squeeze and compress cartilaginous elements such as the menisci. Ultimately, it will no longer be able to compress, and rotational displacement at knee and hip will take place.
The practitioner carefully introduces flexion at the knee to 90�, without allowing the hip to flex, and then, holding just the ankle, allows the knee to fall towards the table. If TFL is normal, the thigh and knee will fall easily, with the knee contacting the table surface (unless unusual hip width, or thigh length prevent this).
If the upper leg remains aloft, with little sign of �falling� towards the table, then either the patient is not letting go or the TFL is short and does not allow it to fall. As a rule the band will palpate as tender under such conditions.
Lewit�s TFL Palpation
(Lewit 1999; see also functional assessment method in Ch. 5)
Patient is side-lying and practitioner stands facing the patient�s front, at hip level. The practitioner�s cephalad hand rests over the anterior superior iliac spine (ASIS) so that it can also palpate over the trochanter. It should be placed so that the fingers rest on the TFL and trochanter with the thumb on gluteus medius. The caudad hand rests on the mid-thigh to apply slight resistance to the patient�s effort to abduct the leg.
The patient�s table-side leg is slightly flexed to provide stability, and there should be a vertical line to the table between one ASIS and the other (i.e. no forwards or backwards �roll� of the pelvis). The patient abducts the upper leg (which should be extended at the knee and slightly hyperextended at the hip) and the practitioner should feel the trochanter �slip away� as this is done.
If, however, the whole pelvis is felt to move rather than just the trochanter, there is inappropriate muscular imbalance. (In balanced abduction gluteus comes into action at the beginning of the movement, with TFL operating later in the pure abduction of the leg. If there is an overactivity (and therefore shortness) of TFL, then there will be pelvic movement on the abduction, and TFL will be felt to come into play before gluteus.)
The abduction of the thigh movement will then be modified to include external rotation and flexion of the thigh (Janda 1996). This confirms a stressed postural structure (TFL), which implies shortness.
It is possible to increase the number of palpation elements involved by having the cephalad hand also palpate (with an extended small finger) quadratus lumborum during leg abduction. In a balanced muscular effort to lift the leg sideways, quadratus should not become active until the leg has been abducted to around 25�30�. When quadratus is overactive it will often start the abduction along with TFL, thus producing a pelvic tilt.�(See also Fig. 5.11A and B)
Method (a) Supine MET treatment of shortened TFL (Fig. 4.15) The patient lies supine with the unaffected leg flexed at hip and knee. The affected side leg is adducted to its barrier which necessitates it being brought under the opposite leg/foot.
Figure 4.15 MET treatment of TFL (see Fig. 1.4 for description of isolytic variation). If a standard MET method is being used, the stretch will follow the isometric contraction in which the patient will attempt to move the right leg to the right against sustained resistance. It is important for the practitioner to maintain stability of the pelvis during the procedure. Note: the hand positions in this figure are a variation of those described in the text.
Using guidelines for acute and chronic problems, the structure will either be treated at, or short of, the barrier of resistance, using light or fairly strong isometric contractions for short (7 second) or long (up to 20 seconds) durations, using appropriate breathing patterns as described earlier in this chapter (Box 4.2).
The practitioner uses his trunk to stabilise the patient�s pelvis by leaning against the flexed (nonaffected side) knee. The practitioner�s caudad arm supports the affected leg so that the knee is stabilised by the hand. The other hand maintains a stabilising contact on the affected side ASIS.
The patient is asked to abduct the leg against resistance using minimal force. After the contraction ceases and the patient has relaxed using appropriate breathing patterns, the leg is taken to or through the new restriction barrier (into adduction past the barrier) to stretch the muscular fibres of TFL (the upper third of the structure).
Care should be taken to ensure that the pelvis is not tilted during the stretch. Stability is achieved by the practitioner increasing pressure against the flexed knee/thigh. This whole process is repeated until no further gain is possible.
Method (b) Alternative supine MET treatment of shortened TFL (Fig. 4.16) The patient adopts the same position as for psoas assessment, lying at the end of the table with non-tested side leg in full hip flexion and held by the patient, with the tested leg hanging freely, knee flexed.
Figure 4.16 MET treatment of psoas using Grieve�s method, in which there is placement of the patient�s foot, inverted, against the operator�s thigh. This allows a more precise focus of contraction into psoas when the hip is flexed against resistance.
The practitioner stands at the end of the table facing the patient so that his left lower leg (for a right-sided TFL treatment) can contact the patient�s foot. The practitioner�s left hand is placed on the patient�s distal femur and with this he introduces internal rotation of the thigh, and external rotation of the tibia (by means of light pressure on the distal foot from his lower leg).
During this process the practitioner senses for resistance (the movement should have an easy �springy� feel, not wooden or harsh) and observes for a characteristic depression or groove on the lateral thigh, indicating shortness of TFL.
This resistance barrier is identified and the leg held just short of it for a chronic problem, as the patient is asked to externally rotate the tibia, and to adduct the femur, against resistance, for 7�10 seconds. Following this the practitioner eases the leg into a greater degree of internal hip rotation and external tibial rotation, and holds this stretch for 10�30 seconds.
Method (c) Isolytic variation If an isolytic contraction is introduced in order to stretch actively the interface between elastic and non-elastic tissues, then there is a need to stabilise the pelvis more efficiently, either by use of wide straps or another pair of hands holding the ASIS downwards towards the table during the stretch.
The procedure consists of the patient attempting to abduct the leg as the practitioner overcomes the muscular effort, forcing the leg into adduction. The contraction/stretch should be rapid (2�3 seconds at most to complete). Repeat several times.
Method (d) Side-lying MET treatment of TFL The patient lies on the affected TFL side with the upper leg flexed at hip and knee and resting forward of the affected leg. The practitioner stands behind patient and uses caudad hand and arm to raise the affected leg (which is on the table) while stabilising the pelvis with the cephalad hand, or uses both hands to raise the affected leg into slight adduction (appropriate if strapping used to hold pelvis to table).
The patient contracts the muscle against resistance by trying to take the leg into abduction (towards the table) using breathing assistance as appropriate (see notes on breathing, Box 4.2). After the effort, on an exhalation, the practitioner lifts the leg into adduction beyond the barrier to stretch the interface between elastic and non-elastic tissues. Repeat as appropriate or modify to use as an isolytic contraction by stretching the structure past the barrier during the contraction.
Additional TFL Methods
Mennell has described superb soft tissue stretching techniques for releasing TFL. These involve a series of snapping actions applied by thumbs to the anterior fibres with patient side-lying, followed by a series of heel of hand thrusts across the long axis of the posterior TFL fibres.
Additional release of TFL contractions is possible by use of elbow or heel of hand �stripping� of the structure, neuromuscular deep tissue approaches (using thumb or a rubber-tipped T-bar) applied to the upper fibres and those around the knee, and specific deep tissue release methods. Most of these are distinctly uncomfortable and all require expert tuition.
Self-Treatment and Maintenance
The patient lies on her side, on a bed or table, with the affected leg uppermost and hanging over the edge (lower leg comfortably flexed). The patient may then introduce an isometric contraction by slightly lifting the hanging leg a few centimeters, and holding this position for 10 seconds, before slowly releasing and allowing gravity to take the leg towards the floor, so introducing a greater degree of stretch.
This is held for up to 30 seconds and the process is then repeated several times in order to achieve the maximum available stretch in the tight soft tissues. The counterforce in this isometric exercise is gravity.
Dr. Alex Jimenez offers an additional assessment and treatment of the hip flexors as a part of a referenced clinical application of neuromuscular techniques by Leon Chaitow and Judith Walker DeLany. The scope of our information is limited to chiropractic and spinal injuries and conditions. To discuss the subject matter, please feel free to ask Dr. Jimenez or contact us at 915-850-0900 .
By Dr. Alex Jimenez
Additional Topics: Wellness
Overall health and wellness are essential towards maintaining the proper mental and physical balance in the body. From eating a balanced nutrition as well as exercising and participating in physical activities, to sleeping a healthy amount of time on a regular basis, following the best health and wellness tips can ultimately help maintain overall well-being. Eating plenty of fruits and vegetables can go a long way towards helping people become healthy.
Suffer Sciatica: Are you experiencing pain along one side of your body from your lower back down through your hip and the back of your leg? If so, you could be suffering from a condition called sciatica.
According to the Mayo Clinic, sciatica can best be described as “most commonly occurring when a herniated disk or a bone spur on the spine compresses part of the nerve. This causes inflammation, pain and often some numbness in the affected leg.”
A variety of issues weigh in on an individual’s likelihood of ending up with sciatica. Most of them deal with increased pressure on the spine.
Suffer Sciatica: Causes
Obesity: carrying too much weight is instrumental in bringing on a number of health related issues. Extra pounds overload the spine, causing damage that results in sciatica.
Improper Lifting: Individuals who frequently twist the bodies and lift heavy loads are more likely to suffer from sciatica. Certain jobs that require these movements are a key cause of the condition.
Sedentary Lifestyle. A person’s job does not have to involve lifting to be responsible for this condition. Sitting for extended periods without stretching or standing puts excess pressure on the spine and can cause sciatica.
Too Many Birthdays. Getting older can affect all of our body’s joints and bones in a negative manner, especially if we never committed to an exercise routing. An individual’s back often deteriorates with age, causing bone spurs and herniated disks that sometimes result in sciatica.
Treatment options for sciatica are varied, and the choice depends on the severity of the condition.
Pain Medication: A common and easy way to treat sciatica is with drug therapy. Anti-inflammatory drugs are frequently used to reduce�the inflammation around the nerve, which is a big contributor of the pain. Over-the-counter pain medicines, as well as codeine, may also help with pain management.
Acupuncture. Alternative therapies like acupuncture have shown positive results in the treatment of sciatica. If a drug-free treatment option appeals to you, find an experienced acupuncturist in your area and talk to them about treatment options.
Strengthening Exercises. A consistent exercise program strengthens your muscles and helps the body function effectively. Ask your doctor which exercises assist the body with bouncing back from sciatica.
Supplements. Supplying the body with vital vitamins and minerals assists in overall health in general, including improvement from sciatica. Daily doses of supplements such as calcium, magnesium, St. John’s Wort, and Vitamin B12 have shown to treat sciatica effectively.
Chiropractic Care. Chiropractors understand all things spine-related, and work with the body as a whole to help it heal itself. Chiropractic treatment for sciatica works to align the spine and reduce the stress to the lower back. Treatment helps alleviate the underlying causes of the condition, and shows positive results in a short amount of time.
Cortisone Injections. Most of the time, sciatica can be treated by the less invasive measures mentioned above. However, severe bouts of sciatica may require a shot of cortisone directly into the inflamed area. Individuals generally choose this option when other treatments have garnered no relief.
Dealing with sciatica is painful and irritating, as the condition often sidelines the sufferer from daily activities. By knowing the treatment options that are effective in combating both the underlying causes and the pain of sciatica, sufferers can begin a regimen that will help them get back on their feet, pain-free in the shortest period of time possible and no longer have to suffer.
If you are suffering from sciatica and would like to talk to an experienced chiropractor about how to treat the condition, contact us today.
Sciatica
This article is copyrighted by Blogging Chiros LLC for its Doctor of Chiropractic members and may not be copied or duplicated in any manner including printed or electronic media, regardless of whether for a fee or gratis without the prior written permission of Blogging Chiros, LLC.
Expectant Mothers: Pregnancy is an exciting, precious time in a woman’s life, full of new experiences. Unfortunately, the baby’s development brings about bodily changes that often wreak havoc on the back and joints, and end up causing pain. These issues also frequently cause issues during delivery, and increase the time it takes for the body to recover post-pregnancy.
Expectant moms benefit from chiropractic care in a number of ways. Here are five key ways chiropractic care helps alleviate the toll pregnancy takes on a woman’s body.
#1: Expectant Mothers: Chiropractic Keeps The Spine In Alignment.
Pregnancy adds significant additional weight to a woman’s body in a short amount of time. This change bears on the spine, frequently pulling it out of alignment.
When this happens, the pain can be quite severe. Chiropractic care during pregnancy works to keep the spine in alignment and all supporting tendons working optimally, to be better prepared and able to adequately support the extra weight.
#2: Chiropractic Reduces Need For Pain Relievers.
Most times, individuals experiencing moderate pain pop a couple of over the counter pain relievers and think nothing of it. However, pregnant women strive to avoid medications when possible.
Chiropractic adjustments decrease the underlying issues that cause pain, so the patient relies less on medications. Experiencing less pain as well as eliminating the need for pain killers is a win-win situation for expectant mothers.
#3: Chiropractic Strengthens And Repairs Joints.
Pregnancy really beats up an expectant mothers joints. Chiropractic care for expectant mothers is a productive way to minimize the effect the large, protruding abdomen has on her hips, legs, and ankles.
Treating the body as a whole, chiropractic treatment works to strengthen the body and promotes healing of injured or strained areas.
#4: Chiropractic Helps Achieve Pelvic Alignment.
An aligned pelvis is critical to the birthing process, and increases the chances of being able to give birth naturally. According to the American Pregnancy Association,
“When the pelvis is misaligned it may reduce the amount of room available for the developing baby. This restriction is called intrauterine constraint. A misaligned pelvis may also make it difficult for the baby to get into the best possible position for delivery. This can affect the mother�s ability to have a natural, non-invasive birth.”
An experienced chiropractor can effectively align the pelvis before delivery, so the mother is able to deliver with little incident.
#5: Chiropractic Increases The Body’s Ability To Bounce Back.
Let’s face it, every pregnant woman thinks “will I ever fit in the clingy red dress again?” The healthier and stronger a woman’s body is before and during pregnancy, the easier it is to get back into shape once the baby is born. Eating right and safely exercising are effective ways to accomplish this.
Chiropractic care is also a valuable component to fitness. Expectant mothers who choose chiropractic enjoy better posture, less pain, and increased mobility, especially late in the third trimester.
This allows them to maintain exercise routines and be active longer than those suffering from back pain and achy joints. After the delivery, it’s easier to get back into a fitness routine, and into that red dress, if the new mother’s joints, back, and hips are aligned and functioning properly.
Chiropractic care can serve to reduce pain and increase the overall heath of expectant mothers, letting her relax and focus on the more pleasant aspects of pregnancy. Expecting women who commit to chiropractic care can look forward to a stronger body, the chances of a smoother delivery, and an easier recovery after the baby comes.
Pregnancy & Chiropractic Care
This article is copyrighted by Blogging Chiros LLC for its Doctor of Chiropractic members and may not be copied or duplicated in any manner including printed or electronic media, regardless of whether for a fee or gratis without the prior written permission of Blogging Chiros, LLC.
Parents of children suffering from ear infections are all too familiar with this cry. Tugging at their ears, crying, and trouble sleeping are all signs of an ear infection in your little one.
Children are more susceptible to ear infections than adults because of their smaller Eustachian tubes, and their less effective immune systems. Unfortunately, chronic ear infections can quickly become a painful, ongoing problem.
Parents have a variety of options at their disposal to treat their child’s ear infections. Drops, antibiotics, and ventilation tubes placed by surgical procedure are all commonly used treatments for chronic infections. Chiropractic care is another option available and is rapidly gaining acceptance and popularity for the effective treatment of ear infections.
According to HealthyChild.com, ear infections are the reason for 35% of pediatrician visits, and ear pain is the number one reason a child visits a chiropractor. Children who suffer from recurring ear infections benefit from chiropractic care in several ways that are not available through other, more traditional forms of treatment.
Here are a few of the benefits chiropractic care offer for ear infections are:
Ear Infections: It Is Non-Invasive
Unlike the surgical procedure that is often used to combat ear infections by inserting tubes in the child’s ears, chiropractic adjustments provide a non-invasive form of treatment.
This treatment option works well because a little one’s spine may be moved out of alignment from the birthing process, or from any number of spills he or she makes learning to walk, run, or navigate stairs. An experienced chiropractor can map out a treatment plan that includes gentle adjustments of the child’s neck and spine. The goal is to decrease fluid build up within the ear canals that bring on ear infections and pain.
It Is A Painless Option Of Treatment
The last thing parents want in any medical treatment is to cause their child more pain. A negative experience at a doctor’s office can create a fear that lasts for years to come.
Children with ear infections have nothing to fear from visiting a chiropractor. During a chiropractic visit, the child will participate in adjustments that are pain free. The treatments will be able to reduce the pain in a short amount of time in many instances, and reduce the chance of dealing with another ear infection down the road.
It Treats The Underlying Cause
Other options of treatment may decrease the symptoms of an ear infection, but never get to the actual root issue. Chiropractic care strives to return the body in its entirety to its normal function.
This is the main building block concept for chiropractic in general. By re-aligning the spine, the body as a whole can be healthier and more resistant to infection and disease. Chiropractic care helps adjust the child’s body back to a normal state, thus providing a way for it to heal itself and fight off future ear (and other) infections better than simply using drops and antibiotics.
If your child is susceptible to ear infections, there are steps you can take to minimize the chances of an occurrence in the first place. Frequent hand washing to prevent the spread of germs and avoiding cigarette smoke are two simple ways to combat ear infections.
Chiropractic treatment continues to show promise in treating the underlying issues that cause a child to suffer from ear infections. If you are looking for a treatment that is pain free, not intimidating to the child, and an alternative to invasive surgery, enlisting the help of a chiropractor is a fantastic option.
So if your child is experiencing chronic ear infections, give us a call. Our Doctor of Chiropractic is here to help!
Doctors Of Chiropractic Ensure Patients Have Strong Posture
This article is copyrighted by Blogging Chiros LLC for its Doctor of Chiropractic members and may not be copied or duplicated in any manner including printed or electronic media, regardless of whether for a fee or gratis without the prior written permission of Blogging Chiros, LLC.
IFM's Find A Practitioner tool is the largest referral network in Functional Medicine, created to help patients locate Functional Medicine practitioners anywhere in the world. IFM Certified Practitioners are listed first in the search results, given their extensive education in Functional Medicine


 #3: Chiropractic Strengthens And Repairs Joints.
 It Treats The Underlying Cause